History View
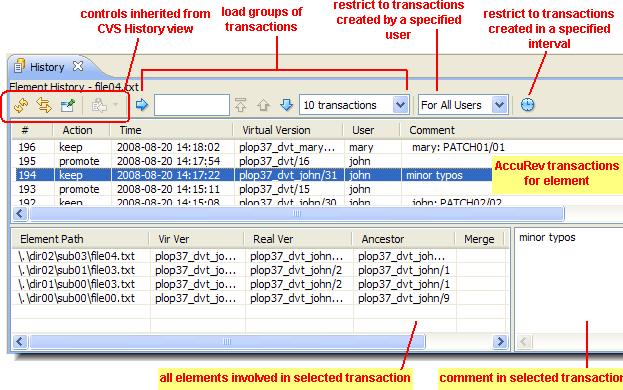
The History view displays a table containing some or all of the AccuRev transactions involving a selected element.
When you select a transaction in the upper table, the lower table is populated with data on all the elements involved in that transaction. The data for each element includes its pathname within the depot, the AccuRev version identifiers of the version this transaction created, identifiers of the versions from which this version was derived, and any associated AccuWork issue record numbers.
You can manipulate the table in the usual way see Working with the Results Table in AccuRev Search/Status View. This view is a variant of the CVS History View, and so inherits some of its controls:
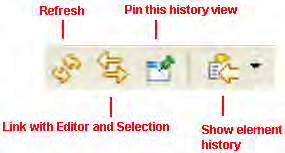
- Refresh
- Checks for new transactions and displays them.
- Link with Editor and Selection
- A toggle switch. When linking is enabled, selecting an element in the Package Explorer/Navigator or switching to an element’s Editor tab automatically displays the element’s history. Up to 15 of these histories are cached in the History view. You can redisplay a cached element history with the Show element history toolbar button.
- Pin this history view
- Ensures that the currently displayed element history does not get overlaid. Invoking the
AccuRev History command again creates a new instance of the History view.
Note: When the Link toggle is enabled, the Pin toggle is automatically disabled, and vice-versa.
- Show element history
- Displays the next element history in the cache enabled by the Link with Editor and Selection toggle, or opens a drop-down menu with all the cache entries.
The element history displayed in an AccuRev History view is discarded when you close the view. So is any element history cache you have accumulated. This data is also discarded if you invoke another command when the Pin toggle is off.
Navigating in the Transaction Table
If an element has many transactions, you can use the toolbar controls at the top of the tab to assist in navigating among them.
Initially, the most recent set of transactions is loaded into the table. Use the list to control how many transactions are included in the set.
To load a set beginning with a particular transaction into the table, type the transaction number into the input box, and click the right-arrow button.
To scroll to the next or previous set of transactions, use the or button. The button loads the first (most recent) set of transactions.
By default, the transaction table includes all transactions that involved the selected element. You can restrict the display to:
- The transactions performed by a specific user (by choosing from the list of users).
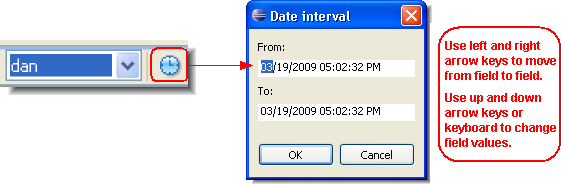
- The transactions created in a specific interval:
History View Commands
You can select a transaction in the upper table and right-click to invoke commands that operate on the version created by the selected transaction:
- Open
- Opens an Editor tab on the file.
- Export
- Copies the file to a location you specify.
- Merge From
- Opens a Merge tool to merge the selected version into your workspace.
- Patch From
- Opens the Eclipse Compare editor, which allows you to copy (patch) changes from one version of a file to another.
Note: In order to perform a Patch From command, the merge tool must be set to Eclipse in the AccuRev preferences. See Using Alternative Diff and Merge Tools for more information on setting preferences.
- Diff Against>
-
- Other Version
- Enabled when two transactions are selected. Compares the versions created by the two selected transactions.
- File in the Workspace
- Enabled when a single transaction is selected. Compares the version associated with the transaction with the version in the workspace. You can configure the file-comparison tool. See Using Alternative Diff and Merge Tools.
You can select an element in the lower table and right-click to invoke commands that operate on the version that this transaction created:
- Open
- Opens an Editor tab on the file.
- Export
- Copies the file to a location you specify.
- Compare the selected version with the version that was in its workspace or stream just before the version was created.
- Properties
- Displays the depot-relative pathname of the selected version, as well as the element type and ID.
Patching From the History View
Use the following procedure to patch a file using changes from another version of that file. The target for the patch operation is the version in your Eclipse project (your AccuRev workspace).
Before you begin, make sure AccuRev Plug-In for Eclipse is using the Eclipse Merge tool. See Using Alternative Diff and Merge Tools.
- In the Navigator view, right-click the file you want to patch and choose . The History view appears. The Element History section displays all of the transactions that involve the file you selected.
- Review the transactions to find the one that contains the changes you want to patch into your version of the file. File versions associated with that transaction are displayed in the lower part of the Element History section.
- Right-click the transaction and choose
Patch From from the context menu. The
Eclipse Compare editor appears. The
Present File pane displays the version of the file in your
Eclipse project. The Workspace file pane displays the version whose changes you want to patch into that file.
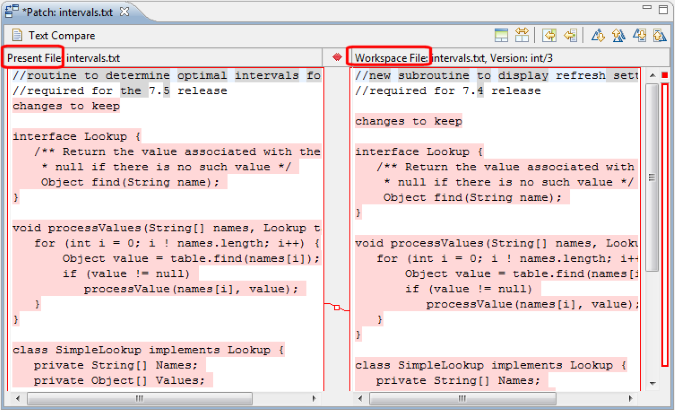
- Scroll through the Workspace File to review changes. Use the:
- Copy All Non-Conflicting Changes from Right-to-Left button
- To copy all changes to your version of the file.
- Copy Current Change from Right to Left button
- to copy individual changes one at a time.
Note: Changed text must be selected for this button to be active.
- Save your changes ().
Tip: Closing the Compare editor prompts you to save changes if you have not already.
AccuRev Plug-In for Eclipse prompts you to Keep the patched file.
- Click Yes to Keep the patched file. Otherwise, click No.