Sample Session
In this session, you:
- Configure an ODBC DSN
- Start Data Builder
- Set options
Configuring an ODBC DSN
Data Express requires a user or system DSN for connectivity to your data store through an ODBC driver, which is configured using the Data Sources (ODBC) administrative tool.
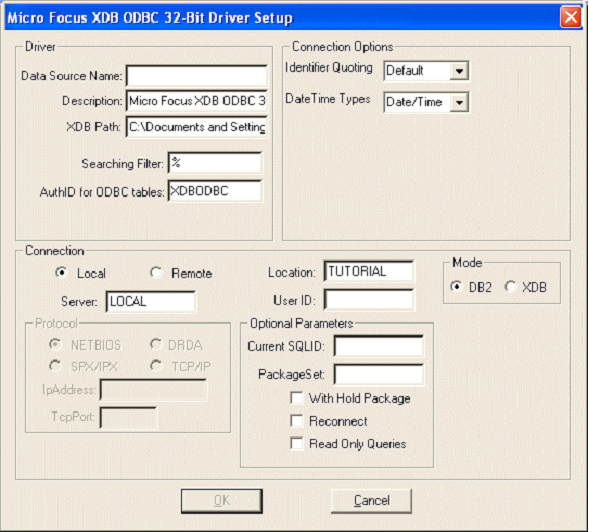
This section provides instructions for configuring a user DSN needed for the ODBC driver provided with your Data Express installation.
The Data Express Knowledge Base also uses a system DSN for connectivity through an ODBC driver; the driver is installed and the preconfigured DSN is implemented during product installation.
A BDE alias is not required for your ODBC-enabled data store.
To configure your ODBC DSN:
- Start the ODBC Data Source Administrator. (Use
Start >
Settings >
Control Panel >
Administrative Tools >
Data Sources (ODBC).)
Note: On some older versions of Windows, you can access Administrative Tools from the Start menu.
- Click the User DSN tab.
- Click Add.
- In the
Create New Data Source window, select the driver
Micro Focus XDB for DX 4.0.

- Enter the following details for the DSN (leave the remaining fields unchanged):
Data Source Name GSDEMO Server DX40 User ID install - Click OK. The DSN appears in the User Data Sources list.
See section Run-time Knowledge Base Requirements as you must create a Run-time Knowledge Base in order to mask or subset data.
Starting Data Builder
Data Builder enables functionality for Data Masking and Data Subset Extraction, and for the ODBC and Oracle Extension technologies. With Data Builder, you can take an inventory of data, and classify the data as you see fit. These processes store information about the data in the Data Express Knowledge Base.
Start Data Builder:
- Click Start > All Programs > Micro Focus Data Express 4.0 > Data Builder.
- Select the XDB Knowledge Base Dist KB for DX 4.0 as the required database with which to launch the connection. By default,
the highlighted item in the list of available databases is the last database you connected to using Data Builder. However,
for the very first connection, Dist KB for DX 4.0 - DX40 is selected by default.
Note: By selecting Dist KB for DX 4.0 - DX40, you do not need to choose the database and then the schema DX40.
- Click OK.
- In the User Name box, type: install.
- In the
Password box, type:
1.
Note: This is the number one.
The[Work with Data Stores] window provides a list of files cataloged by Data Express using different sets of search criteria, including:
- Machine identifiers
- Company names
- Application identifiers
- Data store types
- Data stores with assigned classes (Multiple class Selection)
- Data stores with Data Changer activated
- Data stores with Data Changer inactivated
- Data stores set as Register Table
- Data stores without Register Table attribute
This window comprises four tabular views: Structure, Classes, Data Changer, and Register Tables. You can select a tab to view files using a specific set of criteria as listed previously. Each tab is associated with different grouping criteria.
The list of displayed data stores can be further restricted by applying filters. Filters can be selected from the context menu displayed by right-clicking the List of Files grid, or by selecting the specific icons displayed on the left side of the screen.
Setting Options
Let's look at some ways you can configure Data Express behavior.
Default Environment Parameter Settings Selection
You can set default parameters for the environment, identified by the Machine ID and Company pair. The main parameter, Output Date Format, indicates the format in which dates are displayed in Data Express, for example:
- DD/MM/YY or DD/MM/YYYY - day/month/year (year with 2 or 4 digits)
- MM/DD/YY or MM/DD/YYYY - month/day/year (year with 2 or 4 digits)
Client Options
Options can be edited in the Options window:
- To display the window, click Tools > Options.
- In the Help language list, select English.
- As a security measure to not store password information for the current connection with the Knowledge Base, leave the box Save user name and password unchecked.
- Click the
Filter Settings tab.
The Filter Settings tab allows the scope of the filters configured in the Work with Files area to be selected.
- Select Filter on all TabSheets so that all filtering properties remain regardless of what tab (Structure, Classes, Data Changer, or Registers Tables) in the Data Builder - Work with data stores window is active.
- Leave the box Show filter before loading data unchecked.
- Click the
Confirmation Messages tab.
The Confirmation Messages tab lets you set specific work modes.
- Leave all the default settings, and click Apply.
- Click OK.
- If you're planning to go straight on to the next session, you can keep Data Builder open. Otherwise, either Click
File >
Exit or click the
 button, and then click
Yes.