How to upgrade an application created with Mainframe Express to Enterprise Developer
The following provides an outline of the incremental approach to upgrading a Mainframe Express application to Enterprise Developer where you use both development products to maintain the application while gradually moving the sources to the new IDE.
- Review your Mainframe Express application:
- Create an inventory of the sources it uses, the copybook dependencies, data files, SQL, JCL and IMS files, third party utilities, integrated preprocessors.
- Check what workgroups are used and what the workflow processes are, what repositories are used to store the sources, what
the build scripts and command line parameters are, how the application accesses the mainframe.
Note: Use the MFECL command line utility of Mainframe Express to export the project details to an .xml file which will include all project details at a glance - files in use, workgroups, output and dependency folders, Compiler directives, project and file options. The command to use is:
mfecl /exportxml project-name.mvp [ xml-filename.xml]
- Review the XML file to see what information it includes:
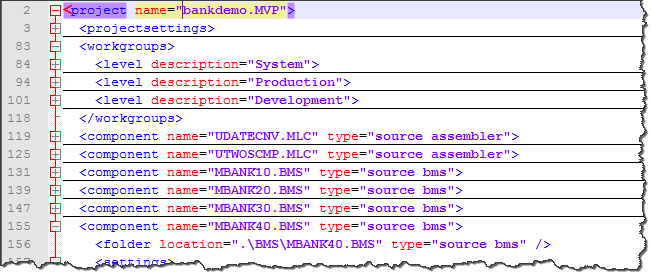
The file provides details about the project and file settings, as well as of the workgroup levels. You are going to use this information when you are configuring the new projects in Enterprise Developer.
- Analyze the strengths and weaknesses of your application in the Mainframe Express environment and to what extent it meets the business requirements. The application might be a good candidate for being modernized by upgrading it to Enterprise Developer.
-
Define a small selection of the source files of your Mainframe Express application that you will move across to Enterprise Developer as a start – this could be the files responsible for a single operation of the application.
See Considerations for whether the files need to be recompiled in the new environment.
- Prepare your original application:
- Replace any hard-coded paths in your Mainframe Express project with concatenated ones – to do this, in Mainframe Express, click Project > Convert Paths to Relative.
- Backup the sources.
- Create mainframe subsystem projects in
Enterprise Developer.
In Visual Studio:
- Click File > New.
- Under COBOL, click Native > Mainframe Subsystem Application.
- Click OK.
To emulate workgrouping behavior in Visual Studio, you can create different projects in your solution that will represent each individual level in the workgroup. For each project, you need to specify the copybook paths that are for the respective workgroup level.
In Eclipse:
- Click File > New > Mainframe COBOL Project.
To emulate workgrouping behavior in Eclipse, you can use copybook projects that will define the copybook paths for each level, and you can add these projects as dependency projects to the ones for the source files. See Emulating workgroups in Eclipse in this guide.
- Configure the projects in
Enterprise Developer.
In Visual Studio, first turn off the automatic directive determination as you will be setting the directives manually:
- Click Tools > Options > Micro Focus > Directives > COBOL.
- Disable Determine directives of files and click OK.
Configure the project properties:
- Click
Project >
YourProject Properties and click the individual tabs to specify folder for the generated files and any other COBOL, IMS, JCL and CICS properties.
You need to set exactly the same project properties as the ones set for the MFE project as taken from the xml-filename.xml file.
In Eclipse, to specify project properties:
- Navigate to the project properties, expand Micro Focus and set the project properties as taken from the xml-filename.xml file.
- Import the source files and establish a product baseline – use linking to add the files to the new projects in order to store
the files in their original location:
In Visual Studio:
- Right-click your project in Solution Explorer, and click Add > Existing Item.
- Browse to the directory which stores the sources of your Mainframe Express application.
- Select the files to add, and click
Add As Link.
This links the files to the project from within the original location and does not create copies of the files in the Enterprise Developer project directory.
In Eclipse:
- Right-click the project, and click New > Folder if you wish to add an entire folder, or New > File.
- Click Advanced, and click Link to alternate location (Linked Folder) or, respectively Link to File in the file system.
- Browse to the folder in your Mainframe Express project that includes the files you wish to add, select the folder or the file to add, and click Finish.
- Set individual file properties:
- In Solution Explorer in Visual Studio, or in Eclipse, in COBOL Explorer, right-click a file in your project, and click Properties.
- Set individual file properties as taken from the xml-filename.xml file.
- Compile the sources in
Enterprise Developer.
In Visual Studio:
- Click Build > Build Solution. Check the Output window for the progress and the result of the build.
In Eclipse:
- By default, Eclipse performs a build automatically as you are adding the source files. Check the Console view to see if there are any errors.
- Create and configure an enterprise server instance for the projects.
Check the xml-filename.xml file to see what regions the original application uses, and what its settings are.
- Run the application.
- Run JCL applications by submitting the JCL file – right-click the JCL file in your project, and click
Submit JCL (in Visual Studio) or
Submit to Enterprise Server (Eclipse).
Use the Micro Focus Rumba emulator supplied with Enterprise Developer to connect to the enterprise server instance you have created. Run the application in Rumba.
- Run JCL applications by submitting the JCL file – right-click the JCL file in your project, and click
Submit JCL (in Visual Studio) or
Submit to Enterprise Server (Eclipse).
- Debug and perform thorough testing.
- Configure MFA and the Mainframe Explorer window or the Remote Systems view.
- Plan for rolling out
Enterprise Developer project and servers to your development and QA teams. Also, organize relevant training for them.
- As a first step, ensure your project is configured as desired and that it builds successfully.
- Distribute the project:
With Visual Studio:
You can use Visual Studio to create customized templates with the desired set of options and the required source programs, and share these within your organization. Then, each user would be able to import the templates from a shared network location into their Visual Studio environments. See the Visual Studio help for more information on how to create, configure and distribute custom project templates.
With Eclipse:
In your workspace, copy the project folder with all the files. You can store this on a shared network location. Users need to import the existing project and sources locally in their workspaces.
Enterprise Server templates:
Create your own templates using the following command at an Enterprise Developer command prompt:
mfds -x [repository type] [repository address] [server name] <options> <user id> <password>
Distribute the server .xml files across your development teams. The file should be saved in the VSInstallDir\Common7\IDE\Extensions\Micro Focus\Visual COBOL SOA\1.0\Etc\ServerTemplates subfolder in the local Enterprise Developer installation folders.