Specifying the Action Descriptors
AWM tools require action descriptors to enable the tools to be called within an application, for example, as a context menu command, or as a get children action.
This tutorial requires you to model three action descriptors:
- An action descriptor to get Eclipse projects.
- An action descriptor to get the children of an Eclipse resource.
- An action to rename an Eclipse resource.
Specifying an Action Descriptor to Get Eclipse Projects
To specify an action descriptor to get Eclipse projects:
- Right-click the
Action Descriptors category folder, and then click
.
This opens the Enter Object ID dialog box.
- In the New ID field, type TUTORIAL_ACT_GetProjects.
- Click OK.
- Right-click
TUTORIAL_ACT_GetProjects, and then click
.
This adds a tool with a missing Target ID.
- Right-click
Tool, and then click
Edit.
This opens the Edit Properties dialog box.
- Double-click the Target ID value cell, and then click TUTORIAL_TOOL_GetProjects.
- Click OK.
- In order to display the element list in the UI, you must add a
Create Element List step to the action.
Right-click the action TUTORIAL_ACT_GetProjects and select .
This adds a new Create Element List relationship to the action.
- Right-click
Create Element List -TARGET_ID_MISSING, and then click
Edit.
This opens the Edit Properties dialog box.
- Under Target ID select the file descriptor TUTORIAL_FD_EclipseResources.
- Click OK.
Specifying an Action Descriptor to Get the Children of an Eclipse Resource
To specify an action descriptor to get the children of an Eclipse resource:
- Right-click the
Action Descriptors category folder, and then click
.
This opens the Enter Object ID dialog box.
- In the New ID field, type TUTORIAL_ACT_GetResChildren.
- Click OK.
- Right-click
TUTORIAL_ACT_GetResChildren, and then click
.
This adds a tool with a missing Target ID.
- Right-click
Tool, and then click
Edit.
This opens the Edit Properties dialog box.
- Double-click the Target ID value cell, and then click TUTORIAL_TOOL_GetResChildren.
- Click OK.
- In order to display the element list in the UI, you must add a
Create Element List step to the action.
Right-click the action TUTORIAL_ACT_GetResChildren and select .
This adds a new Create Element List relationship to the action.
- Right-click
Create Element List -TARGET_ID_MISSING, and then click
Edit.
This opens the Edit Properties dialog box.
- Under Target ID select the file descriptor TUTORIAL_FD_EclipseResources.
- Click OK.
Specifying an Action Descriptor to Rename an Eclipse Resource
To specify an action descriptor to rename an Eclipse resource:
- Right-click the
Action Descriptors category folder, and then click
.
This opens the Enter Object ID dialog box.
- In the New ID field, type TUTORIAL_ACT_RenameRes.
- Click OK.
- Right-click
TUTORIAL_ACT_RenameRes, and then click
Edit.
This opens the Edit Properties dialog box.
- Double-click the Label value cell, and then type Rename.
- Click OK.
- Right-click
TUTORIAL_ACT_RenameRes, and then click
.
This adds a tool with a missing Target ID.
- Right-click
Tool, and then click
Edit.
This opens the Edit Properties dialog box.
- Double-click the Target ID value cell, and then click TUTORIAL_TOOL_DIA_RenameInput.
- Click OK.
- Right-click
TUTORIAL_ACT_RenameRes, and then click
.
This adds a tool with a missing Target ID.
- Right-click
Tool, and then click
Edit.
This opens the Edit Properties dialog box.
- Double-click the Target ID value cell, and then click TUTORIAL_TOOL_RenameRes.
- Click
OK.
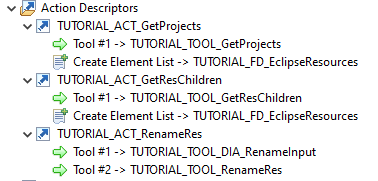
Your action descriptors should look like:

You only need to make the associations for the new actions.
- Right-click
Application Options, and then click
Edit.
This opens the Edit Properties dialog box.
- Double-click the Root Containers Action value cell, and then click TUTORIAL_ACT_GetProjects.
- Click OK.
- In the Element Types category folder, right-click TUTORIAL_ELE_EclipseProject, and then click .
- Right-click
Get Children Action, and then click
Edit.
This opens the Edit Properties dialog box.
- Double-click the Target ID value cell, and then click TUTORIAL_ACT_GetResChildren.
- Click OK.
- Right-click TUTORIAL_ELE_EclipseFolder, and then click .
- Right-click
Get Children Action, and then click
Edit.
This opens the Edit Properties dialog box.
- Double-click the Target ID value cell, and then click TUTORIAL_ACT_GetResChildren.
- Click OK.
- You require an Eclipse resource (project or folder) to be displayed as expandable only when it actually has children. You
can achieve this by specifying an enabling condition depending on the linked property TUTORIAL_PROP_ResHasChildren to an element
type's Get Children Action:
In the Element Types category folder, expand TUTORIAL_ELE_EclipseProject.
- Right-click , and then click .
- Right-click Enable Condition, and then click .
- Right-click
Simple Condition, and then click
Edit.
This opens the Edit Properties dialog box.
- Double-click the Target ID value cell, and then click TUTORIAL_PROP_ResHasChildren.
- Double-click the Value value cell, and then type true.
- Click OK.
- In the Element Types category folder, expand TUTORIAL_ELE_EclipseFolder.
- Right-click , and then click .
- Right-click Enable Condition, and then click .
- Right-click
Simple Condition, and then click
Edit.
This opens the Edit Properties dialog box.
- Double-click the Target ID value cell, and then click TUTORIAL_PROP_ResHasChildren.
- Double-click the Value value cell, and then type true.
- Click OK.