Filter the Data File
The results of a filter include each record that contains data that satisfied the conditions.
-
From the
Micro Focus Data File Tools window, click
, or click
 (Open File).
The Open dialog box appears.
-
Navigate to the required data file, then click
Open.
The Open Data File dialog box appears.
- If you are applying a record layout, click Browse to the right of the Structure File (optional) field, then use the Open dialog box to navigate to and select the structure (.str) file that contains the layout.
-
Click
Open Shared (to open the file in read-only mode) or
Open Exclusive (to open the file in edit mode).
The file is displayed on its own tab in the main window.
-
In the Filter group, click
 (Filter).
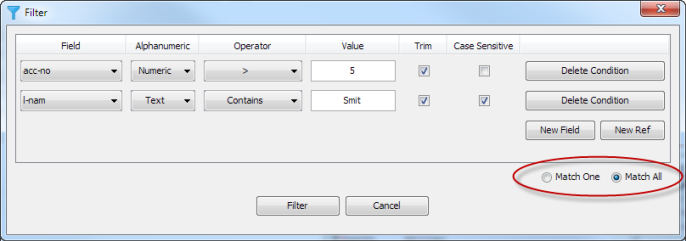
The Filter dialog box appears.
Note: If a message appears warning you that a valid temporary directory does not exist, on the Tools menu, click Preferences, enter a valid directory in the Temporary Directory field, then repeat the last step.Filters are constructed by adding one or more conditions.
-
To add a reference condition:
-
Click
New Ref.
The basic filter elements appear.
-
In the
Field field, enter the start position and the number of positions on from that in which to filter on within each record; for example,
values of 7:3 will filter on positions 7 to 9 within each record, as indicated below:

-
In the
Alphanumeric field, click
 and select the type of text to filter:
Text or
Numeric.
-
In the
Operator field, click
 and select the required operator.
- In the Value field, enter the filter value.
- (Optional) Select Trim to remove any leading or trailing spaces, or leading zeroes from each record before it is filtered.
- (Optional) Select Case to ensure the filtered content is case sensitive.
-
Click
New Ref.
-
To add a field condition:
Note: This type of condition is only available if you are using a layout.
-
Click
New Field.
The basic filter elements appear.
-
In the
Field field, click
 and select the field on which to filter.
Note: Group fields are not available to select.
and select the field on which to filter.
Note: Group fields are not available to select.The Alphanumeric field is updated based on the type of field selected.
-
In the
Operator field, click
 and select the required operator.
- In the Value field, enter the filter value.
- (Optional) Select Trim to remove any leading or trailing spaces, or leading zeroes from each record before it is filtered.
- (Optional) Select Case Sensitive to ensure the filtered content is case sensitive.
By default, a record must match all specified conditions to be included in the results.
-
Click
New Field.
-
To base the results on a record matching any of the conditions, click
Match one.

-
Click
Filter.
The results appear.
Tip: At this point, you can export the filtered results to a new file using the option. -
You can toggle between the results and the original file by clicking
 in the
Records field and select
All
or
Filtered.
-
In the Filter group, click
 (Filter) again and the last set of conditions that were used is displayed, where you can amend, add or delete conditions, then click
Filter again to refine the results of the filter.