Customizing AcuBench Toolbars
One method through which the AcuBench workspace can be adapted to your individual patterns of use is through the ability to customize existing toolbars and create new ones.
If you have modified a toolbar and want to return to the default settings, you can select a toolbar on the Toolbars tab of the Customize window and click Reset. To return all toolbars to their default settings, click Reset All.
Selecting a toolbar name in the Toolbars list makes it visible on the screen; de-selecting a toolbar name hides that toolbar.
You can delete any toolbar that you have created by selecting the toolbar name in the Toolbars list and clicking Delete. You cannot delete any of the default, AcuBench toolbars.
To create a new toolbar
- Click Tools > Customize.
The dialog box opens with the Toolbars tab selected.
- Click New.
A New Toolbar dialog box opens.
- Enter a descriptive name for your new toolbar, then click OK.
The name of your new toolbar is added to the list of toolbars in the dialog box, and a small, floating toolbar appears just below the toolbar area of the workspace.
-
Follow the instructions below to build your toolbar. As with any other toolbar, you can dock your custom toolbar(s) at the top of the screen, or in a variety of other locations in the workspace.
To add buttons to a toolbar
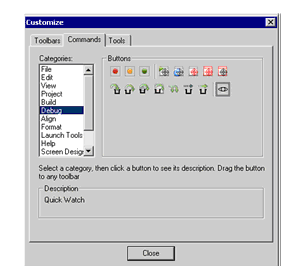
- On the Commands tab of the Customize dialog box.

- Select a type of command from the Categories list box on the left side of the screen. A list of icons associated with the category that you have selected appears in the Buttons frame on the right of the screen.
- Click a button from the list to see a description of the associated functionality in the Description frame.
- Drag a button from the Buttons frame to a toolbar to add that command to the toolbar.
- When you are finished using the Customize dialog box, click Close.
To remove buttons from a toolbar
- Make sure that you are in the Commands tab of the Customize dialog box.
- Drag the button from the toolbar to any part of the Customize dialog box.
To add or remove spacers from a toolbar
- Make sure that you are in the Commands tab of the Customize dialog box.
- To add a spacer character to the left of an existing button, click the button and drag it slightly to the right, then release the mouse button.
- To remove a spacer character from a toolbar, click the button to the right of the character and drag it slightly to the left (overlapping the spacer character), then release the mouse button.