Creating a Data Set
Define data for use with an individual program in a project as follows:
- In the Structure view of the Workspace window, open the desired Program node and right-click the Data Set node (note that data sets are defined for programs, not
projects). Click New Data Set from the menu.
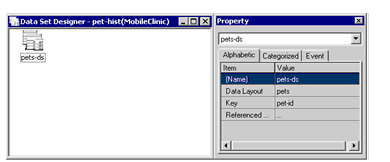
A Data Set Designer window is opened with a new data set icon.

- Display the Property window by clicking View > Property Window.
- In the Property window, specify a descriptive name for the data set in the Name field, then use the Data Layout drop-down list to select the DLT associated with this data set.
It is best to assign a data set name that is different from your data layout name. If your data layout name is clients, for example, you might call your data set clients-ds. Both the data layout name and the data set name appear in the Event Editor's Message drop-down list, so assigning different names helps to prevent confusion.
- If a primary key has been defined in the selected DLT, this value appears in the Key drop-down list. If multiple keys have been defined in the DLT, you can expand the list and select a different key.

Because each data set represents a specific manner in which a data file will be used by your program, a DLT with multiple keys may be associated with multiple data sets. In other words, if you have defined more than one key for a file in your DLT, you can define one data set for each key that the program will use to perform file operations.
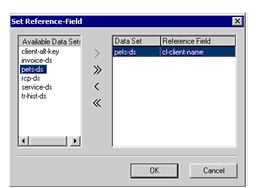
- To create an association between a field in the current data set and a field in a different data set, click in the Value column of the Referenced Data Set field and then click the browse (...) button that appears. The Set Reference-Field dialog is displayed.

Select a data set from the list on the left, then click the right-arrow icon to move the data set name to the list on the right. If the default reference field is not correct, click in the Reference Field column and select the correct field from the drop-down list.
This generates a paragraph similar to the following that you can perform as needed:
Acu-cl-ds-Ref-pet-ds.
    INITIALIZE pet-record OF pets
    MOVE cl-client-id OF clients TO pet-owner-id OF pets
    PERFORM Acu-pet-ds-Read.
When you are finished, click OK.
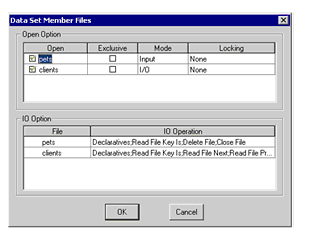
- Right-click in the Data Set Designer window and click Referenced FD/SL Files to open the Data Set Member Files interface. For information about this interface, see Generating File Handling Code.

Here, you can determine whether or not AcuBench will generate OPEN code for each data file associated with a data set in your program. You can also determine an open mode (Input, I/O, Extend, or Output), specify a locking mode, and determine what data handling code will be generated within this program.
By default, the type of file handling code that AcuBench generates is based on the open mode that you select. If you select Output mode, for example, AcuBench's default behavior is to generate WRITE code but not READ code. Expand the IO Operation drop-down list for each file to select or de-select code paragraphs to be generated.
When you are finished, click OK.
- Use the Property window's Event tab to specify or create (via the Event Editor) BEFORE and AFTER procedures as needed for each file handling operation (DELETE, READ, REWRITE, or WRITE) associated with the data set.
- When you are finished, generate the program.
The file handling code that you have specified is generated, and the data items described in the data layout file are made available to the other AcuBench design interfaces (for use, for example, with tools like the Screen Designer and Report Composer Drag-and-Drop interface).