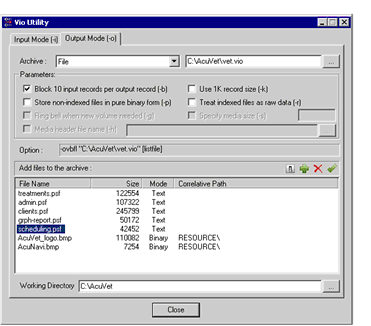
Output Mode
When you want to create a file archive, click the vio Output Mode tab.

Create a vio archive using the following steps:
- From the Archive entry field drop-down list, select the target storage device. Selecting File causes the archive to be placed on the system hard disk.
- In the entry field to the right of the Archive drop-down list, enter the path and name of the archive, or click the ellipsis button to navigate to an existing file.
- In the Parameters section, select the options that you want. The Option field displays the command line that reflects the options chosen. You cannot directly edit the contents of this field. For a complete description of all vio options, see File Transfer Utility — vio.
- Build the list of files to be archived in the Collect files area. Click the Add files button in this area to build your list. The Add Files dialog allows you to browse the file system to locate the file(s) you want to add. Use the Delete button to remove a selected file. Select the Include Subdirectories check box to include all files and subdirectories in the current directory. Repeat this procedure until all the files you want have been added.
- To toggle the file type of any file on the list, select the file from the list and click the Toggle mode button. The current designated file type for any file on the list is indicated under the Mode heading
- To build the archive, click the Start collect button.
- When you are finished, click Close to exit vio.