Running the BISMkApp Program
Run this program from the Start menu: click .
Alternatively, to run this program from Windows Explorer or the command line, navigate to the following directory and either double-click the BISMkApp icon or run BISMkApp.exe.
C:\Program Files\Micro Focus\extend x.x.x\AcuGT\bin
On 64-bit Windows when a 32-bit-only system is installed, replace Program Files with Program Files (x86).
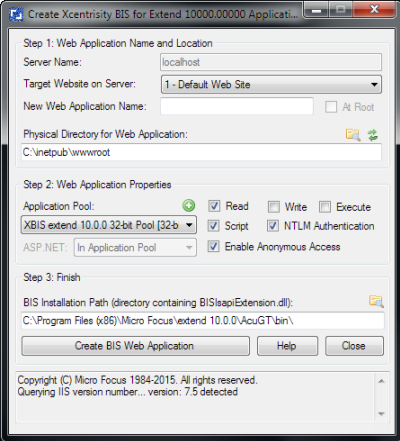
When execution begins, you will see the following dialog box:

This dialog box has the following fields:
-
Server Name
In this release, always contains localhost. Note that this program currently has to be run on the system that contains the IIS server.
-
Target Website on Server
Select the website on the server that will serve the new web application.
-
New Web Application Name
Enter the name of the web application that you wish created. For example, the default installation creates a web application named acubis10.
Note that, in this version of BISMkApp, the At Root checkbox is always disabled.
-
Physical Directory for Web Application
Enter the pathname of the physical directory that will contain the files that are served when the user issues requests against the Web Application Name.
For example, when BIS is installed in the default way and you request this page:
http://localhost/acubis10/samples/default.srfThe requested content is served from:
C:\inetpub\wwwroot\acubis10\samples\default.srf
This is because the BIS installer creates a physical directory named acubis10 in the default web tree, and copies the sample programs into this directory. The installer then creates a virtual root directory named acubis10, configures it so it runs a BIS application (see below) and points it at the previously created physical directory.
Notes:
- The physical directory is not created if it does not exist.
- The physical directory must also have the appropriate permissions (for example, anonymous user read access) or BIS will not be able to serve files from this directory.
- It is usually convenient to create the physical directory in the web tree (for example, c:\inetpub\wwwroot) because the physical directory will inherit the permissions from the IIS parent directory. Otherwise, IIS will only manage the web application permissions (read, write, execute), and the physical directory permissions must be separately managed.
- You may use the Browse button to browse for the directory.
-
Application Pool
The content of this drop-down list depends on the version of Windows that you are running. For versions of IIS that support application pools, this drop-down contains a list of application pools that were found on the server. The name of the application pool will be suffixed with (32-bit) or (64-bit).
-
Checkboxes
The checkboxes control how the web application is created.
- Read determines if web clients will have read permission to this web application. This must be checked if BIS programs will be run in this web application.
- Write determines if web clients will be able to write to this
web application.
Note: This should be enabled only for special purposes, as it is a security risk.
- Execute determines if programs can be executed in this web application. This should not be enabled unless you are also using this web application as a CGI-type directory and plan to run programs out of this web application on the web server.
- Script determines if scripts can be executed in this web application. This must be checked if BIS programs will be run in this web application.
- NTLM Authentication should be checked to use this kind of authentication in this web application. In general, this box should be checked.
-
BIS Installation Path
This is the path to the BIS server program directory (the directory that contains BISISAPI.DLL). This field is preset to the directory where you last installed BIS. You can override this by pressing the Browse button and browsing to a new directory; by typing a directory name; or by typing the full path where BISISAPI.DLL can be found.