5.7.3 Domain Setup: Centralize Session Configuration
This sample configuration demonstrates how an administrator can use a Reflection X Advantage domain to simplify session setup for end users. In this example, the administrator configures public session definitions. End users can launch these public sessions from their workstations, and can also create and start their own sessions.
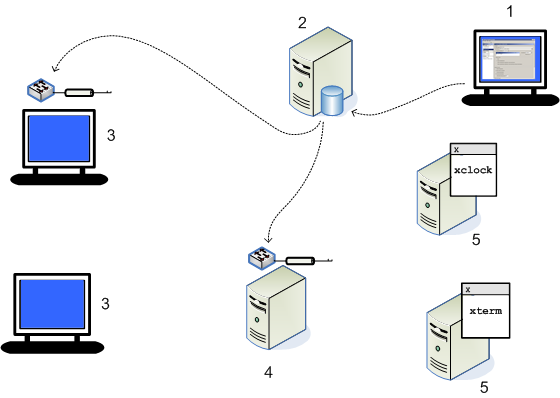
The components of this configuration are:
|
Computer |
Description |
|---|---|
|
Administrative Workstation (1) |
Runs X Administrative Console and X Manager for Domains. The administrator uses these to manage the domain, and to configure and share public session definitions. |
|
Domain Controller (2) |
Runs the Reflection X Advantage domain controller and X Administrative Console. Session information is stored on this computer in the domain controller database. |
|
User workstations (3) |
The user runs public sessions configured by the administrator and can optionally create additional private sessions. |
|
Domain nodes (4) |
(Optional) Run remote session components when sessions are configured to use Remote Session Services. |
|
X client hosts (5) |
The computers that run X applications used in your organization. |
The administrator uses the Administrative console (1) to configure the domain controller (2). When users start sessions, the domain controller can set up session components on user workstations (3) or domain nodes (4):

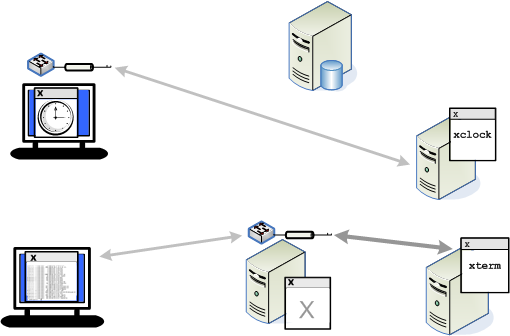
The X server displays are created on user workstations using the centrally managed configurations:

These are the basic steps for setting up this configuration. They are explained in detail below.
Step 1: Set up Reflection X Advantage domain components.
Step 2: Use X Manager for Domains on the administrative workstation to configure and test client and session definitions.
Step 3: Use the Administrative Console to make your definitions public.
Step 4: Use X Manager for Domains on the user workstation to connect using the public definitions.
Step 1: Set up Reflection X Advantage domain components
-
On the domain controller, install the following features:
Domain Services (including the Domain Controller feature)
Java Runtime Environment (JRE) (Windows only)
-
On the administrative workstation, install the following features:
X Administrative Console
X Manager for Domains
Templates
Java Runtime Environment (JRE) (Windows only)
-
On user workstations install the following features:
X Manager for Domains
Java Runtime Environment (JRE) (Windows only)
-
If you are using domain nodes, install Domain Services on these computers (without including the Domain Controller feature). If you are running on Windows, also confirm that Java Runtime Environment (JRE) is selected. Use the rxsconfig utility to add each node to your domain. For details, see Set Up Domain Nodes.
Step 2: Configure and test a session
In the steps that follow, you'll use X Manager for Domains to configure and test a client and session. It is also possible to these definitions using the X Administrative Console, but starting with X Manager for Domains is recommended because it enables you to test your configuration.
-
From the administrator workstation, start X Manager for Domains and log on.
-
For User name and Password, specify any user who can log onto your computer. The name you specify for your initial login will be the default domain administrator.
-
For Domain, enter the name of this computer. The Reflection X Advantage domain name is always the same as the name of the computer running the domain controller.
NOTE:On Windows systems, the first domain user must be a user who is a member of the same Windows domain as the user who installs Reflection X Advantage.
On Linux systems PAM authentication is used by default for user authentication. On some Linux systems, the pam_securetty module is configured by default to allow root logins only if the user is logging in on a secure tty. On these systems you cannot log onto the Reflection X Advantage domain using root credentials
This initial logon creates an administrative account for the domain (using the default authentication method for your system) and imports any settings you select.
-
-
Configure an X client or XDMCP connection to connect to your X client application or your Linux desktop.
NOTE:If you are creating new client definitions, you should leave User name blank because you are going to share this session definition with others. After you make this session public, users can enter their name during the connection process.
-
(Optional) If you have configured domain nodes, you can configure a session in which Remote session services is set to something other than None. If you do this, specify this session as the default for your clients.
-
Start your X client or XDMCP connection.
If your connection is successful, you're ready to make this session definition available to other users.
Step 3: Make the session public
By default, a new session is private. A private session definition can be viewed, used, and modified only by the user who created it. To make your session available to other users, you need to make it public.
NOTE:When you make a client definition public, users also need access to the associated session and any other definition used by the client
-
From the administrator workstation, start the Administrative Console and log on using the same credentials you used to log onto X Manager for Domains.
-
Right-click the client definition and select Public. Note that the icon changes to indicate that this is now a public session.
-
If the client reference a session, right click the session definition and select Public.
Now that the administrator's work is done, all a user needs to know to get connected is:
-
The name of the Reflection X Advantage domain. (The name of the computer running the domain controller.)
-
Logon credentials for the Reflection X Advantage domain. (If you manually added users to the internal authentication database, you need to provide them with these credentials. If you use the default Windows or PAM for authentication, users can log on to the Reflection X Advantage domain using those credentials.)
-
Logon credentials for the X client host.
Here's how it works...
Step 4: Make a connection from the user workstation using the public session
-
From the user workstation, start X Manager for Domains.
-
Enter the domain name provided by the administrator. If default domain authentication is used, the username and password required are the same ones you use to log onto this workstation.
-
Double click any public definition to make a connection, then log on to the host.
Doing more with this idea...
As an Administrator, you can further simplify the end-user experience using the Automatically start client setting in your public client definitions. Also ensure that each client has a default session configured. With this configuration, all a user has to do to start your public clients is log into the domain.