VisiBroker for .NET Developer’s Guide : Building and deploying VisiBroker for .NET applications

Building and deploying VisiBroker for .NET applications
This chapter describes the process for building and deploying your VisiBroker for .NET-powered .NET applications. It contains the following topics:
Generating VisiBroker for .NET stubs and skeletons
The J2EE and CORBA technologies define object-level interfaces, and communication between your .NET applications and server objects is conducted exclusively through these interfaces. In CORBA these interfaces are defined in IDL, in J2EE they are defined in Java RMI.
The VisiBroker for .NET java2cs and idl2cs tools convert the interfaces from Java RMI or IDL into C#. VisiBroker for .NET adds features to the Microsoft Visual Studio .NET so that you can configure and use these tools in your IDE projects. You can also use the command line to compile the interfaces.
Visual Studio
To generate VisiBroker for .NET stubs and skeletons in Visual Studio .NET:
1
2
Figure 2
For an IDL file the compiler should be set to IDL2cs. A JAR or EAR file should use the Java2cs compiler. You can add compiler arguments and rename the output file in the properties dialog.
Important:
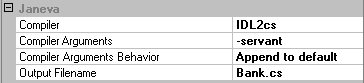
If you are generating the server skeleton code be sure to add the
-servant compiler flag to the compiler arguments.
3
If the compile is successful, it should generate a C# file and add it to your project.
command line
To use the compilers at the command line, make sure that the tools are available in your path so that it can be run from the command prompt. The compilers are located in the bin directory of the VisiBroker for .NET installation directory. To test whether the compilers are in your path, open a command prompt and type idl2cs. You should get a listing of compiler switches.
If you did not add it during the installation process, you can add idl2cs to your path from the command prompt by typing:
prompt> set PATH=<VisiBroker Home>\VisBroker.NET\bin;%PATH%
Once you've confirmed that the compilers are in your path, you can use them:
prompt> idl2cs Example.idl
If the compile is successful, it generates a C# file.
Adding references to VisiBroker for .NET runtime libraries
In order to take advantage of the VisiBroker for .NET runtime, applications must refer to the VisiBroker for .NET DLLs. The following sections describe how to add references to the VisiBroker for .NET runtime libraries in your applications.
Visual Studio
To add references to the VisiBroker for .NET runtime libraries in Visual Studio .NET:
1
2
Figure 3
3
If you are building a client application select only the VisiBroker for .NET Runtime reference. If you are building a server application, select both the VisiBroker for .NET Runtime and VisiBroker for .NET Services references.
4
If you selected the VisiBroker for .NET Runtime reference, the Borland.Janeva.Runtime should appear in your references list. If you selected the VisiBroker for .NET Services reference, the Borland.Janeva.Services should appear in your references list.
command line
To add the reference to the VisiBroker for .NET runtime library at compile time, invoke the C# command line compiler on the C# source code, including Borland.Janeva.Runtime.dll or Borland.Janeva.Services.dll as a reference.
prompt> csc /r:Borland.Janeva.Runtime.dll Client.cs
Deploying VisiBroker for .NET applications
To deploy applications using the VisiBroker for .NET technology you will need to include the following items:
Microsoft .NET Framework Redistributable Package
VisiBroker for .NET is a .NET product. As such, it requires the .NET Framework Redistributable Package for execution, which is available as a free download from the Microsoft Web site, or it may be included with your IDE or operating system.
VisiBroker for .NET runtime libraries
For deployment, VisiBroker for .NET supports client applications on the front end or ASP.NET server applications. You must install the following VisiBroker for .NET runtime libraries on each machine that runs the VisiBroker for .NET-powered applications.
The following two need to be installed only if services such as security, firewall, or transactions are being used:
Depending on the application server being used, you will need to install one or more of the following:
You can install them in one of two ways:
Clients (that make use of the VisiBroker for .NET runtime) on the same host can share the VisiBroker for .NET runtime libraries if you install them in the GAC.
VisiBroker for .NET deployment license key
The VisiBroker for .NET deployment license key is installed in the location <install-dir>\VisiNet\client.slip. You can use the license in one of three ways:
Important
Refer to your license agreement to determine what constraints exist on the number and types of machines on which you can use your deployment license.
Including the license as an embedded resource
The following procedures describe the steps to include the VisiBroker for .NET deployment license as an embedded resource in your application using Microsoft Visual Studio .NET.
To embed a resource using Visual Studio .NET:
1
2
3
4
5
6
Copying the license to the application virtual root
To include the VisiBroker for .NET deployment license in the application root of an ASP.NET server application:
1
Copy the license file (client.slip or server.slip) from <install-dir>\VisiNet\ directory to the application’s root installation directory.
2
Modifying the application configuration file
To include the location of the VisiBroker for .NET deployment license in the application configuration file:
1
2
Modify the XML to include the <license> element as shown in the following example.
<?xml version="1.0" encoding="utf-8" ?>
<configuration>
<configSections>
<section name="visinet” type="Janeva.Settings, Borland.Janeva.Runtime"/>
</configSections
<visinet>
<license dir=”C:\Program Files\Borland\Janeva”/>
</visinet>
</configuration>
The <license> dir value should be the absolute or relative path to the file containing the Micro Focus license key.