8.1 Setting Up the SQL Database
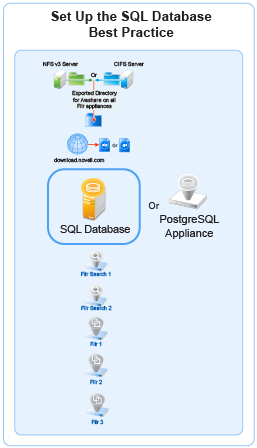
Figure 8-3 illustrates that an SQL database is the second component deployed (after shared storage) when creating an expandable Filr deployment.
Figure 8-2 Set Up an SQL Database

IMPORTANT:OpenText recommends using an existing SQL database if one is available.
Prepare your in-house SQL server by completing the steps in one of the following sections:
8.1.1 Configuring a PostgreSQL Appliance
Deploying a PostgreSQL Appliance
-
Deploy the PostgreSQL Appliance similar to the Filr Appliance. The binary is available on the sld.microfocus.com location.
-
Specify <postgresqlappliance_IP or hostname>:9443 to access the PostgreSQL Appliance as the vaadmin user.
-
Under PostgreSQL Appliance Tools, click Configure PostgreSQL.
-
Specify a password for the “postgres” user, then click OK.
Creating User Roles for Accessing PostgreSQL Appliance
This user is used when connecting Filr to PostgreSQL in 9443 console.
-
Under PostgreSQL Appliance Tools, click phpPgAdmin.
-
Click PostgreSQL, then specify the Username as “postgres” and password that you specified in Step 4.
-
Click Roles > Create role.
-
Specify all the required details to create a user. Ensure to select the options: Create DB? and Can login? and click Create.
Creating Database for Connecting to Filr
This database is used to connect to Filr.
-
Click Databases > Create database.
-
The Name should be same as the user you created in Step 4.
-
In the Template field, select template0, then continue with defaults and click Create.
-
(Optional) Create one more database, if you want to connect to Filr with a database with a different name than the user.
Standby Database Appliance
A standby database is a replica of the primary database that the Filr application uses. If the primary database server fails to respond, the standby database is activated and acts as a primary database. Filr can then be pointed to use this database.
Perform the following steps to set up a standby database
Deploy the Standby Database Appliance
-
Deploy the PostgreSQL Appliance similar to the Filr Appliance. The binary is available on the sld.microfocus.com location.
-
Specify <postgresqlappliance_IP or hostname>:9443 to access the PostgreSQL Appliance as the vaadmin user.
-
Under PostgreSQL Appliance Tools, click Configure PostgreSQL.
-
Specify a password for the “postgres” user, then click OK.
-
Go to PostgreSQL Appliance 9443 > System Services. click PostgreSQL and select Stop from the Actions menu.
Prepare the Primary Database Appliance
On the existing primary database, perform the following steps:
-
Create a new user with replication rights: psql -U postgres -c "CREATE USER repuser WITH REPLICATION ENCRYPTED PASSWORD 'password';"
-
Open the command prompt and set the following variables to update /vastorage/postgres/conf.d/vabase-postgresql.conf
wal_level = replica
wal_log_hints = off
max_wal_senders = 8
max_wal_size = 1GB
hot_standby = on
-
Update the file /vastorage/postgres/conf/vabase-pg_hba.conf with the command host replication repuser <Standby Database Appliance IP>/<Network Mask> md5 to provide access to the replication users.
-
Reload configuration psql -U postgres -c "SELECT pg_reload_conf();"
Set up a Standby Database Appliance
On the Standby database, perform the following steps:
-
Delete the existing database rm -r /vastorage/postgres/data/*
-
Copy the existing database from the primary database pg_basebackup -h <DBPrimaryIP> -U repuser -R -D /vastorage/postgres/data
-
Change the ownership of the files recursively chown -R postgres:postgres /vastorage/postgres/data
-
Go to PostgreSQL Appliance 9443 > System Services, click PostgreSQL and select Start from the Actions menu.
Verify the Replication between the Master and Standby Database
Below are the options to validate if the standby database appliance is replicating the data from the primary database appliance:
Check PostgreSQL Replication Status: Connect to the replica server and use the following SQL query to check the replication status:
SELECT * FROM pg_stat_replication;
Ensure that the state column shows 'streaming' and there are no errors.
Check Replication Lag: To determine the replication run the following command
lag run SELECT now() - pg_last_xact_replay_timestamp() AS replication_lag;
This query will show the time difference between the current time and the timestamp of the last transaction replayed. Ideally, the replication lag should be minimal.
Monitor Logs for Errors: Review the PostgreSQL logs on the replica server for any error messages related to replication. Common log locations include /var/log/postgresql/ or as specified in your PostgreSQL configuration.
Verify Data Consistency: Run queries on the replica to compare data with the primary server. For example, you can select a few rows from critical tables and compare them with the primary server
Make Standby Database as Primary Database
-
Ensure that the primary database is stopped. To stop the primary database appliance, go to PostgreSQL Appliance 9443 > System Services. click PostgreSQL and select Stop from the Actions menu.
-
Update the Host Name or IP Address from Primary to Standby database appliance at PostgreSQL Appliance 9443 > Configuration > Database.
-
Click OK. The Configuration Summary is displayed.
-
Click Reconfigure Filr Server.
-
Promote standby database: su postgres -c "pg_ctl promote -D /vastorage/postgres/data"
NOTE:The existing primary database can be discarded. Create a new standby database appliance as above.
8.1.2 Configuring a MySQL or MariaDB Server
This section describes configuring MySQL or MariaDB server by using the Filr configuration wizard. It is recommended not to manually create the Filr database on your MySQL or MariaDB server.
The MySQL database mentioned in this section is an existing database and not a Filr default database. From Filr 4, the default database is PostgreSQL.
Table 8-1 Configuring MySQL or MariaDB for Filr
|
File |
Do This |
|---|---|
|
1 - Edit the configuration file. |
|
MySQL or MariaDB server > /etc/my.cnf file |
|
|
Continue with Setting Up Two Filr Search Appliances. |
8.1.3 Configuring a Microsoft SQL Server
IMPORTANT:Do not create the Filr database on your MS SQL server manually.
Let the Filr configuration wizard create the database to ensure the correct configuration.
Table 8-2 Configuring Microsoft SQL Server for Filr
|
File |
Do This |
|---|---|
|
1 - Configure the server. |
|
Server management console |
|
|
Server management console |
|