Installing ZMF for Eclipse
Installation Prerequisites
Important
The Readme file contains the latest information about supported software versions and other prerequisites for installation of the ZMF for Eclipse plug-in. Information in the Readme supersedes the guidance given in this document.
z/OS Server Requirements
Before you install ZMF4ECL, verify that requirements in the checklists below are met. Additional information on ZMF started task configuration can be found in the ChangeMan ZMF Installation Guide. The ChangeMan ZMF Administrator’s Guide addresses parameter settings.
Licensing:
ZMF for Eclipse is a separately licensed option of ChangeMan ZMF. Each ZMF site that you plan to access from ZMF for Eclipse requires application of the appropriate license key to enable access. Contact Serena Customer Support to obtain a license.
Connectivity:
TCP/IP connectivity must be established between each instance of ChangeMan ZMF to be accessed and:
-
the Web application server where the ZMF Web Services reside
-
the workbench IDE (Eclipse or IDz) where the ZMF4ECL plug-in will reside
To ensure successful operation of the ChangeMan ZMF for Eclipse interface, the XCH and ZMF ports both need to be open for access by both the Web application server and the workbench IDE.
ChangeMan ZMF Configuration:
A supported version of ChangeMan ZMF must be installed on each z/OS system that is accessed with ZMF for Eclipse 8.1.2. Refer to the Platform Matrix spreadsheet associated with the ZMF for Eclipse 8.1.2 product on the product download area of the Serena Support web site for a list of supported versions of ChangeMan ZMF.
Each ChangeMan ZMF started task that will be accessed by ZMF for Eclipse should be configured to support the following features:
-
XML Services and Web Services access to ZMF over a network
-
Unix System Services (USS) access and data areas (if you plan to work with Java)
-
Hierarchical File System (HFS) library type support (if you plan to work with Java)
Security:
The started task ID for the ChangeMan ZMF started task must be granted UPDATE access in your mainframe security system for all z/OS libraries that will be accessed by the plug-in — including all personal development libraries.
Note
If you do not know the started task ID for the ChangeMan ZMF started task, you can find it in the JESMSGLG output or ask your systems programmer.
User Permissions:
Each workbench user who accesses ChangeMan ZMF on the host must have a TSO user ID defined to the mainframe security system.
Note
ZMF for Eclipse is compatible with the RACF®, CA-ACF2®, and CA-Top Secret® security systems on the mainframe.
Each workbench user who accesses ChangeMan ZMF must be given appropriate developer permissions by your ZMF administrator. Administrator permissions are not required.
Web Application Server Requirements
zmfws.war Web Archive File:
A web application server is required to run the ZMF Web Services. This software manages interactions between ZMF4ECL on the PC and ChangeMan ZMF on the host. The code is distributed as zmfws.war and can be renamed to allow multiple versions if desired. The version desired can be set in the preferences for ZMF4ECL.
Axis SOAP Library:
A web application server that supports Version 1.4 of the Apache Axis SOAP library is required.
Note
Axis Version 1.4 is not the same as Axis2 Version 1.4.
The appropriate Axis library is supplied by Serena with the ZMF Web Services API and need not be installed separately.
Web Application Server Software:
Servers that support the Axis SOAP library include Adobe Cold Fusion, Apache Tomcat, IBM WebSphere Application Server (WAS), Oracle WebLogic, Red Hat JBoss, Sun Microsystems Java System Application Server (JSAS), and many others.
Apache Tomcat can be downloaded at no charge from the Apache Software Foundation at
Refer to the platform matrix on support.serena.com for a list of subsystems that are supported.
A trial version of WAS Express can be downloaded at no charge from IBM at
http://www-01.ibm.com/software/webservers/appserv/express/
Note
ZMF4ECL has not been tested with all the available web application servers that support Axis. It is possible that the plug-in will not work correctly with some servers.
Java:
A Java Runtime Environment is required by the ZMF Web Services software. It must be installed on the same machine where the web application server resides.
JRE can be downloaded at no charge from Oracle (formerly Sun Microsystems) at
http://java.com/en/download/manual.jsp
Server Site
The Web application server may be installed locally on the same PC where the workbench IDE and ZMF4ECL plug-in reside, or it may be accessed over a network.
HTTP Server Support
An HTTP transaction server must accessible to listen for SOAP requests issued by the web application server. As a general rule, the HTTP server should be installed on the same machine as the web application server. Only one HTTP server at a time may be listening for SOAP requests on that machine.
For demonstration purposes, this manual assumes that Tomcat or WebSphere Application Server (WAS) will be configured as the web server.
Workbench Requirements
Workbench IDEs:
Either of the following IDE products are supported by the ZMF for Eclipse plug-in:
-
_Eclipse IDE
-
IBM Rational Developer for z Systems_
Refer to the Platform Matrix on the product documentation area of the support web site at
https://www.microfocus.com/en-us/products/serena/overview
for the required versions of these two products.
The Eclipse Workbench can be downloaded at no charge from the Eclipse Foundation at
http://www.eclipse.org/downloads/
Platform:
Any operating system supported by the workbench is also supported by the plug-in software.
2 GB of RAM or higher are strongly recommended for the workbench.
Java:
A version of the Java Development Kit (JDK) compatible with your workbench is required by the plug-in and must be installed on the same machine as the workbench.
JDK can be downloaded at no charge from Oracle (formerly Sun Microsystems) at http://java.sun.com/javaee/sdk/index.jsp
Note
It is beyond the scope of this document to describe how to install and configure the prerequisite software mentioned here or in the Readme. In addition, the required software may have prerequisites of its own that are not listed. Refer to the documentation supplied with the prerequisite software for installation and configuration information.
Installing the ZMF Web Services
ZMF Web Services Requirements
-
ZMF Web Services for ChangeMan ZMF must be installed as a web application on a web application server prior to using the ZMF for Eclipse plug-in on the IDE.
-
The ZMF Web Services stored in the zmfws.war file, must be upgraded to the 8.1.2 version prior to using ChangeMan ZMF for Eclipse 8.1.2.
-
The ChangeMan ZMF Web Services must be downloaded separately from ChangeMan ZMF for Eclipse on the Serena Support web site. Please read the current Readme file for the latest information.
Downloading the Web Services
zmfws.war Web Archive:
ZMF Web Services is distributed as a set of Java classes in a WAR (or Web ARchive) file called zmfws.war. This file must be downloaded from the Serena Support web site.
To download the ZMF Web Services, perform the following steps.
-
Logon to the Serena Support web site at https://www.microfocus.com/en-us/products/serena/overview
-
Download the most recent version of the
zmfws.warlibrary.-
On the Case Manager page, click the My Downloads tab.
-
In the Please Select Product field, select ChangeMan ZMF Client Pack from the pull-down list.
-
A table will list the releases for which you have a license. In the table entry for the most recent version, find the Available Operating Systems column and click the z/OS link.
-
A table listing downloadable resources displays. Find the table entry for the ChangeMan ZMF Web Services file (
zmfws.zip) and click Download.
-
-
Extract the
zmfws.warfile from the downloadedzmfws.ziparchive.
Installing the WAR as a Web Application
Installation Examples:
ZMF Web Services for ChangeMan ZMF must be installed as a web application on a web application server. Step-by-step installation examples are given below for the following servers:
-
Apache Tomcat 8.0.36
-
IBM WebSphere Application Server (WAS) Express 8.5.5.9
Note
Web application installation steps vary by web application server. It is not possible to document all variations here. For more information about installing web applications on an application server, consult the documentation for your web application server.
Installing Web Services on Apache Tomcat
Tomcat is a simple, reliable, open-source web application server from the Apache Software Foundation. Because Tomcat does not build in much concurrency or session management support in the base product, the installation procedure for web applications is simple and direct.
The following installation instructions apply to Tomcat 8.0. A similar procedure may be followed with many other open-source web application servers.
Uninstalling Old Versions of Web Services
Uninstall zmfws.war:
Before installing the new ZMF Web Services, remove any prior versions from the web application server.
-
Stop the web application service.
-
In Windows, go to Start | Settings | Control Panel | Administrative Tools | Services.
-
From the list of services shown, select the entry for Apache Tomcat and click Stop.
-
-
Delete the zmfws folder and the
zmfws.warfile, if they exist, from the webapps directory managed by the web application server. For Apache Tomcat, a typical location is:C:\Program Files\Apache Software Foundation\ Tomcat 8.0\webapps` -
Do not restart the web application service at this time.
Installing New ZMF Web Services
Installing the new ZMF Web Services is a matter of copying it to the correct location and restarting the web application server.
-
Copy the
zmfws.warfile to the webapps directory in the web application server software directory. For example:C:\Program Files\Apache Software Foundation\ Tomcat 8.0\webapps -
Restart the web application server.
-
In Windows, go to Start | Settings | Control Panel | Administrative Tools | Services.
-
From the list of services, select the entry Apache Tomcat, then click Start or Restart. The server automatically expands the WAR file and installs the ZMF Web Services at startup.
-
Verifying Successful Installation
Verify zmfws.war:
To verify that the ZMF Web Services installed successfully, perform the following steps.
-
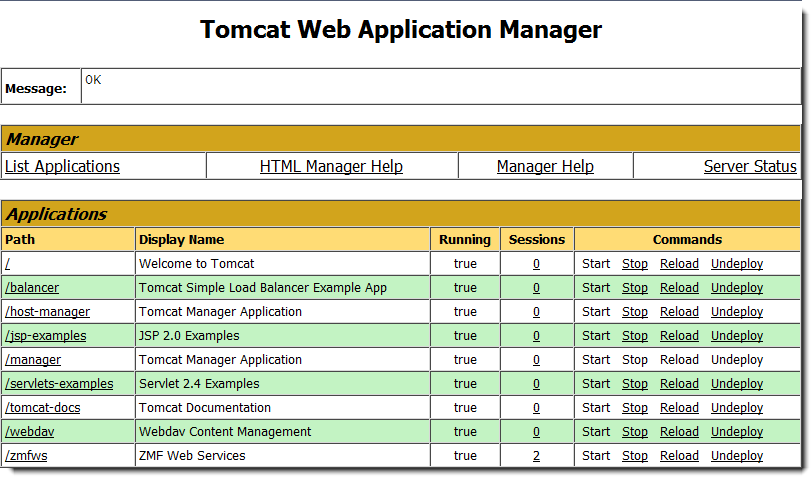
In your Web browser, browse to the home page for Tomcat. A typical location is shown below:
2. In the left navigation column of the Tomcat home page, in the Administration box, click the Tomcat Manager link.<http://RM8553:8080> where `RM8553` is the server name. -
Log on with the administrator user ID and password for Tomcat.
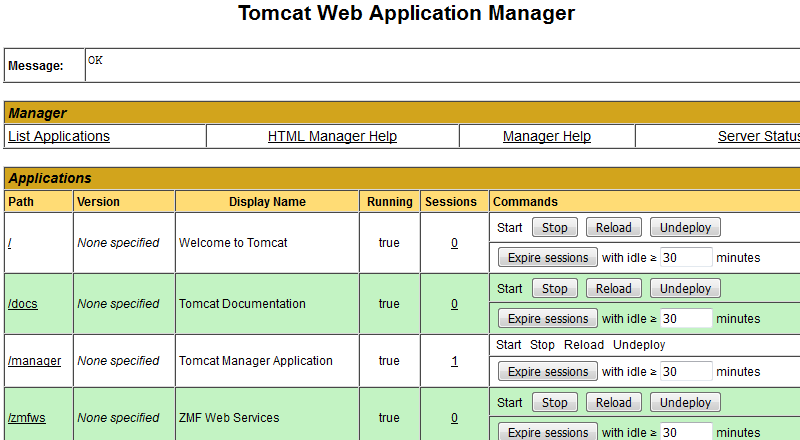
-
When the Tomcat Web Application Manager page displays (see next page), scroll to the bottom of the Applications table. Verify that the ZMF Web Services shows the following values:
-
Path — /zmfws
-
Display Name — ZMF Web Services
-
Running — true
-
-
If the value in the Running column is false, go to the Commands column of the table and click Start.
As an alternative, type the following text into a browser to verify successful installation of the ZMF Web Services:
<http://server:port/zmfws/services/Version>where:
serveris the name of the Web application server.portis the port to which it is connected.For example:
<http://st6019:8080/zmfws/services/Version>If successful, information about the currently installed version of the ZMF Web Services will be displayed. For example:
ZMF Web Services Version 812 - Build 229 - created 9/2/2016
Installing Web Services on WebSphere Application Server
IBM WebSphere Application Server (WAS) is a high-end web application server that builds in support for many levels of concurrency and virtualization, session management, security, single sign-on, and more in the base product. With extra function comes administrative complexity, however, so installing new web applications on WAS is not simple.
WebSphere Application Server Express addresses this complexity by packaging the most commonly co-installed WebSphere programs together — for example, IBM HTTP Server and IBM Rational Developer for z Systems are both included. WAS Express also provides a web application installation "Fast Path".
The following installation instructions apply to WebSphere Application Server Express 8.5.5.9.
Uninstalling Old Versions
Uninstall zmfws.war:
Before installing the new ZMF Web Services, unless you want to run multiple versions of web services, remove the prior versions from the web application server.
-
Open the administrator console for the WAS server where the old ZMF Web Services resides.
-
In Windows, go to Start | All Programs | IBM Websphere | IBM WebSphere Application Server V8.5 | Profiles | app-server-name | Administrative console.
-
Log on to the console with an administrator ID and password.
-
-
In the left navigation pane, expand the Applications node and go to Application Types | WebSphere enterprise applications.
-
From the Enterprise Applications panel, stop the ZMF Web Services application.
-
Click the checkbox beside the entry for zmfws_war.
-
In the row of control buttons above the list, click Stop.
-
-
Uninstall the old ZMF Web Services application by selecting zmfws.war and clicking Uninstall.
-
Delete the zmfws_war.ear folder from the web application server software directory. A typical location is:
C:\ProgramFiles\IBM\WebSphere\AppServer\profiles\
 app-server-name\installedApps\node\zmfws_war.ear
Installing New Web Services
Install a New zmfws.war:
WebSphere Application Server (WAS) provides an installation wizard to assist with installation and configuration of the new ZMF Web Services.
-
Open the administrator console for the WAS server where the ZMF Web Services will reside.
-
In Windows, go to Start | All Programs | IBM Websphere | IBM WebSphere Application Server V8.5 | Profiles | app-server-name | Administrative console.
-
Log on to the console with an administrator ID and password.
-
-
In the left navigation pane, expand the Applications node and click New Application.

-
In the New Application page to the right, click New Enterprise Application.

-
When prompted for the location of a WAR module , click Local file system and browse to the location where you unloaded
zmfws.war. When selected, click Next.
-
You will be asked How do you want to install the application? Choose the Fast Path installation method with default bindings and mappings. (These settings can be changed later if desired.)

-
Click the radio button next to Fast Path.
-
Expand the node Choose to generate default bindings and mappings.
-
Check Generate Default Bindings.
-
Check Use default virtual host name.
-
Click Next.
-
-
In the Select installations options page click Next to accept defaults.
-
The Map modules to servers page asks you to associate particular web applications with particular WAS application servers (see below). Available servers are listed under Clusters and servers. Available applications are shown in the table below the server list.
In the simplest case, only one web application server will be defined. However, several web applications may be available to run on it.
-
In the table of available web applications, check the box beside the ZMF Web Services module. Uncheck all other boxes.
-
In the list of Clusters and servers , find the web application server you want to use to execute the ZMF Web Services. Select that server and click Apply.
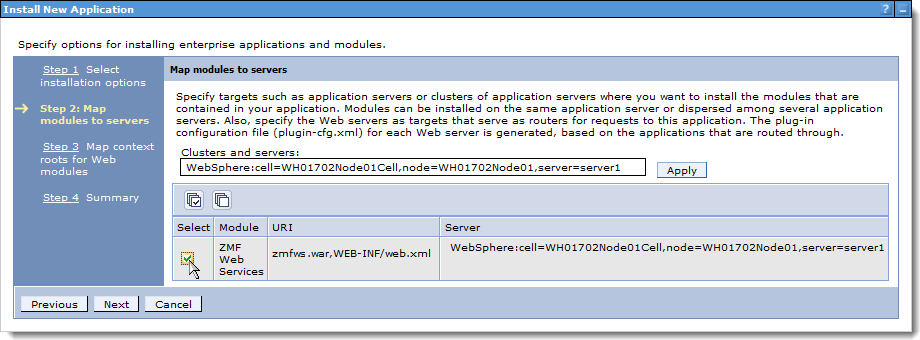
-
Click Next.
-
-
The Map context roots page lets you to define a custom root context (that is, a path to a directory location or folder) for execution of the ZMF Web Services. Specify the following in the Context Root field following the / character:
zmfws
-
Click Next.
-
Review the Summary of the options chosen for the install (see below). Verify that the ZMF Web Services shows the following values:
-
Application name — zmfws_war
-
Validate Schema — No


Click Previous to go back to a prior screen if you want to change a value.
Click Finish to generate the ZMF Web Service.
-
-
A scrolling message log displays while the application is generated. Look for the following message at the bottom of the log:
Application zmfws_war installed successfully.This message indicates that the ZMF Web Services binaries and bindings were created successfully in a local, working directory. The application configuration has not yet been saved in the master WAS directory. It cannot yet be started or managed by WAS.
-
Important hyperlinks are embedded in the message log text below the success message (see below).

-
Click Review to see the generated application configuration. If necessary, discard the configuration, go back and specify different settings, and regenerate the application.
-
Click Save to deploy the application into production under WAS.
-
Verifying Successful Installation
Verify Install of zmfws.war:
To verify that the ZMF Web Services installed successfully, perform the following steps.
-
Expand the Applications node in the left navigation pane.
-
Under the Applications node, expand Application Types and click WebSphere enterprise applications.
-
The page at right displays a table of all the web applications defined to WAS. The ZMF Web Services application should appear in this table with the application name zmfws_war.

-
If zmfws_war has not yet been started, click the checkbox beside it to select it, then click Start in the row of control buttons above.
Note
To view or change configuration settings for
zmfws_war, click the application name. A tabbed configuration page will display.As an alternative, type the following text into a browser to verify successful installation of the ZMF Web Services:
<http://server:port/zmfws/services/Version>where:
serveris the name of the Web application server.portis the port to which it is connected.For example:
<http://st6019:9080/zmfws/services/Version>If successful, information about the currently installed version of the ZMF Web Services will be displayed. For example:
ZMF Web Services Version 812 - Build 229 - created 9/2/2016
Installing Web Services in International Environments
Customers who install the Web Services that are distributed in the zmfws.war file for use by either ZMF for Eclipse or custom applications in non-US environments may need to take additional steps to complete the installation.
These steps are described in detail in Solution S140158 in the knowledgebase on the Serena Support web site.
Preparing to Install the Workbench Plug-in
Uninstalling Prior Versions of the Plug-in
You must remove any previous installations of the ZMF4ECL plug-in (or its WD4ZMF predecessor) before you install the new version. This is only true if you have ZMF for Eclipse 7.1.2.01 or prior and have used the desktop installer to install the plug-in. Once you install version 7.1.2.01 or above using the new Eclipse-based installer, this step is no longer necessary, and you can use the updated install files to upgrade through the Eclipse-based installer.
Note
Be sure to uninstall prior versions of WD4ZMF as well as ZMF for Eclipse.
ZMF4ECL can be uninstalled using the installer you used to install it or from the Windows Programs and Features control panel in Windows. WD4ZMF can only be uninstalled this way.
Removing ZMF4ECL Using the Installer
-
Log on to the PC as a user with Windows administrator privileges.
-
Open the workbench and close the Serena perspective if it is open as follows:
-
Right-click on the Serena perspective tab.
-
Select Close from the contextual menu.
If you don’t close the perspective, the uninstall may leave a residual tab and perspective.
-
-
Close the workbench.
-
Start the installer program
ZmfEclipseVRM.msi. When the Welcome dialog displays, click Next.If ZMF4ECL is already installed, the installer prompts you to remove it. No other options are available.
-
Click Remove.
Removing WD4ZMF Using the Windows Control Panel
-
Log on to the PC as a user with Windows administrator privileges.
-
Open the workbench and close the Serena perspective if it is open as follows:
-
Right-click on the Serena perspective tab.
-
Select Close from the contextual menu.
If you don’t close the perspective, the uninstall may leave a residual tab and perspective.
-
-
Close the workbench.
-
Use the Windows facility Programs and Features to uninstall any previous versions of WD4ZMF.
-
In Windows, go to Start | Control Panel and select Programs and Features.
-
From the list of installed programs, select Serena WD4ZMF and then click the Uninstall button.
-
When the InstallShield Wizard dialog box displays, select the Remove option and click Next.
-
Click Finish after the uninstall completes.
-
Removing ZMF4ECL Using the Windows Control Panel**
-
Log on to the PC as a user with Windows administrator privileges.
-
Open the workbench and close the Serena perspective if it is open as follows:
-
Right-click on the Serena perspective tab.
-
Select Close from the contextual menu.
If you don’t close the perspective, the uninstall may leave a residual tab and perspective.
-
-
Close the workbench.
-
Use the Windows facility to Programs and Features to uninstall any previous versions of WD4ZMF.
-
In Windows, go to Start | Control Panel and select Programs and Features.
-
From the list of installed programs, select ChangeMan ZMF Eclipse Integration and then click the Uninstall button.
-
When the InstallShield Wizard dialog box displays, select the Remove option and click Next.
-
Click Finish after the uninstall completes.
-
Installing the Plug-in
Important
ZMF for Eclipse is a separately licensed option of ChangeMan ZMF. It will not display on the download site if you do not have a license for the product.
Important
Ensure that the Web Server has been updated to use the latest ZMF Web Services version (zmfws.war file) before you install or update the plug-in. See Installing the ZMF Web Services.
You install ChangeMan ZMF for Eclipse with an Eclipse-based installer. You have two choices for installing the ChangeMan ZMF for Eclipse 8.1.2 plug-in:
-
You can download the installation files from the Serena Support web site. If you choose this method, skip the rest of this section and follow the instructions in Downloading the Plug-in from the Serena Support website and Installing Using the Workbench.
-
You can invoke the Eclipse Installer from the Eclipse workbench, and point the installer to the one of the following URLs, and depending on the version of IDz that you are using, you can select the appropriate items to install. (Turn off ’Group Items by Category’ in Eclipse and you will see two - ChangeMan ZMF Eclipse plugin and ChangeMan ZMF IDz integration). You will need both if on IDz.
-
On Eclipse only you can use either URL:
-
For RDz 9.5 and/or Eclipse copy these URLs in blue:
http://help.serena.com/eclipseplugin/ZMF4ECLUpdateSite/RDz 9.5
- For RDz 9.1.x and below and/or Eclipse:
http://help.serena.com/eclipseplugin/ZMF4ECLUpdateSite/RDz 9.1 and below
- If Eclipse can’t find the site, possibly it has inserted one or more %20 for the space character(s), then select Edit to remove any %20 and replace with a space.
Note
You can access this URL only from within the Eclipse Installer from the Eclipse workbench; you cannot access this URL with a browser. If you do try and use a browser, you will see a message like this:
Serena ChangeMan ZMF for Eclipse This URL cannot be accessed with a browser, but only from within the Eclipse installer. Please check the ChangeMan ZMF for Eclipse Readme for more information regarding the URL.
If you choose this installation method, that’s all there is to it. Skip the instructions in "Downloading the Plug-in from the Serena Support website" on page 36 and "Installing Using the Workbench" on page 37.
(You download and install the Web Services as described in "Installing Web Services on Apache Tomcat" on page 23 or "Installing Web Services on WebSphere Application Server" on page 26.)
Download the documentation pertaining to the Web Services and to ChangeMan ZMF for Eclipse from the Serena Support web site at http://support.serena.com.
Downloading the Plug-in from the Serena Support website
You can download the ZMF for Eclipse installation files from the Serena Support website and post them locally or on your company’s network. A user ID and password is required to log on to the Serena Support website.
-
From the support.serena.com case manager page, click the My Downloads tab.
-
From the Please Select Product pull-down menu on the downloads page, select ChangeMan ZMF Client Pack. A list of the ZMF client pack versions for which you are licensed displays.
-
Under Available Operating Systems, click Z/OS for the version of Eclipse for ZMF that you want to integrate with your workbench. A list of installer files displays.
-
In the table entry for the desired IDz version (9.5 or 9.1 and below) ChangeMan ZMF for Eclipse 8.2 Installer , click Download.
-
Click Save and select the directory location in which to save the file.
-
Extract the installer files from the zipped file. The installer files appear in the ZMF4ECL Update Site subdirectory.
The installation can be done using files residing on a local or network file directory. The installer performs the following tasks:
-
Installs the plug-ins for the workbench you are using (Eclipse or IDz), including the Eclipse for ZMF Help plug-in.
-
Upgrades or reverts the plug-ins to a selected version of the Eclipse for ZMF plug-in.
Installing Using the Workbench
After you download your ZMF4ECL installer files to a local file directory, use your workbench to install using the Local installation option.
Important
The exact steps to install local files from the workbench vary from one version of Eclipse and IDz to another. For the exact steps to use for your workbench, please see your Eclipse or IDz documentation.
-
In your Eclipse or IDz workbench, select the option to install or update software. For example, Help | Install New Software or Help | Software Updates.
-
Select the option to add the site on which the install repository is located. For example, click Add or Add Site.
Note
The installation files for ZMF for Eclipse are not hosted in a Web application repository by default. However, you choose the add sites option to browse to and select installation files that reside on a local or network directory.
-
Click Local and browse to the ZMF4ECL Update Site directory that contains the downloaded and extracted install files.
-
Click OK to select the directory.
-
Click OK on the Add Repository dialog to accept the location.
The plug-ins that are available appear. If the list of plug-ins does not appear, make sure Group items by category is unchecked.
-
If using Eclipse only, select ChangeMan ZMF Eclipse Plugin. If using IDz, select both ChangeMan ZMF Eclipse Plugin and ChangeMan ZMF IDz Integration.
-
Click Next.
The Install Details dialog appears.
-
Click Next.
The Review Licenses dialog appears.
-
Review the license text and select I accept the terms of the license agreement.
-
Click Finish.
You may receive a security warning. Click OK to continue with the installation, and the Selection Needed dialog appears asking Do you trust these certificates?
-
Select Serena Software, Development; Serena Software and click OK.
A message appears letting you know that you need to restart your workbench to complete the installation.