Creating a Change Package
Changes and additions to the code base of an application are organized into change packages by ChangeMan ZMF. You can create new change packages from the workbench using the Create Package function.
The Create Package option invokes the Create Package wizard, which walks you through the many steps required to create a new change package in the ChangeMan ZMF repository on the mainframe. The new package is automatically assigned a package name consisting of a four-byte application ID concatenated with a unique package number. The newly created package is automatically added to the Serena Explorer navigation view under the Packages node for the selected application.
Invoking the Create Package Function
The Create Package wizard is invoked from the following workbench menu of Serena perspective:
In the Serena Explorer view, expand the node of the ZMF server hosting the repository where the package will reside. Expand the ZMF Applications node for that server, open the relevant folder with the application, then right-click on the name of the application to which the new package will belong. Select the New Package menu option. See Working with ZMF Applications for more information.
Results
After the Package Create request is submitted, a message dialog box displays the success or failure of the request.
Package Create Procedure
To create a new change package for an application
-
Invoke the Create Package wizard from the contextual menu for the desired application in the Serena Explorer navigation view.
-
When the Package Create wizard displays the Package General Information window, enter the requested information, then click Next to advance to the next window.
Multiple windows will request additional package parameters. The actual windows displayed by the wizard will vary depending on the method of package creation you choose (such as the Quick Method) and on the ZDDOPTS configuration parameters defined by your ZMF administrator.
-
When all information is entered, click Finish to submit the Create Package job for execution.
-
A message dialog from ChangeMan ZMF reports the results of the package creation request. Click OK.
Package Create Wizard Screens
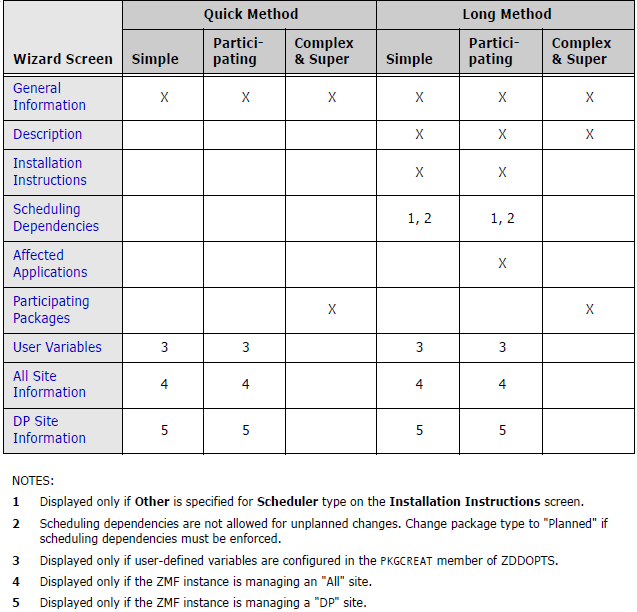
The Package Create wizard displays up to nine dialog screens that correspond to the nine panels in the ISPF interface to ChangeMan ZMF. The actual screens displayed depend on several factors:
- Package "level" (simple, participating, or complex/super)
- Site type (D, DP, or All) targeted by the ZMF instance managing the package
- Settings specified in the PKGCREAT member of ZDDOPTS for the ZMF instance
- Data entered in the first few screens of the wizard itself
Quick method
The "Quick Method" of package creation (also known as the "Short Method" in the ISPF interface to ZMF) skips all screens that are optional for the selected package level.
The following table lists the Package Create wizard screens and indicates which screens are displayed for different data entry methods and package types. Screens with further display conditions are identified by a numbered note that describes those conditions. Wizard screens, if displayed, appear in the order listed from top to bottom in the table.
Note
For more information about creating a change package, refer to the ChangeMan ZMF User’s Guide.
General Information about the Package
The first dialog screen displayed by the Package Create wizard is the Package General Information screen. Package type, level, duration, and basic reporting information are entered on this screen. Editable fields are pre-populated with their most recent values.
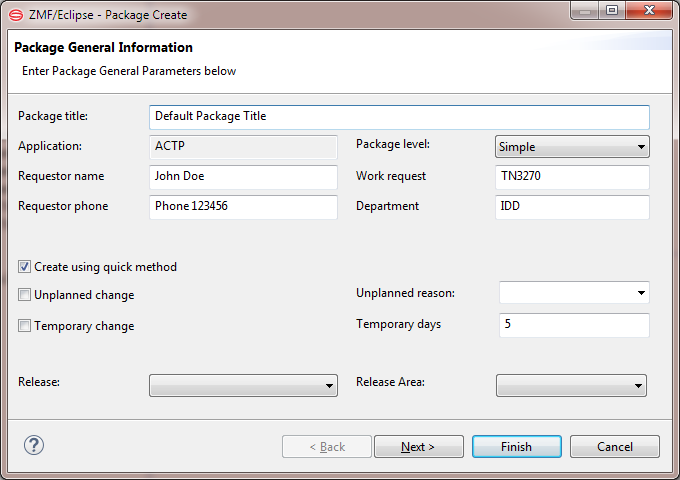
The following describes the fields on the Package General Information screen.
| Field/box | Description |
|---|---|
| Package Title | Type a title for the package. This field is case-sensitive and has a maximum length of 72 characters. |
| Application | Displays the name of the application where the changes in this change package will be applied. You must have UPDATE access to this application defined in ZMF and in your security system. |
| Requestor Name | Type the name of the person requesting this change package. This field is not case-sensitive and has a maximum length of 25 characters. |
| Requestor Phone | Type a telephone number for the package requestor (the person whose name you entered in the Requestor Name field). This field has a maximum length of 15 characters. |
| Work Request ID | Type a work request identifier. Values may be alphanumeric, may include embedded spaces, and are not case-sensitive. Maximum length is 12 characters. This field may be used by the ChangeMan ZMF INFO option. |
| Department | Type the functional department associated with this change package. This field is used for reporting only. This field is not case-sensitive and has a maximum length of 4 characters. |
| Package Level | Select a package level (simple, participating, or complex/super). |
| Simple — The changes in this package are not related to any other package. In addition, the package does not affect any other application, nor does it require changes to software or operational procedures in other applications. (Default) | |
| Participating — This package is related to one or more other participating packages which are associated with the same complex or super package. SYSLIB statements in build jobs include staging libraries from other participating packages under the same complex or super package. | |
| Complex or Super — This package is the administrative parent of two or more participating packages that have interdependent changes to software or operational procedures. If you select this option, a subsequent dialog box will prompt your for a list of participating packages. Remote sites and installation dates are set individually in each participating package. No staging libraries are allocated to complex or super packages. | |
| Note You must define a Complex or Super package as such when the package is created. You cannot redefine a simple or participating package as a complex or super package later using the Package Properties editing wizard. | |
| Create Using Quick Method | Check this option to create a package using the ZMF "Short" method of package creation. This method automatically takes default values wherever possible, allowing the wizard to skip several screens. |
| If you do not select this option, the "Long" method of package creation will be used. Most or all wizard screens will display. | |
| Unplanned Change | Select a ZMF package type (planned or unplanned). |
| Planned — Leave the Unplanned Change box unchecked for planned change packages. Planned packages follow the standard package life cycle for permanent or temporary change packages. Complex, super, and participating packages must be planned. | |
| Unplanned — Check the Unplanned Change box for unplanned change packages. Unplanned packages contain unscheduled changes and possibly emergency fixes. Depending on global and application administrative settings, some package life cycle steps and requirements may be skipped. Complex, super, and participating packages may not be unplanned. | |
| Note Package type (planned or unplanned) is independent of package life cycle (permanent or temporary). Either type may follow either life cycle. | |
| Unplanned Reason | If you selected Unplanned Change as the package type, choose a reason code from the drop-down list. |
| Temporary Change | Select a package life cycle (permanent or temporary). |
| Permanent — Leave the Temporary Change box unchecked if the change package is permanent. At install time, the package components will be installed in the defined production libraries and baselined in the repository. Complex, super, and participating packages must be permanent. | |
| Temporary — Check the Temporary Change option for temporary change packages. At install time, temporary changes will be installed in special override libraries concatenated on top of your production library concatenations. The changes are automatically removed after a specified number of days has passed. (Install duration is entered in the Temporary Days field.) Baseline and production libraries are not updated for temporary packages. Complex, super, and participating packages may not be temporary. | |
| Note Package type (planned or unplanned) is independent of package life cycle (permanent or temporary). Either type may follow either life cycle. | |
| Temporary Days | If you selected Temporary Change, enter the number of days that the changes should be retained in override libraries in production. (This field is disabled for permanent packages.) |
| Note Change duration is the number of calendar days, not the number of full 24-hour periods since the time-of-day at which actual installation occurred. ZMF increments the count of calendar days at 24:00 system time nightly. |
Enter the general package information and then click Next to continue.
Package Description
The Package Description screen captures a text description of changes contained in the package. It is displayed only if you are creating a package using the long method (that is, the Create using quick method box was not checked on the general information screen).
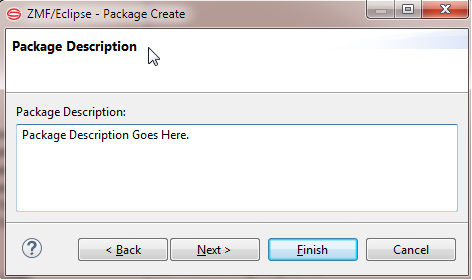
Enter up to 46 lines of text to in the Package Description field. Lines may not exceed 72 characters in length. Click Next to continue. You may also click Back to make changes.
Package Installation Instructions
The Installation Instructions screen requests information about installation scheduling, options in the event of an installation problem, and any special instructions for this particular package. It is displayed only if you are creating a simple or participating package using the long method.
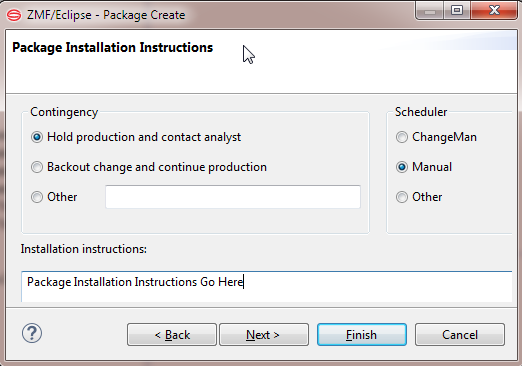
The following describes the fields on the Installation Instructions screen.
| Field/Box | Description |
|---|---|
| Contingency | Select the option that describes what should be done if your change package fails to install properly: |
| Hold production and contact analyst - The analyst name and phone number must be supplied on the site information screen displayed later. This is not the change requestor named on the general information screen. | |
| Backout change and continue production | |
| Other - If you select Other, you must provide an explanation in the corresponding text box of this dialog. | |
| Scheduler | Select an option to determine how the package installation process will be initiated: |
| ChangeMan — Package installation will be initiated by the internal ChangeMan ZMF scheduler. When the install date and time arrive, ZMF will install the package at the defined site. | |
| Manual — Package installation will be initiated whenever approval is received from the final package approver. | |
| Other — Package installation will be initiated by an external scheduler such as CA-7, CA-Scheduler, or CA-ADC2. Scheduling records are inserted into the scheduler database by ZMF when the package is distributed. If this option is selected, the Scheduling Dependencies screen displays after this dialog. | |
| Installation Instructions | Enter up to 46 lines of instructions for installing and backing out the change package. Lines may not exceed 72 characters each. |
Note
Scheduler defaults and available options are determined by global administration settings in ChangeMan ZMF.
- When ChangeMan is the global default, you can change the Scheduler value to Manual, but not to Other.
- When Manual is the global default, you cannot change the Scheduler value.
- When Other is the global default, you can change the Scheduler value to either ChangeMan or Manual.
Click Next to continue, or click Back to return to the previous screens and make changes.
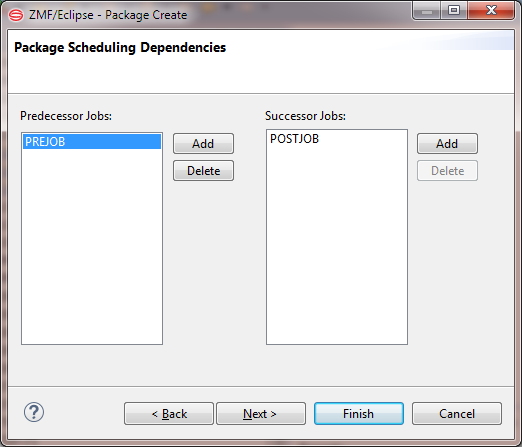
Installation Scheduling Dependencies
The Scheduling Dependencies screen asks for any jobs that must be run by an external scheduler before and/or after the execution of the first install job defined for the package in ChangeMan ZMF. It is displayed only if you selected Other for the Scheduler type on the Installation Instructions screen.
The information you enter is inserted into your external job scheduler database by ChangeMan ZMF job CMN17, which runs when the package is distributed.
The following table describes the fields on this screen.
| Field/Box | Description |
|---|---|
| Predecessor Jobs | Jobs in your automated job scheduler that must run before the first install job for the package. |
| Successor Jobs | Jobs in your automated job scheduler that must run after the first install job for the package. |
Scheduler Controlled Install Jobs
Enter the predecessor and successor jobs that must run before and after the first install job defined to ZMF for your package. The predecessor and successor jobs will initiated by the external scheduler, not by ZMF.
- To add a job name, click the Add button and enter a job name when prompted.
- To delete a job name, select it and then click the Delete button.
- To change a job name, delete it and then add a new one.
Tip
If you do not know which scheduler jobs to run at this time, leave the predecessor and successor job list fields blank. You can provide this information later using the Package Properties wizard. Editing Package Properties
ZMF Controlled Install Jobs
After completion of the externally-scheduled first install job (with its predecessors and successors), the remaining install jobs defined for this package at the target location are executed by ZMF.
Click Next to continue, or click Back to return to previous screens and make changes.
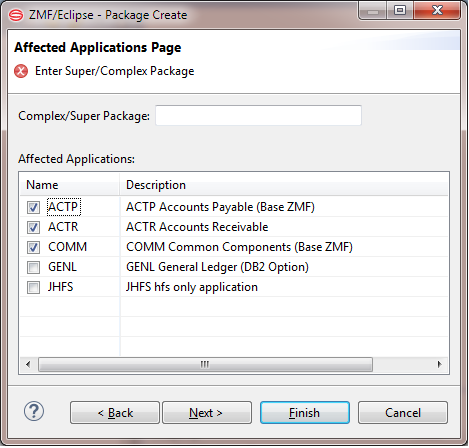
Applications Affected by Change Package
The Affected Applications Page screen requests you to identify any additional applications affected by the newly created change package. It is displayed only if you are creating a participating package using the long method.
The following table describes the fields on the Affected Applications Page screen.
| Field/Box | Description |
|---|---|
| Complex/Super Package | Enter the package ID of the complex or super package that this participating package will be managed under. The complex or super package must be in open (OPN) status. |
| Affected Applications | From the checklist, select additional applications other than the application in which the package is being created that are affected by your change package. |
| When you freeze the participating package, the "Interfacing Approvers" defined for each affected application are assigned to your package. These approvers must sign off on the package before it can be installed. | |
| The applications listed are selected using the workbench application filters specified for the ChangeMan ZMF instance. These are the same applications that display for the instance in the Remote Systems explorer. |
Tip
If you do not know which applications are affected by the package at this time, you can provide the needed information later using the Package Properties wizard.
Click Next to continue, or click Back to return to the previous screens and make changes.
Participating Packages for a Complex/Super Package
The Participating Packages screen allows you to associate existing participating packages with the complex or super package you are creating. This screen is displayed only if you are creating a complex or super package using the long method.
Valid participating packages must be in DEV status, must have an install date that has not passed, and must not be associated with another complex or super package.
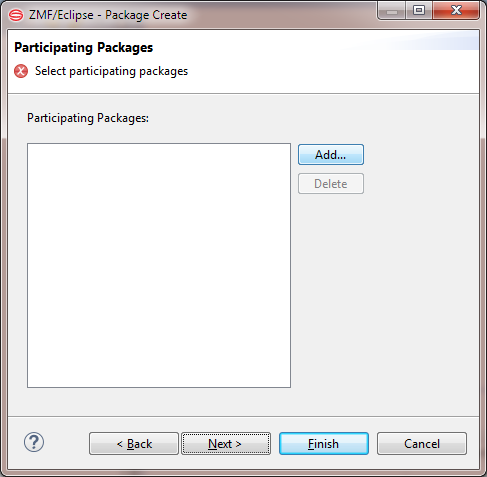
- To add a package to the list, click Add and enter a package ID when prompted.
- To delete a package from the list, select it and then click Delete.
- To change a package ID, delete the package and then add a new one.
Tip
If you do not know the package IDs of the participating packages associated with this complex or super package, you can provide this information later using the Package Properties wizard.
Click Finish to create the package. Click Back to return to the previous screens and make changes.
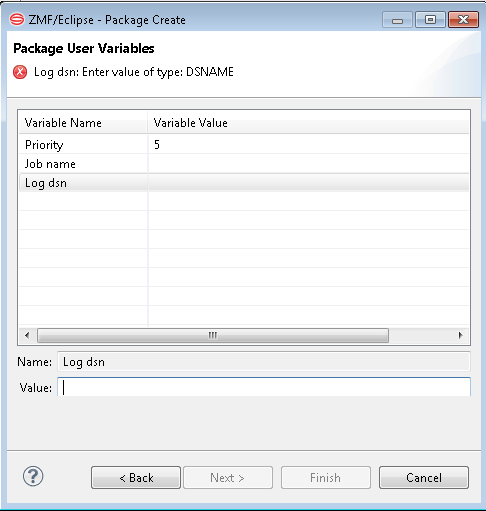
User-Defined Package Variables
The Package User Variables screen requests data entry for any customer-defined package variables. It is displayed only when you are creating a simple or participating package, and only when customer-defined variables have been enabled for client data entry in the PKGCREAT member of ZDDOPTS.
Data entry fields are pre-populated with the most recently entered values.
To update the values for this package, select a variable in the Variable Name column and then enter a value in the Variable Value column. Follow the data validation rules for these entries as specified in the PKGCREAT member.
Tip
You can update these variable values now, or provide this information later using the Package Properties wizard.
Click Next to continue, or click Back to return to the previous screens and make changes.
Site Installation Information - All Site
The All Site Information Page display requests site-specific installation information for the target ZMF site. The All Site Information Page display is displayed only if you are creating a simple or participating package for a ChangeMan ZMF instance that is configured as an All site. (ZMF for Eclipse detects the site type automatically when you connect to it.)
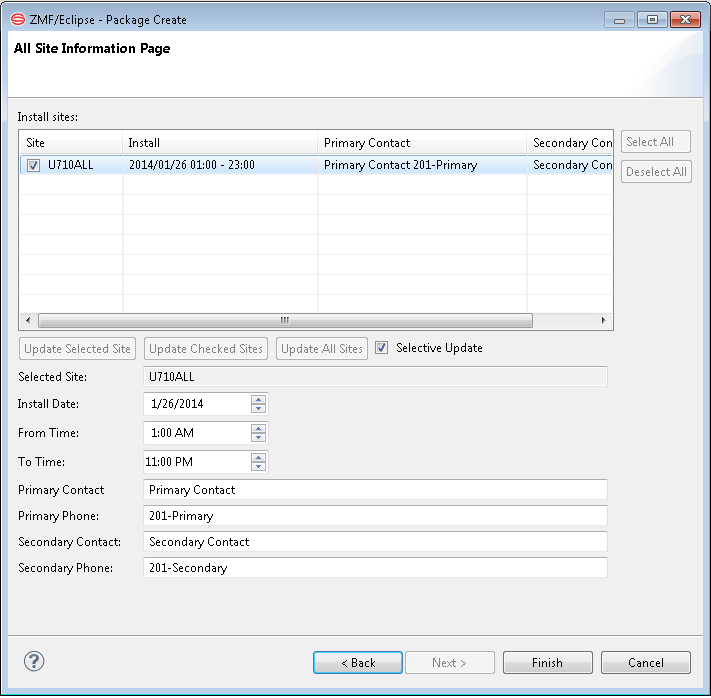
Update the site installation information in the text boxes, as described in the following table.
| Field/Box | Description |
|---|---|
| Install Date | The calendar date when the package should be installed at the site. |
| From Time | The earliest time of day at which installation is acceptable on the install date. |
| To Time | The latest time of day at which installation is acceptable on the install date. |
| Primary Contact | Enter the name of the primary person to contact if there is a problem with the installation at this site. Up to 25 characters may be entered |
| Primary Phone | Enter the telephone number of the primary contact. Up to 15 alphanumeric characters may be entered. |
| Secondary Contact | Enter the name of the secondary person to contact if there is a problem with the installation at this site. Up to 25 characters may be entered. |
| Secondary Phone | Enter the telephone number of the secondary contact. Up to 15 alphanumeric characters may be entered. |
As there is only one site for an All site, click any of the update buttons (Update Selected Site, Update Checked Sites, Update All Sites) to update the site information.
Click Back to makes changes to previous screens. Click Finish to create the package.
Site Installation Information - DP Site
The DP Site Information Page display requests site-specific installation information for one or more target installation sites managed by a ZMF DP site. The page is displayed only for simple or participating packages managed by a ChangeMan ZMF instance that is configured as a DP site.
The page uses default values if no other values are available. After you update the site information and create a package, the next package create will be initialized with the saved values for each site.
ZMF DP sites can manage package installations across multiple production sites concurrently. At least one site is required.
Note
If only one site has been defined, the Site ID field is pre-populated with that ID when a package is created. If multiple Site IDs have been defined, the Site ID field is prepopulated with the ID of the first site in the list.
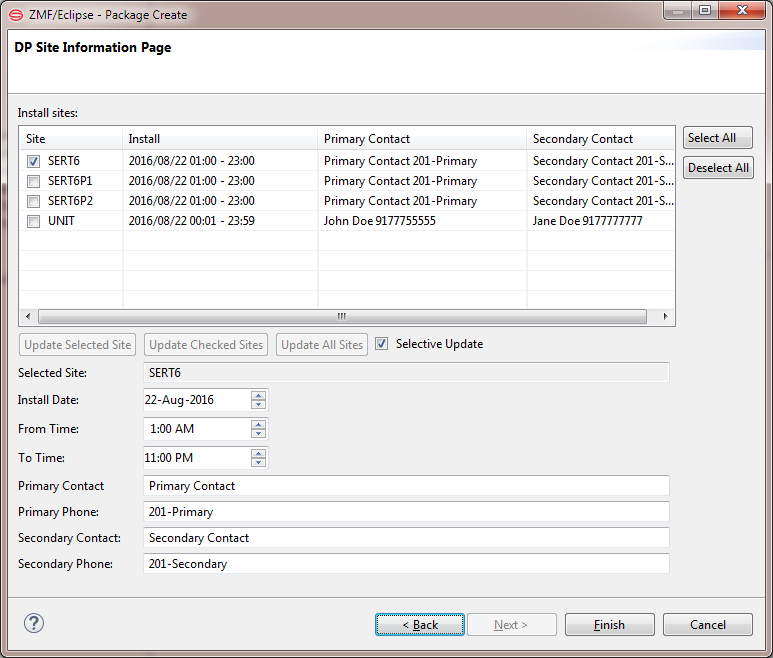
The install sites available for the package are displayed in the Install Sites window, with associated install dates and contacts for each. Update the site installation information for the sites to be associated with the package.
Update the information in the text boxes as described in the following table.
| Field/Box | Description |
|---|---|
| Install Date | The calendar date when the package will be installed at the site. |
| From Time | The earliest time of day at which installation is acceptable on the install date. |
| To Time | The latest time of day at which installation is acceptable on the install date. |
| Primary Contact | Enter the name of the primary person to contact if there is a problem with the installation at this site. Up to 25 characters may be entered |
| Primary Phone | Enter the telephone number of the primary contact. Up to 15 alphanumeric characters may be entered. |
| Secondary Contact | Enter the name of the secondary person to contact if there is a problem with the installation at this site. Up to 25 characters may be entered. |
| Secondary Phone | Enter the telephone number of the secondary contact. Up to 15 alphanumeric characters may be entered. |
The information may be updated in a variety of ways using the buttons and check boxes.
The functions of the buttons and check boxes on the DP Site Information page are:
| Button/Checkbox | Function |
|---|---|
| Select All | Selects all sites in the table. |
| Deselect All | Deselects all sites in the table. |
| Update Selected Site | Updates the selected site with information from the text fields. |
| Update Checked Sites | Updates the checked sites with information from the text fields. |
| Update All Sites | Updates all sites with information from the text fields. |
| Selective Update | When selected, only information that has been updated in a text field is applied. |
Click Back to change previous wizard screens. Click Finish to create the package.