Promoting a Package
The Promote function copies components from package staging libraries into previously defined promotion libraries. Promotion can be configured to execute additional processes to prepare promoted components for execution.
The workbench supports full promotion of all package components as a group, or selective promotion of one or more individual components within the package. The usual promotion rules defined for the application by your administrator remain in force — for example, you may be required to freeze a package before you can promote it.
Invoking Promotion and Viewing Results
To invoke the Promote function
The Promote function is invoked from the following workbench menus:
-
Serena perspective — In the Serena Explorer view, expand the ZMF Applications node, then expand the Packages node below it. Right-click on the name of the package to be promoted. When the contextual menu displays, select the Promote option near the top of the menu. See Working with ZMF Packages for more information.
-
Java perspective — In the Package Explorer view, right-click on a project that you have shared with a ZMF change package. When the contextual menu displays, open the Team submenu, then select the ZMF Promote option. See Project-Level ZMF Functions for more information.
Viewing promotion job status
Successful submission of the Promote job to ZMF does not guarantee the job will complete successfully. Job status can be viewed from the workbench as follows:
-
Serena perspective — In the Serena Explorer view, find the node for the system or site where the relevant ZMF repository resides. Expand the z/OS Jobs node under that repository. Then expand the node for the job filter associated with your user ID and/or the application to which the promoted package belongs. The promotion job will be listed by job name and the output can be viewed in a workbench editor. See Working with z/OS Jobs for more information.
-
Remote System Explorer perspective (IDz only) — In the Remote Systems navigation view (at right in the default layout), find the node for the z/OS system where the relevant ZMF repository resides. Expand the JES node under the system name, then expand the My Jobs node to see a list of job filters. Expand the node for the job filter associated with your user ID and/or the application to which the promoted package belongs. The promotion job will be listed by job name and the output can be viewed in a workbench editor. See z/OS Projects Perspective Overview for more information.
-
z/OS Projects perspective (IDz only) — In the Remote Systems navigation view (at left in the default layout), find the node for the z/OS system where the relevant ZMF repository resides. Expand the JES node under the system name, then expand the My Jobs node to see a list of job filters. Expand the node for the job filter associated with your user ID and/or the application to which the promoted package belongs. The promotion job will be listed by job name and the output can be viewed in a workbench editor. See z/OS Projects Perspective Overview for more information.
Procedure for Promoting a Package
The Promote wizard displays up to four windows, one of which is optional. The steps for promoting a package using the wizard are summarized step-by-step here. Click on a blue hyperlink to see a detailed description of each window.
-
Invoke the Promote function from the Serena Explorer view of the Serena perspective.
-
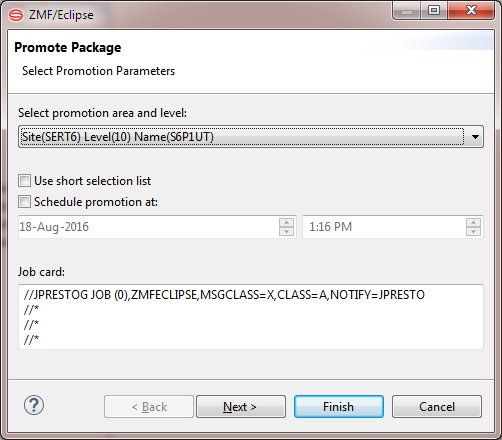
The Promote Package - Select Promotion Parameters window is the first to display. Use this screen to:
- Identify the target promotion site and level.
- Schedule a date and time to promote the package.
- Edit the JCL for the promotion job card as needed.
- If you plan to perform a selective promotion, choose here whether or not to filter the component list that will be displayed on the next screen.
- Click Next.
-
When the Promote Package - Select Promotion Type window displays, choose between a full or a selective promotion.
-
A list of package components is shown on the Select Promotion Type window immediately below the promotion type selection buttons. All package components are shown by default. However, if you checked the option to filter the component list on the first wizard window (see Step 2), only components that have not previously been copied into the target promotion area are shown.
- If you chose selective promotion in Step 3, select or deselect the components to promote using the checkboxes in the component list.
- Click Next.
-
Optionally, the Promote Package - Specify Promotion User Variables window displays customer-defined package variables for editing. This window displays only if user-defined package variables have been set up in ZMF and enabled for remote editing in the PROMOTE member of the ZDDOPTS parameter library.
-
The Promote Package - Review Promotion Overlays window is the final window displayed by the promotion wizard. It displays all components in the target promotion library that will be overlaid by components in the change package if you proceed with the promotion.
- If the components to be overlaid are those you expect, click Finish to generate the promotion job and submit it for execution.
- Otherwise, click Back to make corrections or Cancel to exit the promotion wizard.
Promotion Parameter Window
The Promote Package - Select Promotion Parameters window is the first to be displayed by the Promote Package wizard.
Selecting a Target Promotion Site and Level
Select the desired target promotion site and level from the pull-down menu. The promotion areas listed in the menu are those defined for the application in ZMF. Valid promotion targets for a package depend on the particular promotion rule defined for the application to which the package belongs. They also vary with the current promotion status of the package. In general:
-
The promotion level for a package component need not match the promotion level for the package as a whole. For example, a full promote of the entire package to level 10 may be performed successfully, but then a component may be selectively demoted to level 0 (zero), unfrozen, edited, staged back into the package, audited, refrozen, and selectively promoted back to promotion level 10.
-
Before the first package promotion (that is, when the package promotion level is zero), individual components can be selectively promoted to a level higher than that of the package. This can be useful for unit testing of components in specific execution environments.
-
After the first package promotion, components cannot be selectively promoted to a level higher than that of the package. At this stage, selective promotion is generally used after a selective demote to return a component to the package promotion level. More information on promotion sites, levels, rules, and paths can be found in the ChangeMan ZMF User’s Guide.
Scheduling a Promotion Date and Time
Select the desired date and time when you want to schedule the promotion from the dropdown lists.
Short Selection List
This checkbox controls the contents of the component list to be displayed on the next wizard screen.
-
Check this box to filter the component list. Only components that have not already been promoted to the target promotion level in their current form will be displayed. The displayed components will include newly activated components and components that have been restaged after an earlier version was promoted.
-
Leave unchecked to display all package components.
Job Card
The Job Card field at the bottom of the window displays the JCL JOB statement that will be used to run the Promote job on the mainframe. Modify it as necessary. By default, your TSO user ID is appended with an alphabetic character to create the job name. Each time this dialog displays, the last character of the default job name is incremented alphabetically.
If you change the displayed values, your changes will be saved and used as defaults the next time a job card is displayed.
The following syntax conventions apply:
- A maximum of four lines are allowed.
- Lines must begin with double slashes and may not exceed 71 characters in length.
- An asterisk in position three marks a comment.
- A blank in position three continues the JCL command from the previous line. The content of a continuation line must begin in positions 4 to 16. Parameters may not be broken across continuation lines.
Promotion Type and Component Selection Window
The Promote Package - Select Promotion Type window is the second window to be displayed by the promotion wizard.
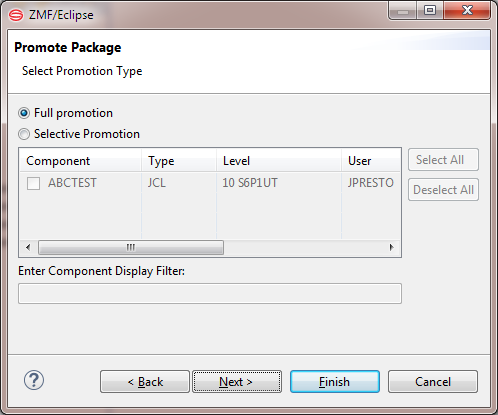
Select the type of promotion to perform:
- Full promotion (to promote the entire package as a whole)
- Select promotion elements below (to promote selected components only)
Valid promotion options depend on the current promotion status of the package. The most common situations are summarized in the table below.
| Situation | Full Promote | Selective Promote |
|---|---|---|
| First promotion of this package at this site. | Yes | Yes |
| Package was previously promoted to some non-zero level and you want to promote to a new higher level. | Yes | No |
| Package was previously promoted to a nonzero level. Target level is the same or lower than the promotion level of the whole package. | No | Yes |
Component selection list
The component selection list displays package components and their associated library types. The list may be complete or it may be filtered to show only those components eligible for promotion, depending on whether or not you checked the option to Use short selection list on the previous screen.
The checkboxes beside each component name can be selected only for a selective promotion — that is, only if you choose the option to Select promotion elements below. Use Select All and Deselect All to select or deselect components currently displayed in the list. Click the column name to sort the list. Click again to sort in the opposite order.
Check the box beside each components that you wish to promote, then click Next.
Note
If the message "No components to promote" shows in title pane of this window, all eligible package components have already been promoted to the target promotion level. Choose Full Promotion to promote the package or click Cancel to exit the wizard.
Enter Component Display Filter
For selective promotions, you can use a pattern-matching filter so that only a subset of the components appears in the selection list. For example, to see only the load components that have a type of LOD, you could enter *.LOD in the Enter Component Display Filter field.
User Variables Window
The Promote Package - Specify Promotion User Variables window displays customer-defined package variables for editing. This window displays only if user-defined package variables have been set up in ZMF and enabled for remote editing in the PROMOTE member of the ZDDOPTS parameter library.
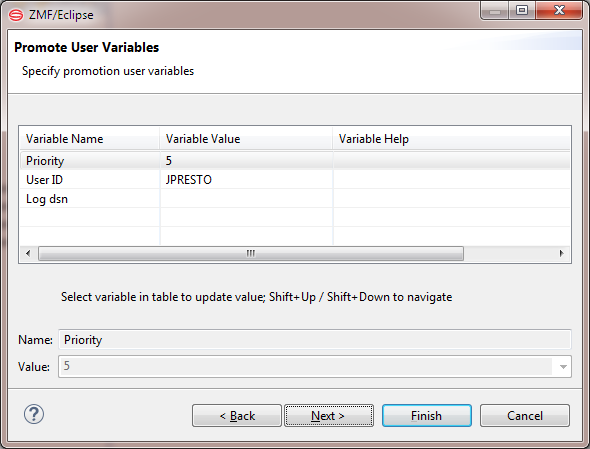
- Update the variables as needed, following the validation rules specified in the PROMOTE member of ZDDOPTS.
- Click Next.
Promotion Overlays Window
The final window displayed by the Promote Package wizard is the Promote Package window. It displays all components in the target promotion library that will be overlaid by components in the change package if you proceed with the promotion. If there are no overlays it will advise No overlays.
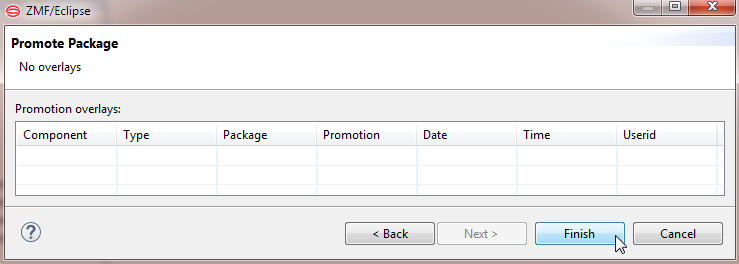
- If the components to be overlaid are those you expect, click Finish to submit the promotion job.
- Otherwise, click Back to make corrections or Cancel to exit the promotion wizard.
Displaying the Scheduled Package Promotions View
Take the following actions to display a list of scheduled promotions in the Scheduled Package Promotions view:
- On the Window Menu item, select Show View, Other and select Scheduled Package Promotions. A new tab will open, titled Scheduled Package Promotions.
- Right-click on the area withing the tab/view and select refresh. The Query Scheduled Promotions dialog appears.
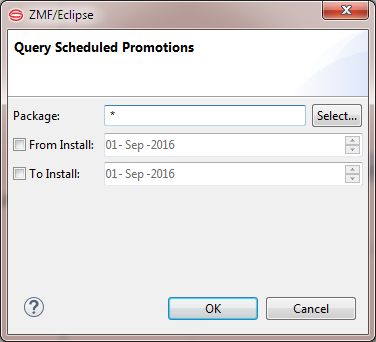
-
Specify or select a package name in the Package field. You can specify a wildcard for the package name to select all packages whose names match the wildcard specification.
-
Check the From Install box and specify a From Install date to request the scheduled package promotions from that date forward.
-
Check the To Install box and specify a To Install date to request the scheduled package promotions up to and including the specified date. Specify both a From Install and To Install date to request the scheduled package promotions within the From/To time frame.
-
Click OK.
All scheduled package promotions that match the criteria that you specify on the Query Scheduled Promotions dialog are displayed in the Scheduled Package Promotions view.
Deleting, Holding, Releasing, or Updating a Scheduled Package Promotion
Take the following actions to refresh the Scheduled Package Promotions view or delete, hold, release, or update a scheduled package promotion:
-
Right-click on a package that is listed in the Scheduled Package Promotions view. An action pop-up menu is displayed:
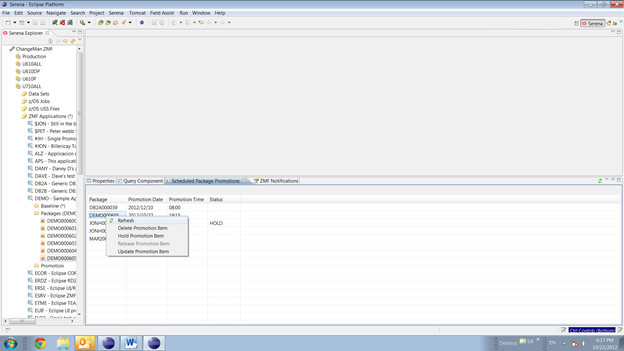
-
Select the desired action (Refresh, Delete Promotion Item, Hold Promotion Item, Release Promotions Item, or Update Promotion Item) from the pop-up menu.
Updating a scheduled package promotion
If you select the Update Promotion Item from the preceding action list, the Scheduled Promotion Update dialog appears:
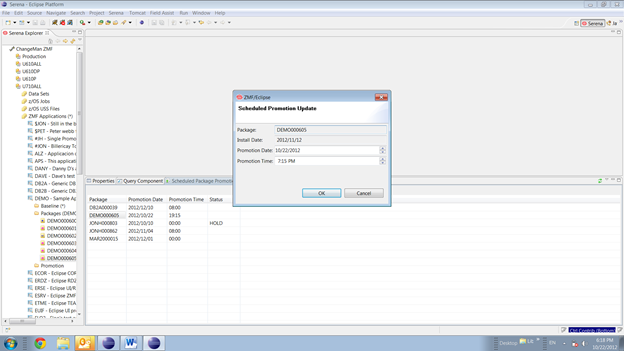
Specify the desired update to the Promotion Date and/or Promotion Time on this dialog and click OK.