Building a Component
The Build function transforms a package source component into an executable module in the same change package. Default build procedures are predefined in ChangeMan ZMF, but build parameters may be modified using the Build wizard. Multiple components may be built concurrently.
The following rules apply to the Build function:
-
The package must be in development (DEV) status.
-
The component type must be like-source.
-
The source component and component type must already exist in the package.
-
The component must not be a generated component.
-
If multiple components are being built, they must all be the same type.
-
The component may be locked or unlocked.
-
If the Auto Submit Build option in settings is checked, and history exists for a module, selecting build will submit the build process without going through all of the various selection dialogs, however if Auto Submit Build is checked, you can choose the Build (with dialog) context menu option, which then will forces the build dialog to be displayed, even though Auto Submit Build is set on.
See the ChangeMan ZMF User’s Guide for more information about the Build function.
Invoking the Build Function and Viewing Results of the Build Job
In the Serena perspective, the component Build function is invoked in two ways:
-
From the contextual menu of a package component — In the Serena Explorer navigation view of the Serena perspective, expand the ZMF Applications node, the desired application, the Packages node for that application, the desired change package, and the appropriate like-source staging library containing the component to be built. Right-click on the component to bring up its contextual menu, then select the Build option. See ZMF Operations on Package Components.
-
At checkin — The Build function can be invoked by clicking the appropriate checkbox at component Checkin. See Checking In a Component.
In the Java perspective, if a project is shared with ZMF, the component Build function can be invoked from the contextual menus for the following project objects:
-
Project contextual menu — In the Package Explorer navigation view, right-click on the desired project to bring up its contextual menu, select the Team submenu, then select Build. ZMF for Eclipse will build all like-source components in the project.
-
Folder contextual menu — In the Package Explorer navigation view, expand the desired project and right-click on the desired folder to bring up its contextual menu. Select the Team submenu, then select Build. ZMF for Eclipse will build all like-source components in the folder.
-
Component contextual menu — In the Package Explorer navigation view, expand the desired project and folder, then select one or more like-source components to build. Right-click on the selection to bring up its contextual menu, select the Team submenu, then select Build. ZMF for Eclipse will build the selected components.
See ZMF Functions in the Package Explorer for more information on ZMF functions in the Java perspective.
Viewing Build Job Results
The results of the Build job can be viewed in the Serena perspective of the workbench. In the Serena Explorer navigation view, find the ZMF server where the build job was executed and expand its z/OS Jobs node. Under the appropriate job viewing filter, look for the job identified with the job name supplied on your Build JOB statement.
See Working with z/OS Jobs for more information on viewing the output of your job.
Build Wizard Windows
The Build wizard displays three windows. These windows display default build parameters and allow you to modify them if desired.
Defaults in the editable wizard fields are populated differently, depending on how many components have been selected for the build job:
- One component — Displayed defaults are populated from the component build history, if it exists. Otherwise, the defaults defined for the source language in ZMF are shown.
- Multiple components — Displayed defaults are those defined for the source language in ZMF. These defaults are automatically overridden at execution time by the most recently used build parameters in each selected component’s build history.
Important
If you change any displayed defaults, your entries will be used to build all selected components, regardless of predefined build defaults for the source language or actual component build history.
-
When you invoke the Build function from a component contextual menu, the first of two Build Component - Enter/Verify Build Parameters windows displays.
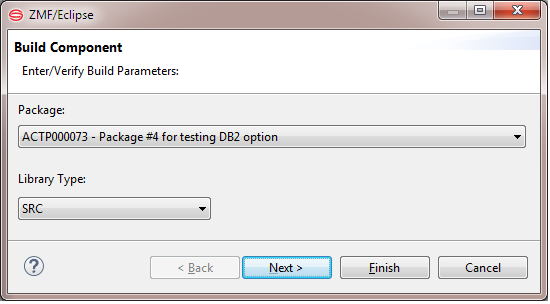
Edit the default entries as needed, and then click Next.
-
Package - Supply the package ID where the selected like-source component(s) reside after checkin or checkout, and where the executable module(s) resulting from the build will be stored. By default, the package shown is that associated in ZMF for Eclipse with the most recent checkout or checkin of the component(s) listed in the Component(s) field. If the named component(s) should be built in a different package, select the desired package from the drop-down list.
-
Library Type - Lists the Library Type. Verify that the selection is correct.
-
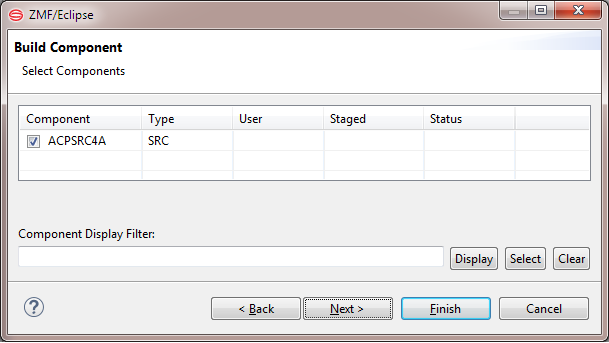
Components - Lists the selected component(s) to be built. Verify that the selection is correct.
-
Job Statement - Displays the JCL JOB statement that will be used to run the Build job on the mainframe. Modify it as necessary. By default, your TSO user ID is appended with an alphabetic character to create the job name. Each time this dialog displays, the last character of the default job name is incremented alphabetically.
If you change the displayed values, your changes will be reused as defaults the next time a job card is displayed. The following syntax conventions apply:
- A maximum of four lines are allowed.
- Lines start with double slashes and may not exceed 71 bytes in length.
- An asterisk in position three marks a comment.
- A blank in position three continues the JCL command from the previous line. The content of a continuation line must begin in positions 4 to 16. Parameters may not span lines.
-
-
The Build wizard displays the second of two Build Component - Enter/Verify Build Parameters windows.
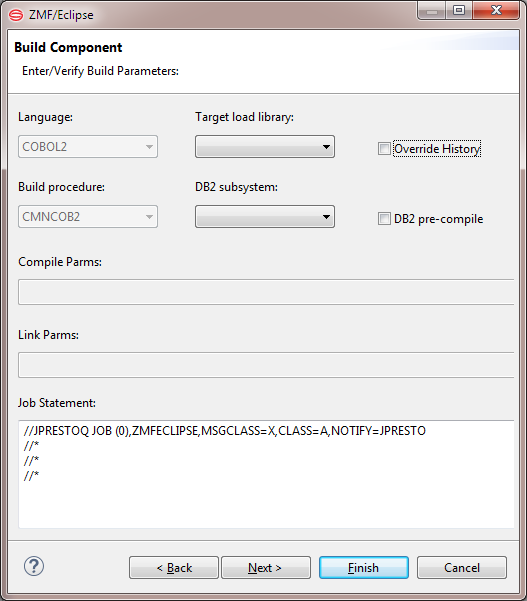
Edit the fields as needed. When ready, click Next.
-
Language - Select a source code language from the drop-down list.
-
Target load library - Select a target from the drop-down list.
-
Override History - Unless this is checked, you can’t adjust the three fields, Language, Target load library and Build procedure.
-
Build Procedure - Select a build procedure from the drop-down list. Procedures shown are those defined for the selected language in ZMF.
Note
If a designated build procedure has been defined for a component in ZMF, it will be used for that component even if a different procedure is selected in this field for the component selection as a whole.
-
DB2 Subsystem - If the component(s) being built access a DB2 relational database, select the appropriate DB2 subsystem from the drop-down list. A value is required if you select the DB2 Pre-compile option immediately below this field.
-
DB2 Pre-compile - If the component(s) being built access a DB2 relational database, check this box to include a DB2 pre-compile step in the build. If this box is checked, a value is also required in the DB2 Subsystem field.
-
Compile Parms - This 34-byte field displays a comma-separated list of compile parameters. These parameter values are used only if a value is not already set elsewhere by the following:
- System defaults for the compiler
- Hard-coded options in designated compile procedures
- User-defined compile options set by file tailoring
For more information about compile parameters, see the ChangeMan ZMF User’s Guide.
-
Link Parms - This 34-byte field displays a comma-separated list of link parameters. These parameter values are used only if a value is not already set elsewhere by the following:
- System defaults for the compiler
- Hard-coded options in designated compile procedures
- User-defined compile options set by file tailoring
For more information about compile parameters, see the ChangeMan ZMF User’s Guide.
-
Job Statement - Displays the JCL JOB statement that will be used to run the Recompile job on the mainframe. Modify it as necessary. By default, your TSO user ID is appended with an alphabetic character to create the job name. The last character of the default job name is incremented alphabetically each time a job card displays. If you change the displayed values, your changes are used as defaults. The following syntax conventions apply:
- A maximum of four lines are allowed.
- Lines must begin with double slashes and may not exceed 71 characters in length.
- An asterisk in position three marks a comment.
- A blank in position three continues the JCL command from the previous line. The content of a continuation line must begin in positions 4 to 16. Parameters may not be broken across continuation lines.
-
-
The final window displayed by the Build wizard requests values for user-defined build parameters defined by your ZMF administrator. These options are used in JCL file tailoring for the build process.
The display defaults are those in effect for the language used by the selected source components. The labels displayed for each user-defined option are configured in the BUILD member of the ZDDOPTS configuration library.
Only options with a status of Editable="Y" can be changed in this window. The example screen below shows some common user-defined options, but those used at your site with vary.

-
Make any desired changes, then click Finish to submit the Build job for execution.