z/OS Data Set Library Functions
The functions available for data set libraries differ from those for individual data set members. Contextual menus for libraries and members differ accordingly. The current properties of a selected object also affect the contents of a contextual menu.
Right-click on a data set name to bring up the data set library contextual menu. For example:
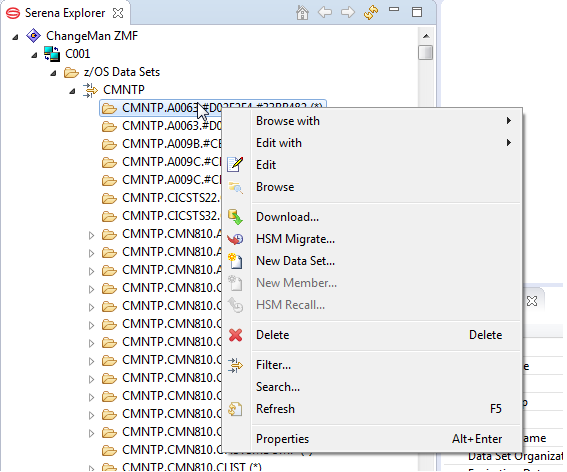
ZMF Functions for z/OS Data Sets
The following mainframe functions are available in the workbench for data sets as a whole (the first 4 are only available for sequential datasets):
-
Browse with - gives you a dialog to choose what tool to use to browse
-
Edit with - gives you a dialog to choose what tool to use to edit
-
Edit - invoke the default text editor to edit
-
Browse - invoke the default text editor to browse
-
Filter
For functions that apply to individual data set members, see Working with z/OS Data Set Members
Tip
The order of data set names is different to that seen in ISPF due to the differences between EBCDIC and ASCII sort orders.
If the data set you’re looking for is not shown, you may need to modify or create a data set viewing filter. See Filtering z/OS Data Sets.
Refreshing a Data Set
The Refresh option on the contextual menu for a z/OS data set refreshes the list of members in the data set based on the current members present in the dataset
Allocating a New Data Set
The New Data Set option on the contextual menu for a z/OS data set brings up the Allocate Data Set dialog:

If you right-clicked on the name of a data set or data set that resides on an Extended Attribute Volume (EAV) to bring up the z/OS Data Set contextual menu, the fields of the Allocate Data Set dialog are initially populated with the saved preference values for the attributes. Fields of the Allocate Data Set dialog are:
- Data Set Name
- Data Set Type
- Record Format
- Record Length
- Block Size
- Data Class
- Storage Class
- Management
- Space Units
- Primary Quantity
- Secondary Quantity
- Directory Blocks
- Generic Unit
- Volume Serial
- Extended Attributes
Fill in/overtype the values for these fields as appropriate for the data set that you are allocating and click OK to allocate the data set. Your userid must have the required authority to create the dataset requested, otherwise you will see an error message at the top of the Allocate Dataset window:
SER9008E Unauthorized access (ALTER): datasetname
Note
This function enables you to set extended attribute values for a data set that resides on an EAV.
Creating a New Data Set Member
You can create a new partitioned data set (PDS) member on the mainframe using the New Member function. To do this, perform the following steps.
-
From the parent data set’s contextual menu, select the New Member option.
-
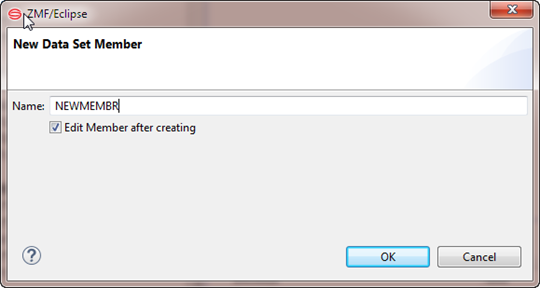
When the New Data Set Member window displays, enter:
-
Name - Type a member name of 8 characters or less in length, the case is folded to upper case.
-
Edit member after creating - Check this box to open the PDS member in a workbench editor after the member is created.
-
-
Click OK. If the name you choose already exists, the error
Name already existswill appear in the heading panel of this window.
Note
The new data set member is not a component in a ChangeMan ZMF repository. To add the member to a ZMF repository, use Checkin to check it in to a change package. See Checking In and Building a Data Set Member.
Deleting a Data Set
The Delete option on the contextual menu for a data set deletes the selected z/OS data set on the host. As an alternative, you may press the Delete key to delete a data set.
A dialog box asks the user to "Confirm Data Set delete" before executing the request. Click OK to proceed with deletion, or Cancel to leave alone.
Downloading a Data Set
The Download option on the contextual menu for a data set copies all data set members as separate files to any directory you select.
To download the members from a data set:
-
Select the Download option from the contextual menu for the data set library to be downloaded.
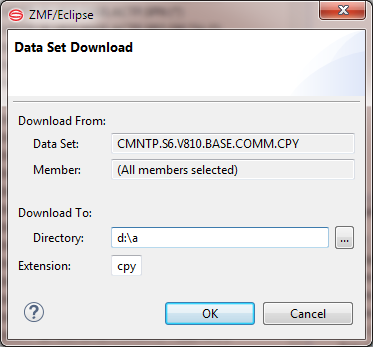
The Data Set Download window displays.
-
The Download From section of the Data Set Download window is already populated and cannot be changed. Verify that this information is correct.
-
In the Download To section of the Data Set Download window, supply the desired target desktop directory information for the download.
-
Directory — Supply the path to the target directory for the download. Click the ellipsis () button at right to navigate to another target directory.
-
Extension — Type the filename extension that will be appended to all member file names created on the PC during the download. This is not limited to three characters, and case is as-is.
By default, the Extension text box shows the Windows file extension defined for the selected z/OS data set library type by library-to-file-type mapping parameters in the ZDDOPTS configuration library of ChangeMan ZMF. To override the default mapping, type a desired file extension in this field.
-
-
Click OK.
-
A progress bar displays in the bottom right corner of the window while data set members are downloading. If desired, the user can do the following:
- Click the icon in the corner (hover the mouse and it will say "Shows background operations in Progress view") to observer progress as the download completes in the background.
- Click the red box (hover the mouse and it will say "Cancel Operation") at the right of the progress bar to stop the download.
-
On completion, the progress bar will disappear.
Migrating a Data Set Offline
After working with a data set, you may want to archive it offline to a Hierarchical Storage Management (HSM) system such as a tape library, rather than delete it. The HSM Migrate function lets you do this. The offline copy can be retrieved if needed.
To migrate a data set offline:
-
Select HSM Migrate from the contextual menu for the data set to be migrated.
-
When the confirmation dialog (Are you sure you want to migrate dsname) displays, verify that the data set name is correct.
-
Click OK to proceed with the migration.
or
-
Cancel to exit without migrating the data set.
-
A dialog notifies you when data set migration is initiated with a return code, reason code, and a message SER4133I HMIGRATE issued for datasetname. Click OK.
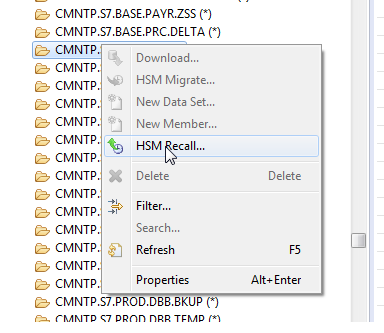
Recalling a Migrated Data Set
Data Sets that are unused for a long period are often archived automatically to an offline Hierarchical Storage Management (HSM) system such as a tape library. ZMF for Eclipse, provides an option to recall such data sets from HSM storage to online storage.
Recalling a migrated data set can take several minutes even with an automated HSM system. If manual intervention is required, the recall process takes longer. ZMF for Eclipse allows you to keep working on other things while the recall is processed in the background.
To recall a migrated data set to online storage, perform the following steps.
-
Select HSM Recall from the contextual menu for the data set to be recalled.
-
When the confirmation dialog displays, verify that the data set name is correct. If the dataset is on tape (ML2) the context menu will say "HSM Recall from Tape."
-
Click OK to proceed with the recall. If the dataset is on ML2 (i.e., on Tape) it will also warn that migrated to Tape and may take extended time to recall
-
Click Cancel to exit without recalling the data set.
-
A dialog notifies you the data set recall request(s) was submitted. Click OK.
Searching
The Search facility enables you to search for the following ZMF-searchable objects:
- Data sets
- Data set members
- Data set filters
- zFS filters
- zFS files
- zFS folders
- Baseline data sets
- Staging data sets
You can search any of these objects for any character string. You can further specify:
- Whether the search is case sensitive.
- The record positions to examine for the string.
- Two strings with a boolean OR or AND relationship.
To request a search:
-
Right-click on the desired object in the Serena Explorer perspective. (A data set is chosen in this example.)
-
Select Search from the pop-up menu. The Search dialog appears.
If data sets are migrated you will see a dialog that asks if you want to recall and process the data set (Yes), Skip it (No), or Cancel to stop the operation at that point. Results found to that point will be displayed if you click cancel. You can observe progress either in the window or you can send it to background and view in the progress pane if you have it open. You can click on the icon at the bottom right similar to the download process.
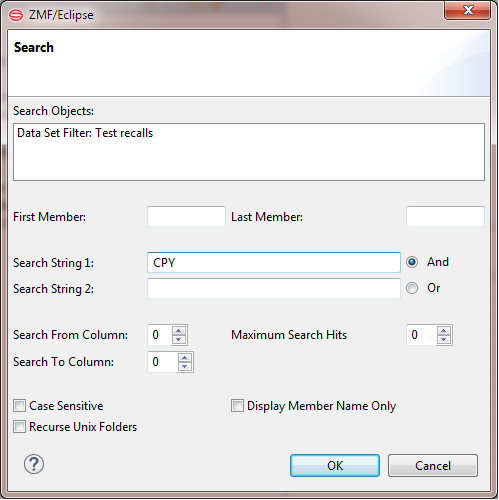
Fields on the Search dialog are:
First Member/Last Member
Type the First Member name and Last Member name to specify a range of members to search.
- To search all members, leave the First Member and Last Member fields blank.
- To search a single member, type its name in the First Member field. Leave the Last Member field blank.
- To limit the search to members that match a pattern, type a pattern (such as ABC*) in the First Member field. ChangeMan ZMF for Eclipse ignores the Last Member field value.
- You can type a range, such as MEMBERA for the First Member and MEMBERZ for the Last Member even if the members do not exist in the data set. All members that fall within the specified name range will be searched.
Search String 1/Search String 2
Type the string or strings to search for. Do not enclose a string containing embedded blanks or nonalphabetic characters in single quotes. Enclose a string that contains leading or trailing blanks in single quotes.
And/Or
If you specify a value for Search String 2, specify if you want Search String 1 and Search String 2 to be logically ANDed or ORed.
Search From Column/Search To Column
Type the starting (From) and ending (To) column positions to search in each record. Type 7 for column 7, 36 for column 36, and so on. Type 0 in the From and To Column fields to search all positions in the record.
Maximum Search Hits
Type the number of output records to display:
- 0 Display all records that match the search criteria.
- n Display up to n records that have been retrieved.
This value determines the number of target records that are included in the displayed output. (It does not limit the number of record hits that search retrieves.)
Case Sensitive
Check this box to search for a string exactly as you typed it. Leave the box unchecked to find all occurrences of a string, whether in upper, lower, or mixed case.
Display Member Name Only
Check this box to display only the name of a member where a hit occurs. Leave the box unchecked to display the names of the members and the data that meet the search criteria.
Recurse Unix Folders
Search the current folder and its subfolders for the specified search string.
Search View Results
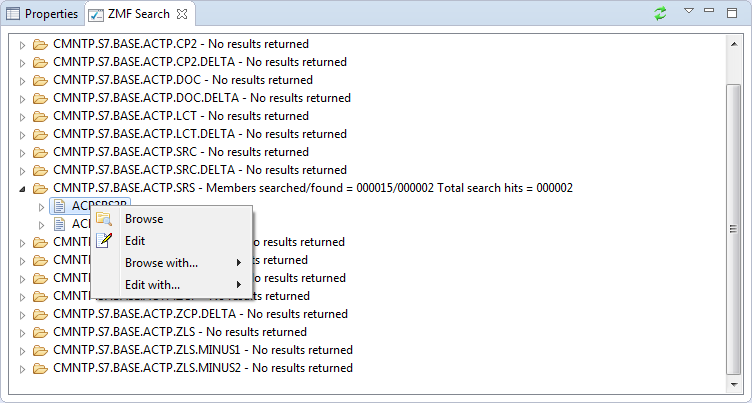
Results of the search are displayed. You can right-click on a member of file that is listed in the display to bring up a Browse/Edit menu:
- Select Browse or Browse with... to browse the selected member or file.
- Select Edit or Edit with... to edit the selected member or file.