Working with the Serena Perspective
You can customize the Serena perspective as needed to suit your personal preferences and to rearrange your tools as you move from project to project or task to task. You should become familiar with the following workbench essentials.
- Opening the Serena Perspective
- Switching Between Perspectives
- Showing the Serena Explorer View
- Hiding the Serena Explorer View
- Filtering Views in Serena Explorer
- Opening ZMF Table Views
Opening the Serena Perspective
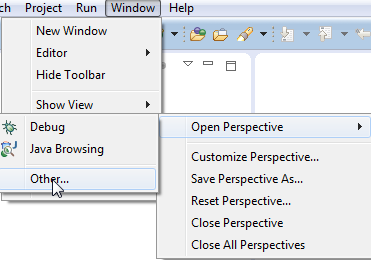
To open the Serena perspective in the workbench, perform the following steps.
-
From the workbench Window menu, select Perspective | Open Perspective | Other
-
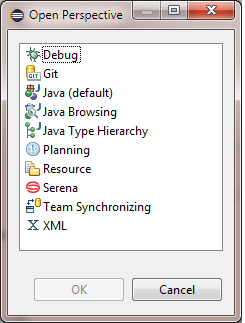
When the Open Perspective dialog appears listing the "other" perspective choices, select the Serena perspective.
-
Click OK. The Serena perspective displays, showing the Serena Explorer navigation view.
Switching Between Perspectives
Switch between multiple open perspectives in the workbench by clicking on a perspective button in the upper right of the workbench window.
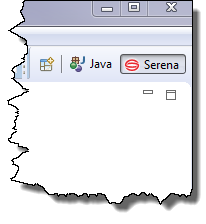
- Switch to the Serena perspective from other perspectives by clicking on the Serena button in the upper right of the workbench window.
- Switch to the Java perspective from the Serena perspective or elsewhere by clicking on the Java button.
In IDz only:
- Switch to the IDz Remote System Explorer perspective from the Serena perspective or elsewhere by clicking on the Remote System Explorer button.
- Switch to the IDz z/OS Projects perspective from the Serena perspective or elsewhere by clicking on the z/OS Projects button.
Showing the Serena Explorer View
Within the Serena perspective, you can show or hide the Serena Explorer as needed to navigate among resources or to free screen space to work with one or more files.
To show the Serena Explorer view in any perspective where it is not displayed:
-
Select the area of the workbench where you want to display the Serena Explorer.
-
From the workbench Window menu, select Show View | Other.
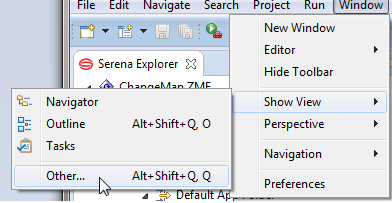
-
When the Show View window displays, open the Serena folder and select Serena Explorer, then click OK.
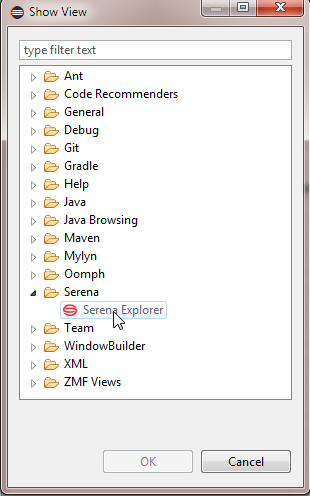
-
The Serena Explorer navigation view opens in the workbench window with the ChangeMan ZMF node collapsed. Click on the triangle to the left of this node to expand it and view available ZMF server connections.

Hiding the Serena Explorer View
To hide the Serena Explorer view, click the Close button  in the upper right of the Serena Explorer tab.
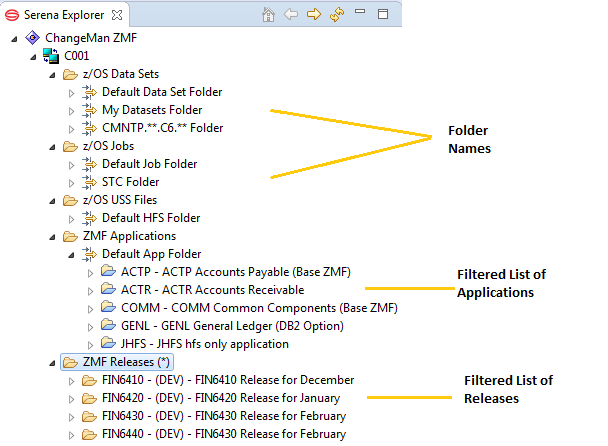
Filtering Views in Serena Explorer
All resources shown in the Serena Explorer view are filtered via the use of folders. The default folders show all resources of a given type associated with your TSO user ID on the mainframe. Additional folders may be created, deleted, or modified at any time in ZMF for Eclipse.
For z/OS data sets, z/OS jobs, and z/OS File System (zFS) libraries, each filtered navigation view is represented as a directory node under the resource type. Expand a folder, then expand a filter node to access the libraries or jobs that meet the filter criteria. The same library or job may appear in multiple filter views.
For ZMF applications, multiple folders may be defined at a time, and each folder can have a filter applied. Expand a folder, then an application node to access the baseline libraries, change packages, and promotion libraries that you are authorized to work with.
For ZMF Releases, only one filter may be defined at a time, so the filtered releases are listed directly under the ZMF Releases node. Only one filter is active, so no filter nodes appear under the ZMF Releases node in Serena Explorer rather the current active filter which appears after the Label, for example ZMF Releases (F*).
For example:
Create, delete, or modify filters from the contextual menu of the relevant folder. See the following topics for step-by-step instructions:
- Filtering z/OS Data Sets
- Filtering z/OS Unix zFS Files
- Filtering z/OS Jobs
- Filtering ZMF Applications
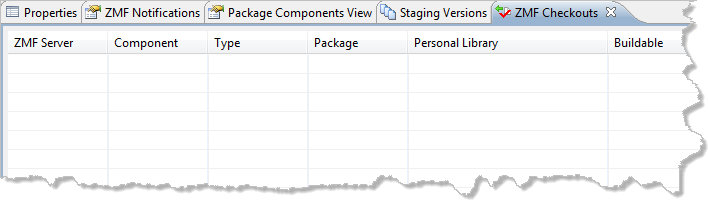
Opening ZMF Table Views
ZMF for Eclipse provides a number of ZMF-specific, tabbed table views for the compact display of repository information. Many of these are shown automatically in the Serena perspective when you invoke a function from a contextual menu. But any of them can be requested on demand. Some, like the ZMF Notifications view, are frequently kept open at all times.
ZMF table views can be opened in any perspective.
To display one or more ZMF table views in the Serena perspective, perform the following steps.
-
Switch to the Serena perspective.
-
From the workbench Window menu, select Show View | Other.
-
When the Show View dialog box displays, type "ZMF" in the filter text box or scroll to the bottom of the view navigation tree to locate the ZMF Views folder.
-
Expand the ZMF Views node in the tree. A list of ZMF table views is shown below it.
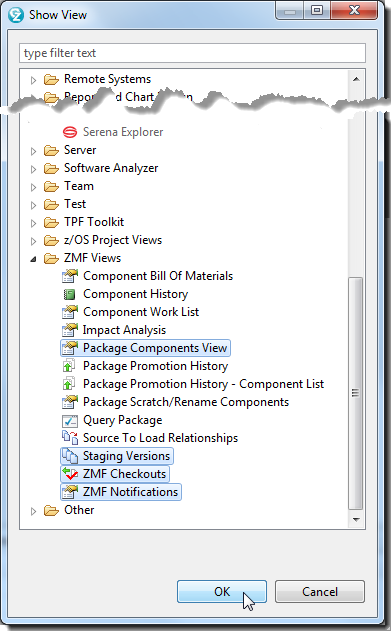
-
Select one or more ZMF table views as desired, then click OK.
-
The selected table views display together, each with its own tab, in the lower right pane of the perspective. No data will be displayed at this time.