Working with the Java Perspective
Opening the Java Perspective Switching Between Perspectives Enabling ZMF Functions in the Team Menu
Java Perspective Overview
The default Java perspective in Eclipse and IDz displays the Package Explorer view in the left pane, one or more tabbed editor windows in the upper right pane, and various utility views in the pane at the lower right. The active view is highlighted.
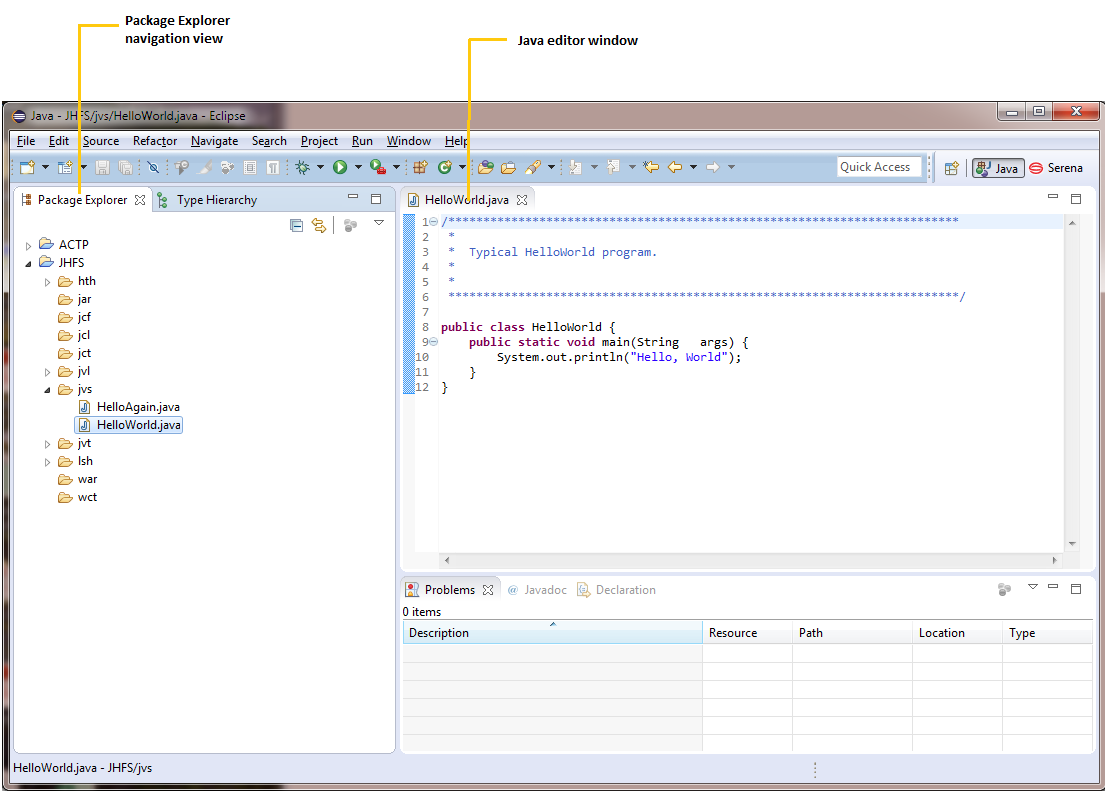
The Package Explorer Navigation View
The main view in the Java perspective is the Package Explorer navigation view. The Package Explorer view provides hierarchical navigation among Java projects and development resources in the desktop workspace.
- Expand or collapse a node in the hierarchy by clicking on its plus or minus symbols.
- Open the contextual menu for a resource by right-clicking on its name.
- Perform actions on a resource by choosing commands from its contextual menu.
Working with the Java Perspective
The Java perspective is native feature of the Eclipse workbench and is not described in detail here. However, you should become familiar with the following essentials.
Switching Between Perspectives
Enabling ZMF Functions in the Team Menu
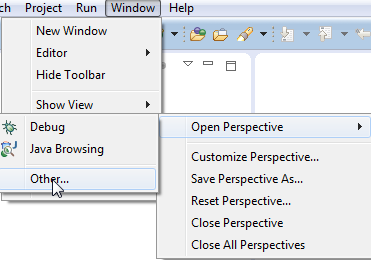
Opening the Java Perspective
To open the Java perspective in the workbench, perform the following steps.
-
From the workbench Window menu, select Open Perspective | Other.
-
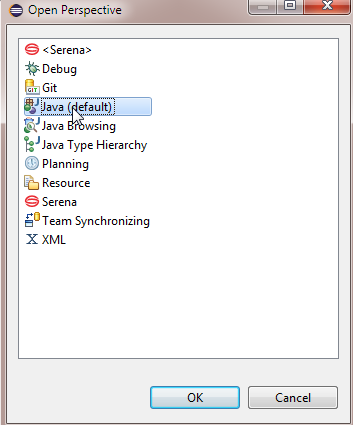
When the Open Perspective dialog appears listing the "other" perspective choices, select the Java perspective.
-
Click OK. The Java perspective displays, showing the Package navigation view.
Switching Between Perspectives
Switch between multiple open perspectives in the workbench by clicking on a perspective button in the upper right of the workbench window.
- Switch to the Java perspective from other perspectives by clicking on the Java button in the upper right of the workbench window.

- Switch to the Serena perspective from the Java perspective or elsewhere by clicking on the Serena button.
In IDz only
- Switch to the IDz z/OS Projects perspective from the Java perspective or elsewhere by clicking on the z/OS Projects button.
- Switch to the IDz Remote System Explorer perspective from the Java perspective or elsewhere by clicking on the Remote System Explorer button.
Enabling ZMF Functions in the Team Menu
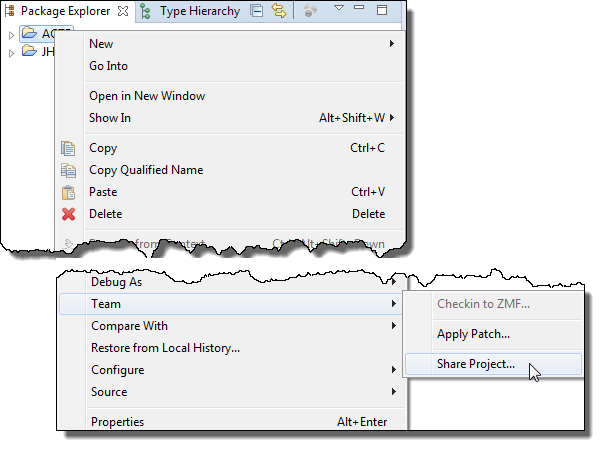
Java projects must be shared with a ChangeMan ZMF repository through the Team menu of the Package Explorer before you can access ZMF repository functions from the Java perspective.
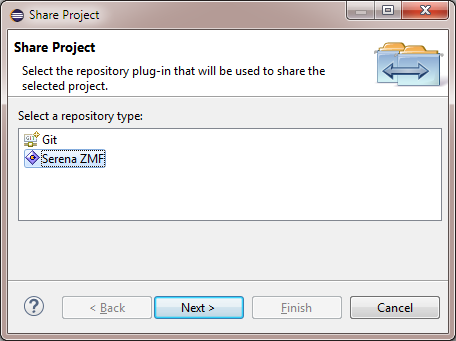
To share a project with ZMF
-
In the Package Explorer view, right-click on the project you want to share with ZMF. Then in its contextual menu, select Team | Share Project.
-
When prompted to choose a repository type, select Serena ZMF and click Next.
-
When prompted to select a particular ZMF server and application, enter the following:
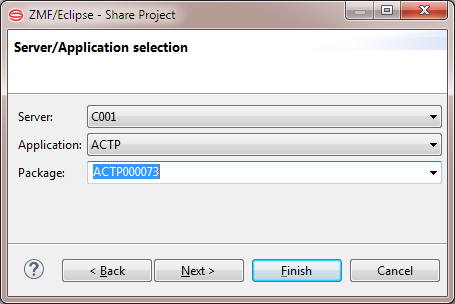
- Server — Select the desired ZMF repository (or site) from the drop-down list.
- Application — Select the ZMF application associated with your project.
- Package — Select the ZMF change package associated with your project (optional). If a package is not selected now, you will be prompted to select one at checkin.
Note
Be sure the application you select allows checkin from a personal development library. If it does not, you will not be able to check in your code later.
-
Optionally, click Next to verify the mappings between the project folder names used in your Eclipse project and the library types defined in the ZMF repository.
Important
Folder-to-library mappings can not be changed from the client. However, you can verify that the folder names in your Eclipse project are those that ZMF expects. This is necessary for the correct operation of Checkin and Checkout.
-
Click Finish to enable sharing.