Editing Files Using ChangeMan Edit
The ChangeMan Edit utility is included with ChangeMan ZDD and supports path names that exceed 259 characters in length if you are using Windows Vista or Windows 7.
Overview
ChangeMan Edit is a context-sensitive editor that supports several programming languages and file types. The following standard templates define settings specific to each language or file type:
-
ANSI C Source File
-
ANSI C Fortran
-
ANSI C Pascal
-
CL Code
-
COBOL
-
General Make File
-
Help
-
HTML Source File
-
Java Source File
-
MS C++ Source File
-
MS Visual Basic
- Simple Text
You can modify the standard templates, or create your own custom templates.
You can edit the following types of data using ChangeMan Edit:
-
Any text-based file on your local computer
-
Mainframe data that you access through ChangeMan ZDD:
-
Sequential data sets
-
Partitioned data set members
-
Unix files (text-based)
-
ChangeMan components (text-based)
-
JES spool data sets
ChangeMan Edit does not create temporary (intermediate) or backup files, so you are not required to change any settings to use it with ChangeMan ZDD. Some other text editors require setting changes to prevent temporary and backup files from being created.
Invoking the Editor
If ChangeMan Edit is your default editor, right-click any file in Windows Explorer and choose ZDD Network -> Edit from the popup menu. Otherwise, choose All Programs -> ChangeMan ZDD -> ZDD Edit from the Windows Start menu. The ChangeMan Edit window displays.

If the file you are attempting to edit has been migrated, the following message displays:
An unknown error occurred while accessing <file name>.
To recall the data set, right-click the file and choose ZDD Network -> Recall Data Set from the popup menu.
You can customize some components of the display window by selecting or deselecting options on the View menu. In the above example, the code window is bordered by a ruler bar on top and a line number bar to the left.
Using the Navigation Bar
The following screen shot shows the navigation bar, which can be displayed on the left side of the ChangeMan Edit window. You can show or hide the navigation bar by selecting Navigation Bar on the View menu.
The navigation bar includes the following components:
-
Filter box
-
Toolbar
-
File list
-
Folder tree
Filter Box
The filter box is displayed on the top left side of the navigation bar:

The filter box allows you to filter the list of files displayed using a pattern string with wild characters. The pattern can contain include multiple names, separated by semicolons. For example: “*.txt;*.src”.
Toolbar
The toolbar is displayed at the top of the navigation bar, next to the filter box:

The toolbar contains buttons to perform the following operations:
-
Refresh – Refresh file list
-
Parent folder – Go up to parent folder
-
Open – Open a file or folder
-
New folder – Create a new folder
-
Delete – Delete a file
-
Rename – Rename a file or folder
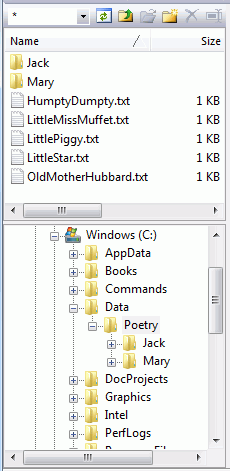
File List
The top half of the navigation pane contains a file list. You can double click on a file to open it in the editor. Double clicking on a folder will open the folder in the navigation bar. You can also right click on files in the file list to perform the operations listed in the Toolbar section.
Folder Tree
The bottom half of the navigation pane contains a folder tree. The folder tree allows you to navigate between folders. Selecting a folder in the folder tree displays that folder in the file list.
Modifying a File
You can use ChangeMan Edit to modify files in the same way you edit text in most Windows-based word processing or development utilities.
Use the scroll bars to the right and bottom of the code window to scroll the editable area of the window.
Use the mouse or keyboard to position the insertion point on a line of code.
To use the mouse, scroll the editable area using the scroll bars, position the cursor, then click the left mouse button.
If you use the keyboard to position the insertion point, ChangeMan Edit automatically scrolls the editable area to ensure that the new insertion point is always visible.
The current cursor position is always shown on the ruler bar and line number bar.
The following is a list of keyboard navigation commands available for a file opened in ChangeMan Edit.
| Press… | To Move… |
|---|---|
| Ctrl + Right arrow | One word to the right. |
| Ctrl + Left arrow | One word to the left. |
| Left arrow | One character to the left |
| Right arrow | One character to the right |
| Up arrow | To the previous line |
| Down arrow | To the next line |
| Ctrl + Home | To the start of the file |
| Ctrl + End | To the end of the file |
| Alt + Home | To top f window |
| Alt + End | To bottom of window |
| Home | To the start of the current line |
| End | To the end of the current line |
| Page Up | To the previous page |
| Page Down | To the next page |
| Ctrl + Page Up | Half screen width to the left |
| Ctrl + Page Down | Half screen width to the right |
| Ctrl + Up arrow | Scroll up one line |
| Ctrl + Down arrow | Scroll down one line |
| Ctrl + Right arrow | One word to the right. |
| Ctrl + Left arrow | One word to the left. |
| Tab | Next tab stop |
| Shift + Tab | Previous tab stop |
...
Once you have identified the point at which you want to begin editing, and you have set the insertion point, a flashing cursor is displayed.
When editing more than one character you must identify a selection.
-
To create a selection, place the insertion point at the start of the selection, hold the mouse button down, and drag the insertion point to the end of the selection.
-
To remove an existing selection, click anywhere in the editable area, or press one of the arrow keys.
-
To extend or restrict an existing selection, move the insertion point using either the mouse or keyboard while keeping the Shift key pressed.
Selecting Text
A selection is a marked region of text. There are three types of selections:
-
Character selection: Any range of continuous text.
-
Line selection: Group of full lines
-
Block selection: Block of text within a range of columns
There is a selection indicator, located in the status bar along the bottom of the editor window that displays the type of selection. This indicator will display None, Char, Line, or Block, allowing you to see which type of selection that you have made.
Character selection
Character selections are used to select any contiguous range of text. The character selection includes all text between the starting location and an ending location, and may be include parts of lines, as well as full lines.
You can create a character selection using any of the following methods:
-
Click the left mouse button and drag.
-
Press Ctrl+K to start the selection, and then use the arrow keys to extend the selection. Press Ctrl+K again to end the selection.
-
Press the Shift key with any cursor movement keys, such as the arrow keys, Page Up, Page Down, Home, End, etc.
You can select words of text as follows:
-
Press Ctrl+W to select the word at the cursor location.
-
Double click on the word with the left mouse button.
Line Selections
A line selection is used to select a range of complete lines.
Line selections are treated differently than character selections. A line selection is always inserted before or after another line, and never inserted into the middle of another line. When performing operations on complete lines, line selections are faster and easier to use than character selections.
You can create a line selection using any of the following methods:
-
Triple-click on a line with the left mouse button. You can then hold the left mouse button down and drag to select multiple lines.
-
Click on a line number in the line number bar on the left side of the window with the left mouse button. You can hold the left mouse button down and drag to select multiple lines.
-
Press Ctrl+L to start the selection, and then use the arrow keys to extend the selection. Press Ctrl+L again to end the selection.
-
Press Ctrl+A (or Select All from the Edit menu) to select the entire file. This is treated as a line selection.
Block Selections
A block selection is used to select a block of text within a range of columns. The block may consist of segments from multiple lines.
You can create a block selection using any of the following methods:
-
Right-click the using the mouse the mouse and drag.
-
Press Ctrl+B to start the selection, and then use the arrow keys to extend the selection. Press Ctrl+B again to end the selection.
Moving and Copying Text
This section describes how to move, copy, and paste text.
Moving a Selection to a New Location Using Commands
| Step | Action |
|---|---|
| 1 | Make a selection. |
| 2 | Click Cut or choose Cut from the Edit menu. |
| 3 | Bring the insertion point to a new location. |
| 4 | Click Paste or choose Paste from the Edit menu. |
...
Copying a Selection to a New Location Using Commands
| Step | Action |
|---|---|
| 1 | Make a selection. |
| 2 | Click Copy or choose Copy from the Edit menu. |
| 3 | Bring the insertion point to a new location. |
| 4 | Click Paste or choose Paste from the Edit menu. |
...
The Copy command can be used to copy selections in the same file, in different files opened in the Edit module, or between Edit and other Microsoft Windows programs.
ChangeMan Edit uses the clipboard for all text movements. The clipboard is a shared resource that allows all Microsoft Windows applications to provide a temporary location for storing data that needs to be moved/copied.
To copy a selection, you can also use a shortcut key combination such as Ctrl + C or Ctrl + V for the copy/paste commands.
Moving a Selection Using the Drag-and-Drop Method
The drag-and-drop method is a simple way to move or copy a limited selection a relatively short distance.
| Step | Action |
|---|---|
| 1 | Make a selection. |
| 2 | Point to the selected text and hold down the left mouse button. |
| 3 | Drag the insertion point to the new location. |
| 4 | To move the text, release the mouse button. |
...
Copying a Selection Using the Drag-and-Drop Method
| Step | Action |
|---|---|
| 1 | Make a selection. |
| 2 | Point to the selected text and hold down the left mouse button. |
| 3 | Drag the insertion point to the new location. |
| 4 | Press and hold CTRL while releasing the mouse button. |
...
Undo and Redo Commands
If you make a mistake in the code window, you can undo your last action or command. For example, if you delete a selection you can easily restore it.
To undo the last action, click Undo from the Standard toolbar, or select Undo from the Edit menu.
As you make changes in the Code Window, ChangeMan Edit records all of your actions, and lets you undo them if necessary. The number of actions that you can undo is based on the amount of available RAM.
After you undo the last action, you may realize that you need it after all. In this case, you can use the Redo command.
To redo the previously undone action, click Redo from the Standard toolbar, or select Redo from the Edit menu.
Find and Replace Commands
You can use the Find and Replace commands to locate and change specific text in your document.
Finding Text
Use this procedure to find a text string:
| Step | Action |
|---|---|
| 1 | Click Find , or choose Find from the Edit menu. ChangeMan Edit displays the Find dialog box. |
| 2 | In the Find dialog box, enter the text to find. |
| 3 | You can customize your search by setting the following options: |
| Match whole words only- Select this option to find the whole words, not parts of words, that match the text displayed in the Find what box. | |
| Match case- Select this option to find the text with the same capitalization as the text displayed in the Find what box. | |
| 4 | Click Find Next to start the search process. ChangeMan Edit highlights the next occurrence of the search text that matches the criteria. The Find dialog uses your current selection as the initial criteria to be displayed in the Find what box. |
...

To resume the Find search for the previously defined criteria, click Repeat.
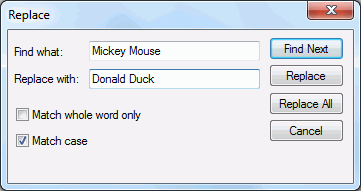
Replacing Text
Use this procedure to replace one text string with a different string:
| Step | Action |
|---|---|
| 1 | Choose Replace from the Edit menu. ChangeMan Edit displays the Replace dialog. |
| 2 | In the Find what field, type the text to be replaced. |
| 3 | In the Replace with field, enter the replacement text. |
| 4 | Select the match search criteria (if necessary). |
| 5 | Determine how you want the search to proceed by choosing from the following options: |
| Click… To… | |
| Replace Replace the text and find the next occurrence. | |
| Replace All Change all occurrences of your selection without confirmation. | |
| Find Next Leave the text unchanged and search for the next occurrence. | |
| Cancel (or press ESC) Cancel a search in progress or close the dialog box. | |
| To undo the effects of the last replacement,choose Undo from the Edit menu. This will reverse the last change made. |
...
...
Bookmarks
Bookmarks provide a convenient way to mark specific lines in a file and enable you to quickly jump to the next/previous bookmark or cycle through all of the bookmarks.
NOTE Bookmark functionality is identical for the ChangeMan Edit and ChangeMan Diff utilities.
Placing a Bookmark
Use this procedure to place a bookmark:
| Step | Action |
|---|---|
| 1 | Place the cursor in the text where you wish to insert a bookmark. |
| 2 | Either: |
| Click Toggle Bookmark | |
| Choose Toggle Bookmark from the Edit menu. | |
| ChangeMan Edit places the bookmark symbol on the Marker Bar for the corresponding line. |
...
Removing a Bookmark
Use this procedure to remove a bookmark:
| Step | Action |
|---|---|
| 1 | Place the cursor in the line containing the bookmark. |
| 2 | Click Toggle Bookmark , or choose Toggle Bookmark from the Edit menu. |
| ChangeMan Edit removes the bookmark symbol from the Marker Bar. |
...
Navigating to Bookmarks
Use these actions to navigate bookmarks:
| To… | Do this… |
|---|---|
| Move to the next bookmark. | Choose Next Bookmark from the Edit menu. |
| Move to the previous bookmark | Choose Previous Bookmark from the Edit menu. |
| Remove all bookmarks in the active document | Choose Clear All Bookmarks from the Edit menu. |
...
Displaying Bars
ChangeMan Edit contains different visual bars that help you to easily edit your code.
The Ruler Bar and Line Number Bar help you track column and line positions. As the insertion point is moved in the Code Window, the status bar displays the current line number and character position, where the first number indicates the ruler position and the second the line number.
Displaying the Ruler
The Ruler Bar at the top of the code window provides a visual indication of the character position relative to the first character of each line.
To display the ruler, click the Ruler button, or select Ruler from the View menu.
Displaying Line Numbers
To display line numbers, click Line Number button, or select Line Number from the View menu.
Displaying the Markers
The Marker Bar shows the location of your bookmarks.
To display the markers, click Marker button, or select Marker from the View menu.
Displaying the Dates
The Date Bar normally displays the date on which a line was changed. However, the template can be configured to place a user-specified change ID in this area instead. See Configuring an Automatic Date or Change ID for details.
To display the line change dates, click Date button, or select Date from the View menu.
Displaying the Status Bar
The Status Bar shows either a color key for your text or the location of your cursor.
To display the Status Bar, select Status Bar from the View menu.
Window Management
Tab Groups
ChangeMan Edit displays the files being edited as tabbed windows. Normally, the editor displays one file at a time, and you use the tab to select which file is currently displayed.
You can display more than one file at a time by creating multiple tab groups. Each tab group has its own set of tabs, and each group displays one file at a time. There are two types of tab groups:
-
Vertical tab groups: The windows are aligned side-by-side.
-
Horizontal tab groups: The windows are aligned with one above the other.
You can only use one type of tab group at a time. It is not possible to have a combination of both vertical and horizontal tab groups.
The picture below illustrates a frame window with two vertical tab groups.

To create a new tab group using the following commands from the Window menu:
-
New Vertical Tab Group (or Ctrl + G)
-
New Horizontal Tab Group (or Ctrl + Shift + G)
Use the following commands from the Window menu to move a file from one tab group to another:
-
Move to Next Tab Group (or Ctrl + M)
-
Move to Previous Tab Group (or Ctrl + Shift + M)
You can also move a window from one tab group to another by clicking on its tab and dragging it to a different tab. A tab group is removed when you close the last file in that group or move the last file to a different tab group.
You can even view the same file in two different tab groups at the same time. To accomplish that, first use the New Window command to create a second window for the file. Then move one of the windows to a different tab group. However, split windows, described in the next section, provide a more flexible way to have multiple views of the same file.
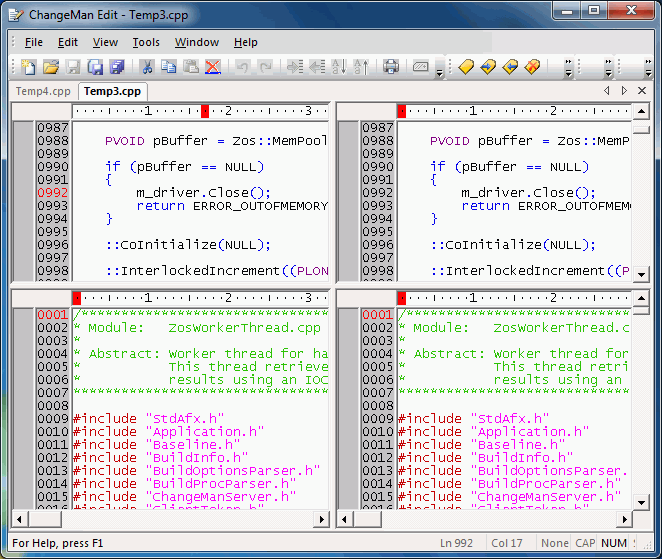
Split Windows
Split windows, allow you to split an edit window into multiple panes. Each pane can be scrolled separately and this allows you to view different parts of the file at the same time.
The window can be split vertically, horizontally, or both. Thus, the window is divided into either two or four panes.
To create a split window, use the Split Window command from the Window menu, or Ctrl + T from the keyboard. A cross-hair is then displayed, which you move to the location at which you want the window to be split. You can move the cross-hair either by dragging it with the mouse or by using the arrow keys on the keyboard. To set the cross-hair location, either release the mouse button, or press enter.
If you set the cross-hair in the center of the window, the window will be split into four panes. To split the window into only two panes, move the cross-hair over to one of the window edges.
The picture below illustrates the cross-hair used to set the size and position of the split windows.

The window panes are divided by a splitter bar. You can resize the window panes by dragging the splitter bar. To remove a window pane, just move the splitter bar all the way to the edge of the window.
The picture below illustrates a window that has been split into four panes.
Full Screen Mode
Full screen mode provides the largest possible view of your edit windows. Full screen mode expands the ChangeMan Edit frame window to fill the entire screen. During full screen mode the tool bars are hidden in order to increase the viewing area.
Full screen mode can be very useful when editing very large files or when the frame window is divided by tab groups or split windows.
You can toggle back and forth between full screen mode and normal screen mode using either of the following methods:
-
Full Screen command from the View menu.
-
Ctrl + Alt + Enter from the keyboard
Customizing the Editor
ChangeMan Edit allows you to configure settings that change the appearance and control the behavior of editing features.
There are two types of editor settings:
-
Global editor settings – apply to all languages
-
Language specific settings – apply only to a specific language
Language specific settings are specified using templates, and these are set using the Template Manager. See the section entitled Saving a File for details on language specific options.
Global editor settings are set using the Customize dialog, which can be displayed from by selecting Customize from the Tools menu.
Global Editor Settings
To open the global editor settings, select Customize from the Tools menu. The Customize dialog box has an Editor tab for the global editor settings.

Any boxes that are checked in the Editor tab will apply to all languages. If the box is checked it will override the language-specific option in the templates. If the box is not checked, the setting from the template will be used. This provides a quick way to set an option globally without having to change every template.
| Option | Description |
|---|---|
| Remove trailing spaces | Trims trailing spaces from the end of each line when loading or saving a file. |
| Tab using spaces | Uses spaces, rather than tab characters to indent text. When saving a file, tab characters are converted to spaces. |
| Allow cursor past end of line | Allows the cursor to be positioned past the end of line. This makes some editing operations easier to perform. |
...
For files on a z/OS server, it is important to use spaces rather than tab characters. Tab characters are generally not recognized by z/OS software. Using tab characters can result in compiler errors, JCL errors, etc.
Inserting a Change ID
You can automatically insert a user-specified change ID at a specified position into each line that you change. The template you are using must be configured to use a change ID. See Configuring an Automatic Date or Change ID for information on configuring the template for this.
If the template is configured to use a change ID, you can set the change ID at any time by choosing Set Change ID from the Tools menu. The dialog box below will display allowing you to set or disable the change ID.
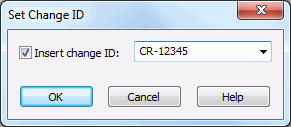
...
If the Insert change ID box is not checked, the change ID insertion will be disabled.
Saving a File
ChangeMan Edit provides Save and Save As options for saving files.
When you change a file, a date tag appears in the Modification Date Bar next to the changed line, indicating that the file has been modified. The modification date tag disappears when you save the file, and reappears when you make new changes to the file.
Saving with the Original Name
To save a file using the original name, click Save (or choose Save from the File menu). ChangeMan Edit checks the file for changes since it was last loaded or saved; if no changes are detected, the Save command is disabled.
If you have more than one file opened for editing, you can save changes to all files by selecting the Save All command.
Saving with a Different Name
Use this procedure to save files with a different name:
| Step | Action |
|---|---|
| 1 | Choose Save As from the File menu. |
| 2 | Navigate to the folder into which the file is to be saved. |
| 3 | Enter the new name of the file in the File name box. |
| 4 | Click Save. |
...
Creating a New File
ChangeMan Edit lets you create a new file directly from the Edit module.
Use this procedure to create the file:
| Step | Action |
|---|---|
| 1 | From ChangeMan Edit, click New Document (or choose New from the File menu). ChangeMan Edit displays a list of all the configured editor templates. |
| 2 | Select a template, then click OK. ChangeMan Edit opens a blank code window. |
...
When you finish editing a new file, save it with the Save As command.
Submitting JCL
When you are editing a file containing JCL, you can submit the JCL to run as a job on a z/ OS server. To submit the JCL, select File → Submit JCL from the menu.
Since all valid JCL begins with "//", the Submit JCL command is disabled unless the first line of the file begins with "//".
You will then be prompted with the dialog box below, on which you select the name of the z/OS server.

You do not need to save the JCL file before submitting it. The JCL will be submitted as it currently appears in the edit window.
Jobs submitted with the Submit JCL command run under the authority of the logged on user (the owner ID is the same as the logged on user ID). If you are not already logged on, you will be automatically prompted to log on.
Notify Messages
You can receive notify messages when jobs submitted from ChangeMan ZDD complete.
Notify messages are written to the Notify message log. At any time, you can view the last 64 messages written to this log by launching the Notify message viewer application that is installed with ChangeMan ZDD: choose Start → Programs → ChangeMan ZDD → Notify.
You can also choose to have a message box pop up every time you receive a message.
These options can be configured using the Notify page of the ZDD Network properties.,
Submitting XML
When you are editing a file containing XML request for XML Services, you can submit the XML request to a server or ChangeMan ZMF. To submit the XML, select File →Submit XML from the menu.
Since all valid XML begins with "\<?xml", the Submit XML command is disabled unless the first line of the file begins with "\<?xml".
You will then be prompted with the dialog box below, on which you select the name of the z/OS server and ChangeMan instance.

...
If no ChangeMan instance is specified, the XML file will be submitted to the server, rather than a ChangeMan instance. This is only valid for SerNet services and not for ChangeMan ZMF services. ChangeMan ZMF services must be directed to a ChangeMan instance.
You do not need to save the XML file before submitting it. The XML will be submitted as it currently appears in the edit window.
If you are not already logged on, you will be automatically prompted to log on.
On completion, the results will be displayed in another edit window. The results window will have a name such as "Result01.xml". You can then save the results, if you wish to do so.