Creating a New Package
The New Package function uses a wizard interface with nine pages, corresponding to the nine panels in the ChangeMan ZMF ISPF interface. However, unlike the ISPF interface, the wizard allows you to go forward and backward through the pages.
When a page displays, the editable fields are populated with the values that were last entered in those fields. On some of the pages, you can leave certain fields blank and then update them later using the package Properties sheet. See Updating Package Information.
Wizard Pages
The following table lists the wizard pages and indicates which pages are displayed for different types of packages. See notes following the table.
| Wizard Page | Short Method | Long Method | ||||
|---|---|---|---|---|---|---|
| Simple | Partici- pating | Super/ Complex | Simple | Partici- pating | Super/ Complex | |
| General | X | X | X | X | X | X |
| Description | X | X | X | |||
| Implementation | X | X | ||||
| Scheduling | note1 | note1 | ||||
| Affected Applications | X | |||||
| Participating Packages | X | X | ||||
| Other Options | note2 | note2 | note2 | note2 | ||
| Site | note3 | note3 | note3 | note3 | ||
| Sites | note4 | note4 | note4 | note4 |
Notes:
| note1 | Displayed only if Other is specified for Scheduler type on the Implementation page. |
|---|---|
| note2 | Displayed only if there are user options specified in the PKGCREAT member of ZDDOPTS. |
| note3 | Displayed if the ChangeMan ZMF instance is specified as "all" sites. |
| note4 | Displayed if the ChangeMan ZMF instance is specified as a "DP" site. |
Running the New Package Wizard
Right-click a ChangeMan ZMF instance, an application folder, or the Packages folder to display the popup menu. Point to ZDD Network and then click New Package.
The first page displayed is the General page.
...
General Page
The General page is the initial page displayed in the New Package wizard. The editable fields are populated with the values that were last entered in those fields.

The following table describes the fields on the General page.
| Field / Box | Description |
|---|---|
| Package title | Type a title for the package. This field is case-sensitive and has a maximum length of 72 characters. |
| Application | Choose an application mnemonic from the drop-down list. You must have UPDATE access to this mnemonic in your security system. |
| Package level | Choose a package level from the drop-down list: Simple - The changes in this package are not related to any other package. This level does not affect any other application, nor does it require changes to software or operational procedures in other applications. Participating - This package is related to one or more other participating packages which are listed under the same super or complex package. SYSLIB statements in build process jobs include staging libraries from other participating packages under the same super or complex package. Super or Complex - This package is the parent of two or more participating packages that have interdependent changes to software or operational procedures. To create a super or complex package, you provide the information on this page, and in a subsequent page you provide a list of participating packages. Remote sites and installation dates are set in each participating package. No staging libraries are allocated to super or complex packages. |
| Requestor name | Type the name of the person requesting this change package. This field is not case-sensitive and has a maximum length of 25 characters. |
| Work request ID | Type a work request number. This field is not case-sensitive and has a maximum length of 12 characters. This field may be used for the ChangeMan ZMF INFO option. |
| Requestor phone | Type a telephone number for the person whose name you entered in the Requestor Name field. This field has a maximum length of 15 characters. |
| Department | Type the department associated with this change package. This field is used for reporting only. This field is not case-sensitive and has a maximum length of 4 characters. |
| No package description | Select this option to skip the package description page. A default package description will be used. |
| No implementa tion instructions | Select this option to skip the package implementation instructions page, and the scheduling information page. Default values will be used for the fields on those pages. |
| Unplanned change | Package Type - Planned or Unplanned. Select this option for Unplanned changes, meaning the package contains unscheduled changes and possibly emergency fixes. Depending on Global and Application administration settings, some package lifecycle steps and requirements may be skipped. If you do not select this option, the package type is Planned and follows the standard package life cycle for Permanent or Temporary packages. Super, Complex, and Participating packages must be planned. |
| Unplanned reason | If you selected Unplanned change, choose a Reason Code from the drop-down list. |
| Field / Box | Description |
|---|---|
| Temporary change | Package Time Span - Permanent or Temporary. Select this option for Temporary changes, meaning the changes are installed in special override libraries concatenated on top of your production environment library concatenations. The changes are removed from these libraries after the number of days (entered in the Temporary Days field on this page) has passed. Baseline and production libraries are not changed. A temporary package may be either planned or unplanned. If you do not select this option, the package is Permanent, meaning the package components are installed in baseline and production libraries. A permanent package may be either planned or unplanned. Super, Complex, and Participating packages must be permanent. |
| Temporary days | This field is enabled if you selected Temporary change. Indicates the number of days that changes in a temporary package are to remain in override libraries. The count of calendar days for this field is incremented at 24:00 system time each night. Temporary package components are automatically removed at the time-of-day specified in the Install Date/Time information (provided on the Site Information pages). Therefore, the number entered in this field does not necessarily equate to 24-hour days. For example, if a temporary package has an Install Date/Time of 20060815/1800, a Temporary Days value of 1, and the package is actually installed at 2100 on the install date of 8/15/ 2006, then the package components are automatically removed from temporary libraries at 1800 on 8/16/2006, which is less than 24 hours after they were installed. |
| Release | Select a release from the drop-down list. |
| Release Area | Select a release area from the drop-down list. |
...
Enter the general package information and then click Next to continue.
Description Page
The Description page is not displayed if you selected the "No package description" option on the first wizard page.

Enter up to 46 lines of text and then click Next to continue.
You may also click Back to return to the previous page and make changes.
Implementation Page
The Implementation page is not displayed if you selected the "No implementation instructions" option on the first wizard page.

The following table describes the fields on the Implementation page.
| Field / Box | Description |
|---|---|
| Contingency | Select the option that describes what should be done if your change package fails. If you select Other, you must enter an explanation in the corresponding text box. |
| Scheduler | Select an option to determine how the package installation process is initiated: ChangeMan - Package installation will be initiated by the internal ChangeMan ZMF scheduler when it determines that the package Install Date and From Time have arrived at the specified site. Manual - Package installation will be initiated when the last approval is entered. Other - Package installation will be initiated by an external scheduler, such as CA-7, CA-Scheduler, or CA-ADC2. Scheduling records are inserted into the scheduler database by job CMN17, which runs when the package is distributed. The default Scheduler option is determined by the Installation Job Scheduler defined in ChangeMan ZMF Global Administration. The global default value determines whether you can change the Scheduler field for a new package: When ChangeMan is the global default, you can change the Scheduler field to Manual, but not to Other. When Manual is the global default, you cannot change the Scheduler field. When Other is the global default, you can change the Scheduler field to ChangeMan or Manual. |
| Installation instructions | Enter up to 46 lines of instructions for installing and backing out the change package. |
Enter the implementation information and then click Next to continue.
You may also click Back to return to the previous pages and make changes.
Scheduling Page
The Scheduling page is displayed only if you selected Other for Scheduler type on the Implementation page. The information on this page is inserted into your job scheduler database by job CMN17, which runs when your package is distributed.

The following table describes the fields on the Scheduling page.
| Field / Box | Description |
|---|---|
| Predecessor jobs | Jobs in your automated job scheduler that run before the first installation job for the package. |
| Successor jobs | Jobs in your automated job scheduler that run after the first installation job for the package. |
Enter the predecessor and successor jobs that run before and after the first installation job for your package (or leave blank and provide it later using the Scheduling page of the package Properties sheet).
-
To add a job, double-click on a blank line or click the New button above the list.
-
To edit a job, double-click the entry and an edit box will open.
-
To delete a job, select it and then click the Delete button above the list
All installation jobs after the first job are submitted by the ChangeMan ZMF internal scheduler.
Click Next to continue, or click Back to return to the previous pages and make changes.
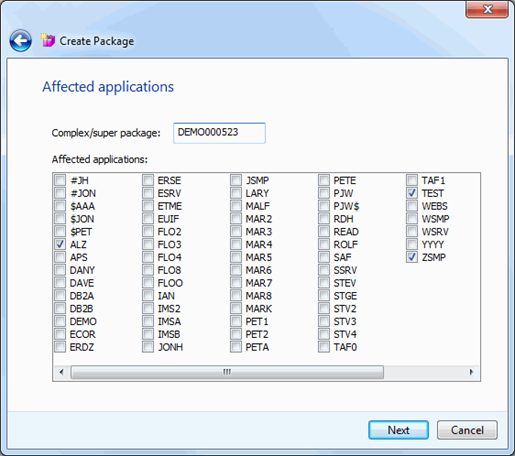
Affected Applications Page
The Affected Applications page is displayed only if you are creating a participating package using the long method.
The following table describes the fields on the Affected Applications page.
| Field / Box | Description |
|---|---|
| Complex/ super package | Enter the package ID of a Super or Complex package in OPN status that this participating package will be managed under. |
| Affected applications | The applications listed have been selected using the filter for the ChangeMan ZMF instance (in other words, the same applications that display for the ChangeMan ZMF instance in File Explorer). Select the applications that are affected by your change package. When you freeze the participating package, planned approvals that are defined as Interfacing Approvals in the affected application are assigned to your package. |
...
You may enter the information now, or provide it later using the Applications page of the package Properties sheet.
Note
If you leave the Complex/super package field blank, you will not be able to enter it later on the Applications page of the Properties sheet. To specify a complex/ super package at a later time, go to the Properties sheet for a complex/super package and enter the participating package ID on the Participating page.
Click Next to continue, or click Back to return to the previous pages and make changes.
Participating Packages Page
The Participating Packages page is displayed only if you are creating a complex or super package.

You can select participating packages to associate with this complex/super package from the dropdown list. The first time you open the dropdown list, there may be a delay during a search for eligible packages to fill the dropdown list.
The dropdown list will only contain eligible participating packages, which are those in DEV status, have an install date that has not passed, and are not be already associated with another complex or super package.
-
To add a participating package, select the package from the dropdown list, and then press the Add button.
-
To remove participating packages, select one or more packages in the list at the bottom of the page, and then press the Remove button.
You may enter the information now, or provide it later using the Participating page of the package Properties sheet.
Click Finish to create the package, or click Back to return to the previous pages and make changes.
Other Options Page
The Other Options page is displayed only when you are creating a simple or participating package, and only when customer-defined options have been specified in the PKGCREAT member of ZDDOPTS.

Update the values as needed for this package, following the validation rules specified in the PKGCREAT member.
Click Next to continue, or click Back to return to the previous pages and make changes.
Site Page -All site
The Site page is displayed only when you are creating a simple or participating package for a ChangeMan ZMF instance specified as an "all" site.

The following table describes the fields on the Site page.
| Field / Box | Description |
|---|---|
| Install date | The calendar date that the package will be installed at the site. Enter a date in mm/dd/yyyy format, or click the arrow button to display a calendar from which to select a date. |
| From time | The earliest time of day when the installation should begin. Enter a time in hh:mm:ss am/pm format, or select a segment of the time (for example "hh") and then click the arrow buttons to update it. |
| To time | The latest time of day when the installation should begin. Enter a time in hh:mm:ss am/pm format, or select a segment of the time (for example "hh") and then click the arrow buttons to update it. |
| Primary contact | Enter the name of the primary person to contact if there is a problem with the installation at this site. Up to 25 characters may be entered. |
| Primary phone | Enter the telephone number of the primary contact. Up to 15 characters may be entered. |
| Secondary contact | Enter the name of the secondary person to contact if there is a problem with the installation at this site. Up to 25 characters may be entered. |
| Secondary phone | Enter the telephone number of the secondary contact. Up to 15 characters may be entered. |
Enter the site information and then click Finish to create the package.
You may also click Back to return to the previous pages and make changes.
Sites Page (DP site)
The Sites page is displayed only when you are creating a simple or participating package for a ChangeMan ZMF instance specified as a "DP" site. Sites can be added, updated, or deleted.

...
The following table describes the fields on the Sites page.
| Field / Box | Description |
|---|---|
| Site | Select a site where the package is to be installed. |
| Install date | The calendar date that the package will be installed at the site. Enter a date in mm/dd/yyyy format, or click the arrow button to display a calendar from which to select a date. |
| From time | The earliest time of day when the installation should begin. Enter a time in hh:mm:ss am/pm format, or select a segment of the time (for example "hh") and then click the arrow buttons to update it. |
| To time | The latest time of day when the installation should begin. Enter a time in hh:mm:ss am/pm format, or select a segment of the time (for example "hh") and then click the arrow buttons to update it. |
| Primary contact | Enter the name of the primary person to contact if there is a problem with the installation at this site. Up to 25 characters may be entered. |
| Primary phone | Enter the telephone number of the primary contact. Up to 15 characters may be entered. |
| Secondary contact | Enter the name of the secondary person to contact if there is a problem with the installation at this site. Up to 25 characters may be entered. |
| Secondary phone | Enter the telephone number of the secondary contact. Up to 15 characters may be entered. |
| Install sites | Displays information for the sites that have been added for this package. |
Use the following procedures to add, update, and delete sites for this package.
When you are finished entering site information, click Finish to create the package, or click Back to return to the previous pages and make changes.
To Add a Site
-
Select a site from the Site drop-down list.
-
Enter information for the selected site.
-
Click the Add button to add the information to the Install sites list.
To Update a Site
-
Select a site from the Site drop-down list, or click the entry in the Install sites list. The information will display in the update fields.
-
Update the site information.
-
Click the Change button to update the information and display it in the Install sites list.
To Delete a Site
-
Select a site from the Site drop-down list, or click the entry in the Install sites list.
-
Click the Remove button to delete the site from the Install sites list.