Building Components
The Build function uses a wizard interface with the following pages:
-
Components
-
Settings
-
User Options
Use the Build function to transform a package component into an executable module. The following rules apply:
-
The package must be in DEV status.
-
The component and component type must already exist in the package.
If you want to Stage a component from development, use the Check In function. See Checking In To a Package.
-
The component type must be “like SRC”.
-
The component must not be a generated component (generated components have a red arrow on the icon and are read only).
-
If more than one component is selected for a build, they must all be the same type.
-
The component can be locked or unlocked.
Note
If you want to stage a non-source component, such as a copybook, you have two options:
-
Edit the component in the package and save it. This will have the same effect as Stage - it will change the status to Active.
-
Use the Check In function to copy the component to a package - this will also change the status to Active.
...
Running Build
Select one or more package components or a Unix subdirectory in a package; right-click and choose ZDD Network | Build from the popup menu. You can also right click on a package or library type folder.
...
Location Page
When you do not select the components in advance, the Location page is first displayed. If you already preselected components in the File Explorer, this page is skipped.

Components Page
On the Components page, select the components to build.

Selecting Components
There are two ways to select or deselect components:
-
Select or deselect components individually using the check boxes in the Components list.
-
Use the Selection filter field to enter one or more name patterns with wild characters, delimited by semicolons. Then press the Select or Clear button.
Build Settings Page
On the Build Settings page, you specify the standard build settings.
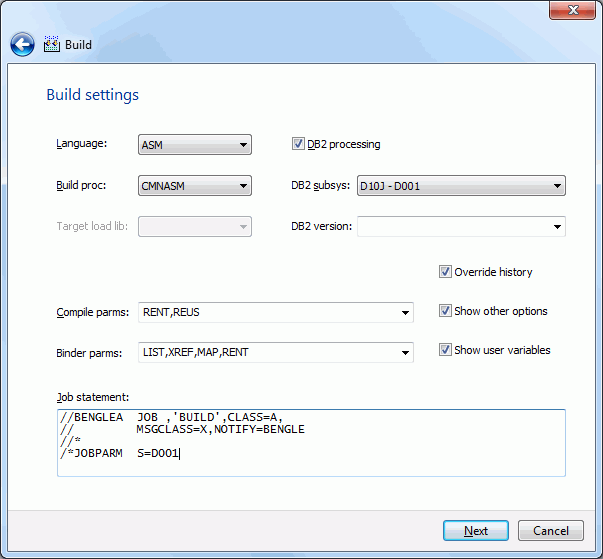
The defaults in the editable fields are populated from the component history (if it exists) and only one component is selected; otherwise, the defaults are those set up for this language for the ChangeMan ZMF instance.
If more than one component is being built, the displayed defaults are used only for the following cases:
-
the component does not have history
-
the Override History box is checked
Fields on the Build Settings Page
The following table describes how to complete the fields on the Build Settings page.
| Field / Box | Description |
|---|---|
| Language | Choose a language. |
| Build Procedure | Choose a build procedure. If a designated compile proc has been defined for a component, it will be used even if you type a procedure name in this field. |
| Target load library | Not applicable for the Build function. |
| Override History | If multiple components are selected for this Build, check this box to override the component history and use the displayed defaults. |
| Show other options | Displays UserOption\ fields on the "Other options" page of the wizard. |
| Show user variables | Displays UserVariable\ fields on the "Other options" page of the wizard. |
| DB2 Precompile | This option can be selected only if it is appropriate for the type of build being done. |
| DB2 Subsystem | If you selected the DB2 Precompile option, choose the DB2 subsystem name. |
| Compile Parms | You can use the default compile parameters or change them. |
| Link Parms | You can use the default link parameters or change them. |
| Job Statement | Default values are displayed initially. If you change the values, they will be stored in your registry and used as the defaults in the future. Each time this dialog displays, the last character of the jobname is incremented alphabetically. If the \&SYSUID parameter in the Notify field is not overridden, the user ID is automatically substituted. |
If you are building a component with a type like "Other" (OTH), there is a simplified version of this page shown below, which contains only a few fields.

Other Options Page
If either the "Show other options" or the "Show user variables" boxes is checked, the Other Options page will be displayed. Otherwise, the Build Settings page is the final page.

The Other Options displayed are for the specified language for the ChangeMan ZMF instance. The labels displayed in the Name field are determined by how your administrator configured the BUILD member in the ZDDOPTS library, described in the ChangeMan ZDD Server Installation Guide. They may not match the labels in the ISPF client.
Only options with a status of “Allow Use” can be changed.
Submitting the Build
On the final page of the wizard, click Finish to submit the build job.
After you click Finish to submit the job, the following message displays for a successful submission.
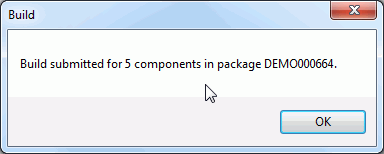
No other messages on the job status will be displayed by ChangeMan ZDD.
See Viewing Output for ChangeMan ZMF Jobs for information on viewing job output through ChangeMan ZDD.