Promoting and Demoting Packages
The Promote function copies components from package staging libraries into promotion site/level libraries, combining them with components from other packages.
The Demote function deletes components from libraries that were populated by promotion.
The rules under which the Promote and Demote functions operate in ChangeMan ZDD are the same as those that are in effect for ChangeMan ZMF in the ISPF client. Refer to the ChangeMan ZMF User’s Guide for complete information on promotion and demotion.
Components can be promoted/demoted at the package level or individually within the package.
The Promote and Demote functions use a wizard interface. There are four pages for Promote, and three for Demote:
-
The first page for Promote and Demote displays the Package ID, a directory tree for selecting the promotion site/level, and the job card.
-
The second page for Promote and Demote displays the Package ID, the promotion site and level, and a list of components to be promoted/demoted. You may have the option of selecting and deselecting components, depending on the particular promotion/demotion.
-
The third page for Promote and Demote displays the User Options. This page displays only if customer-defined options have been specified in the PROMOTE/DEMOTE members of ZDDOPTS.
-
There is a fourth page for Promote that displays components in the site/level library that will be overlaid if you proceed with the promotion.
After you successfully submit the Promote/Demote request, you can check the job status through ChangeMan ZDD or in ISPF. See Viewing Output for ChangeMan ZMF Jobs for information on viewing job output through ChangeMan ZDD.
...
Running Promote Package
There are three or four pages in the Promote wizard. You can go back and forth between the pages using the Next and Back buttons. The Back button is the back arrow button at the upper left corner of the window.
At the end of the wizard, press the Finish button to perform the promote operation. Press Finish. See Viewing Output for ChangeMan ZMF Jobs for information on viewing job output through ChangeMan ZDD.
Note
Components are promoted to all libraries that are defined for a promotion library type. (Multiple libraries for a library type for a promotion level display in ChangeMan ZDD with a number suffix. For example, if you have two libraries defined for JCL, they display as JCL.1 and JCL.2).
To start the Promote wizard, do one of the following:
-
Right-click a package folder, a package library folder, or components in a package library folder. Then choose Promote from the popup menu.
-
Drag-and-drop a package library folder, or components in a package library folder to a promotion site/level folder.
The example in this section describes how to do a first promotion to a new level.
...
Promote Location Page
On the Promote Location page, specify the location to which you are promoting the components.

The upper window displays a directory tree of promotion sites and levels. Hold the mouse pointer over a promotion level to see a description, which would be one of the following:
-
First promotion for the site.
-
New level. Package has previously been promoted to a lower level for the site.
-
Promoted level with no components. Can be any level up to the highest promotion level for the site.
-
Promoted level with components. Can be any level up to the highest promotion level for the site.
-
Invalid level selection.
The Schedule box on the right side allows you to schedule a package promotion at a future date or time. If no date and time are specified, the promotion job will be submitted immediately. Scheduled promotions require ChangeMan ZMF 6.1 or higher.
The "Show user variables" check box displays the Other Options page which allows you to set user variables.
The lower window displays the job card for submitting the Promote job:
-
Default values are displayed initially. If you change the values, they will be stored in your registry and used as the defaults in the future.
-
Each time this dialog displays, the last character of the job name is incremented alphabetically.
-
If the \&SYSUID parameter in the Notify field is not overridden, the user ID is automatically substituted.
Select a valid site/level to which you want to promote the package and change the job card if necessary.
Promote Components Page
On the Promote Components page, select the components to promote.
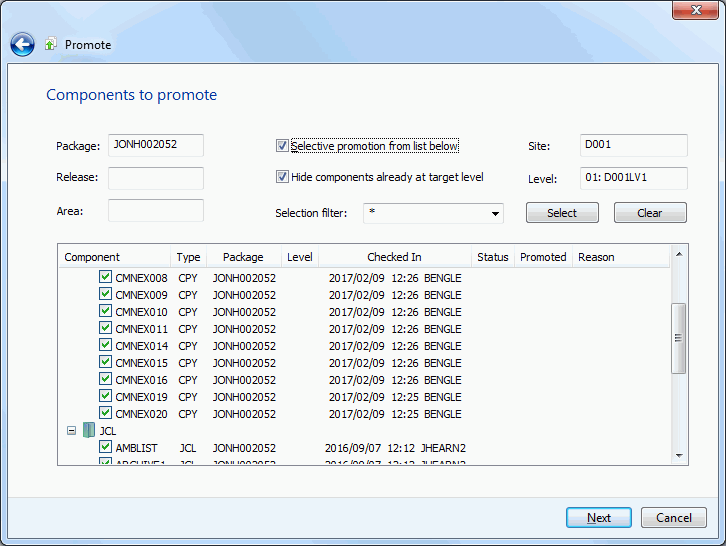
In this example, level 01 for site D001 was selected. The display window lists all of the components available for promotion.
To hide components that have already been promoted to the target level, select the option "Hide components already at target level".
Selecting Components
There are two ways to select or deselect components:
-
Select or deselect components individually using the check boxes in the Components list.
-
Use the Selection filter field to enter one or more name patterns with wild characters, delimited by semicolons. Then press the Select or Clear button.
Promote Overlay Page
The Promote Overlay page lists components already in the promotion library that will be overlaid if you proceed with this promotion.

Promote Other Options Page
The Promote Other Options page displays only if customer-defined options have been specified in the PROMOTE member of the ZDDOPTS library.

Update the options as needed, following the validation rules specified in the PROMOTE member of ZDDOPTS.
Running Demote Package
There are two or three pages in the Promote wizard. You can go back and forth between the pages using the Next and Back buttons. The Back button is the back arrow button at the upper left corner of the window.
At the end of the wizard, press the Finish button to perform the promote operation. Press Finish. See "Viewing Output for ChangeMan ZMF Jobs" on page 246 for information on viewing job output through ChangeMan ZDD.
To start the Demote wizard, right-click a package folder, a package library folder, or components in a package library folder. Then choose Demote from the popup menu.
Demote Location Page
On the Demote Location page, specify the location from which you are demoting the components.

The upper window displays a directory tree of promotion sites and levels. Hold the mouse pointer over a promotion level to see a description, which would be one of the following:
-
First promotion for the site.
-
New level. Package has previously been promoted to a lower level for the site.
-
Promoted level with no components. Can be any level up to the highest promotion level for the site.
-
Promoted level with components. Can be any level up to the highest promotion level for the site.
-
Invalid level selection.
The "Show user variables" check box displays the Other Options page which allows you to set user variables.
The Schedule box on the right side allows you to schedule a package demotion at a future date or time. If no date and time are specified, the demotion job will be submitted immediately. Scheduled demotions require ChangeMan ZMF 8.3 or higher.
The lower window displays the job card for submitting the Demote job:
-
Default values are displayed initially. If you change the values, they will be stored in your registry and used as the defaults in the future.
-
Each time this dialog displays, the last character of the jobname is incremented alphabetically.
-
If the \&SYSUID parameter in the Notify field is not overridden, the user ID is automatically substituted.
Select a valid site/level from which you want to demote the package, and change the job card if necessary.
Demote Components Page
On the Demote Components page, select the components to demote.

The display window lists all of the components available for demotion.
Selecting Components
There are two ways to select or deselect components:
-
Select or deselect components individually using the check boxes in the Components list.
-
Use the Selection filter field to enter one or more name patterns with wild characters, delimited by semicolons. Then press the Select or Clear button.
Demote Other Options Page
The Demote - User Options page displays only if customer-defined options have been specified in the DEMOTE member of ZDDOPTS.

Update the options as needed, following the validation rules specified in the DEMOTE member of ZDDOPTS.