Working with Data Sets
PDS Member Name Extensions
A file extension is appended to the member name to create the file name used by ChangeMan ZDD. The file extension is determined by the data set name, and for a PDS, all members must have the same file extension. It is not possible to have files named SAMPLE.TXT and SAMPLE.BAK residing in the same PDS, because both would have a member name of SAMPLE.
Even though you may be using simple 8-character names with the same file extension, some text editors or other programs may create temporary files. These temporary files may have names longer than eight characters or have different file extensions. For example, a text editor may create a temporary file called SAMPLE.001 or SAMPLE.BAK when editing SAMPLE.TXT. With a PDS, the creation of these temporary files will fail, causing the text editor or application program to malfunction.
As such, you must configure text editors to not to create backup files inside the PDS.
See File Extensions Page for details on configuring file name extensions for PDS members.
PDSE Long Name Support
A PDSE allows long names to be created. Primary member names are still
restricted to 8 characters, but they may have long name aliases. When saving
files with long names in a PDSE, ChangeMan ZDD automatically generates an 8
character random name and assigns the long name as an alias. The generated name
has the form {xxxxxx}, where xxxxxx is 6 random characters. When viewing the PDSE from TSO/ISPF, you will see only the
generated short names and will not see the long alias names. ChangeMan ZDD
does show the long names and hides the generated random names.
Data Set Properties
To display the properties of a data set, right click on the data set and select Properties from the popup menu. There are three pages in the data set properties:
-
Data Set: DCB attributes and space usage information
-
Space: Pie chart illustrating space usage
-
Directory: Pie chart illustrating PDS directory usage information
Member Properties
To display the properties of a PDS or PDSE member, right click on the member and select Properties from the popup menu. There member properties display the ISPF statistics for the member.
Allocating Data Sets
You can allocate a PDS, PDSE, or sequential data set using the New Data Set command. You can use the properties of an existing data set as a model.
In the File Explorer, right-click either a data set folder or a data set. Choose ZDD Network | New Data Set from the popup menu. The New Data Set dialog box displays.

Note
-
Enter a data set name in the Data set name text box.
-
Choose a data set type from the Data set type drop-down list: SEQ, PDS, or PDSE.
-
Fill in the remaining fields as you would when allocating a data set using the 3.2 option of ISPF.
Downloading Data Sets
You can download a sequential data set or PDS member to a Windows folder using either of the following methods:
-
Drag the data set or member and drop it onto a Windows folder.
-
Right-click on the data set or member and select ZDD Network → Download to Windows folder from the popup menu.
Uploading Data Sets
You can upload a Windows file to download a sequential data set, or to PDS as a member using either of the following methods:
-
Drag the Windows file and drop it onto the data set.
-
Right-click on the Windows file select ZDD Network → Upload to data set from the popup menu.
The Upload Data Set dialog box will display, allowing you to specify the target data set and member. If the target data set does not exist, you will be prompted to create it using the New Data Set dialog box.

Copying Data Sets
You can copy one data set to another without downloading the data to Windows (the copy occurs on the mainframe server). The source and target data sets may be on different servers.
You can copy a PDS, PDSE, sequential data set, or selected members. Member names can contain the * wild character.
If the target data set does not exist, you will be prompted to create it using the New Data Set dialog box, described in Allocating Data Sets.
Initiate the Copy Data Set function in either of the following ways:
-
Right-click a partitioned or sequential data set (or PDS members), or use the right mouse button to drag and drop a data set or members to another data set. When the popup menu displays, choose ZDD Network | Copy to Data Set.
-
Use the left button to drag and drop a data set or members to another data set. The Copy Data Set dialog box displays.

Fields in the From panel are as follows:
| Field | Description |
|---|---|
| Server | Displays the server name from which you are copying. |
| Data set | Displays the data set name from which you are copying. |
| Member | Optionally, enter one or more member names, separated by spaces. Member names can contain the * wild character. If you do not enter any member names, all members will be copied. |
Fields in the To panel are as follows:
| Field | Description |
|---|---|
| Server | The default server name is displayed. You may select a different one from the drop-down list. |
| Data set | Type a data set name or select one from the drop-down list. If this data set does not exist, you will be prompted to create it using the New Data Set dialog box. NOTE The Data set drop-down list contains the last 25 data set names that you entered in this field. |
| Member | If you entered member names for the From data set, you may enter new names for these members in the To data set. The order of the new member names must match the order of the member names entered for the From data set. If you do not wish to rename the members, leave this field blank. |
Creating a New Member
You can create a new, empty member in a partitioned data set.
Right-click a partitioned data set and choose ZDD Network | New Member from the popup menu. The New Member dialog box displays.

Enter member name and press OK to create the member.
Creating Files Using Windows
You can create a file in a ChangeMan ZDD folder using either of the following Windows features:
-
The drag-and-drop feature (simply drag a file and drop it into a ChangeMan ZDD data set folder).
-
The Save As option.
Migrated Data Sets
Windows has built-in support for offline (migrated) files. There is a new Offline (O) file attribute. There are also built-in error codes and error messages appropriate for offline files.
Migrated data sets and ChangeMan ZMF libraries are indicated by an overlay of a gray X or a green X. A gray X means the data set is migrated to tape (ML2, or migration level 2). A green X means the data set is migrated to disk (ML1, or migration level 1) and can be recalled quickly. If the icon has a cloud overlay, it is migrated to the cloud.
Note
ZDD can only distinguish between ML1 and ML2 when connected to SerNet/ZMF 8.1 servers. On older servers, all migrated data sets display with the gray X.
Recalling Migrated Data Sets
To recall migrated data sets and ChangeMan ZMF libraries, right-click the file and choose ZDD Network | Recall Data Set from the popup menu.
PDSE Member Generations
PDSE version 2 libraries support multiple versions or generations of a member. This allows you to access previous generations of a changed member. When you create the data set, the MAXGENS option specifies the maximum number of generations that are retained for each member.
Each previous member generation has an absolute generation number (positive), and a relative generation number (negative). The current generation is always generation 0, for both the absolute and relative generation number.
Deleting Members with Generations
If you delete a member in a library that supports generations, that deletes the current generation only. The deleted generation becomes the -1 generation. Since the member has no current generation, it is invisible, and does not appear in member lists. This does allow the possibility of recovering a previously deleted member.
If you want to permanently delete all generations of a member, right click on the member and select ZDD Network | Delete Permanently from the popup menu.
You can delete members with generations in the File Explorer using the Delete key on the keyboard as follows:
-
Delete: Deletes the member, but allows the member to be recovered later. Deletes the current generation, and it becomes the -1 generation. This is equivalent to moving a Windows file into the Recycle Bin.
-
Shift+Delete: Permanently deletes all generations of the member. The member cannot be recovered. This is a shortcut for the Delete Permanently command.
You can selectively delete previous generations of a member using the Member Generations tool, which is described in the next section.
Member Generations Tool
The Member Generations tool displays a list of generations for a PDSE v2 member. You can use this tool to perform the following operations:
-
Edit a member generation
-
Compare two member generations
-
Copy a member generation to another location
-
Recover a previous member generation and make it the current generation
-
Permanently delete a member generation
To display this dialog box, right click on a PDSE member, and select ZDD Network | Member Generations from the popup menu. This command is only available for PDSE version 2 libraries, which have MAXGENS > 0.
The Member Generations dialog box is shown below.
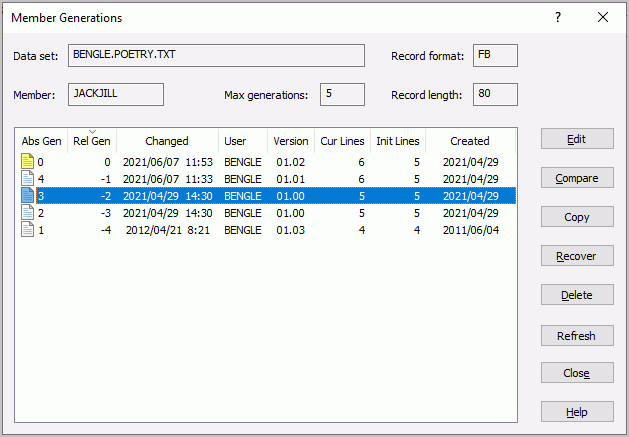
You can perform various operations with the member generations by selecting them in the list and then pressing one of the command buttons.
Edit
You can view or edit any generation by selecting it in the list and pressing the Edit button. The default text editor you specify on the Editor tab of ZDD Network properties is started. If you did not specify a default editor, ChangeMan Edit is started (see the ChangeMan ZDD Tools Guide).
If you save the member generation, it will update that generation, and will not create a new generation. To create a new generation, use Save As to save it as a regular member. You can also save it as a local file on your computer.
Compare
You can compare any two generations of the member. You can also compare a member generation with a file on your local computer.
To perform the compare, select one or two generations and press the Compare button. When the Compare Files dialog box displays, you can select an additional file or change the file(s) you originally selected.
When you click OK in the Compare Files dialog box, the ChangeMan Diff tool is launched. For more information, see the ChangeMan ZDD Tools Guide.
Copy
You can retrieve any generation in the list and copy it into a file.
When you select a generation and press the Copy button, the Save As dialog box displays where you can specify a file name.
Recover
You can recover a previous generation and make it the current generation. To recover a previous generation, select that generation and press the Recover button. The Recover button is disabled if the current generation is selected.
Delete
You can delete selected generations for a member. To delete specific generations, select one or more generations to be deleted and press the Delete button.
Deleting a previous generation may leave a gap in the absolute generation numbers.
If you delete the current generation, then the previous generations are promoted so that the newest generation becomes the new current generation.
If you delete all generations, then the member will be permanently deleted.
Refresh
The Refresh button will refresh the list of member generations.
Deleted Members Tool
The Deleted Members tool displays a list of deleted PDSE v2 members. You can use this tool to perform the following operations:
-
Recover (undelete) a previously deleted member
-
Permanently delete a member (all generations)
To display this dialog box, right click on a PDSE library and select ZDD Network | Deleted Members from the popup menu. This command is only available for PDSE version 2 libraries, which have MAXGENS > 0.
See Deleting Members with Generations for more information on deleted members.
The Deleted Members dialog box is shown below.

You can perform various operations with the deleted members by selecting them in the list and then pressing one of the command buttons.
Recover
You can recover (undelete) members by selecting one or more members and pressing the Recover button. This will restore the newest generation to become the current (active) generation.
After you recover a member, it will no longer appear in the deleted members list since the member is no longer deleted.
Delete
You can permanently delete members by selecting one or more members and pressing the Delete button. This will permanently delete all generations of the selected members.
If you permanently delete a member, it is no longer possible to recover the member. After you permanently delete a member, it will no longer appear in the deleted members list since there are no generations left.